
Creating Custom Role in Microsoft Azure
This guide describes how to create and maintain custom Azure RBAC roles that grant Cloudaware additional permissions beyond the built-in Reader role.
Prerequisites
To create or update custom roles, you must have one of the following at the target scope (subscription or management group):
Owner
User Access Administrator
Overview
Create or update a Cloudaware custom role when Cloudaware must:
Read Storage Account keys (required for storage/VHD data collection)
Read Azure App Service configuration settings
Read/write tags on subscriptions and resources
Scope guidance:
Prefer creating roles at the subscription scope unless you centrally manage RBAC via a management group.
Ensure the role’s assignableScopes includes every scope where Cloudaware will be assigned.
Create a custom role in Azure Portal
Use these steps for each role below:
Sign in to the Azure portal.
Navigate to the scope where you want to define the role:
Subscription: Subscriptions → select subscription
Resource group: Resource groups → select resource group (only if you truly want resource group-only scope)
Select Access control (IAM) → the Roles tab.
Click + Add → Add custom role.
In Basics, set:
Name: for example, Cloudaware Custom Policy.
Description: Grants Cloudaware additional read permissions beyond the built-in Reader role.
Baseline permissions: select Start from JSON (recommended); alternatively, select Start from scratch or Clone a role.
In Permissions, confirm the required
actionsare present (or edit JSON directly).In Assignable scopes, verify the scope(s) are correct.
Open Review + create → Create.
Creating or updating a custom role is an asynchronous operation. It can take a few minutes before the role appears in search results.
Storage Account keys access
The built-in Reader role does not allow listing Storage Account keys. Cloudaware may require key access to collect specific storage/VHD-related metadata.
Required permissions
Microsoft.Storage/storageAccounts/listKeys/action
Optional (only if you install Breeze Agent via VM extension)
Microsoft.Compute/virtualMachines/extensions/write
Start from JSON (recommended)
Create a JSON file using the template below:
{
  "IsCustom": true,
  "Name": "CloudAware Collector Extended",
  "Description": "Grants Cloudaware access to storage account keys and VM extensions for collecting data about Blob Containers and VHDs",
  "Actions": [
    "Microsoft.Storage/storageAccounts/listKeys/action",
    "Microsoft.Compute/virtualMachines/extensions/write"
  ],
  "notActions": [],
  "assignableScopes": [
    "/subscriptions/<SUBSCRIPTION_ID>"
  ]
}
Replace <SUBSCRIPTION_ID> with your Azure subscription ID. Remove Microsoft.Compute/virtualMachines/extensions/write if you do not deploy VM extensions.
Start from scratch
On the Permissions tab, select Add permissions. Search for Microsoft.Storage/storageAccounts/listKeys/action. Select Microsoft Storage.

Check the box for Other: List Storage Account Keys.
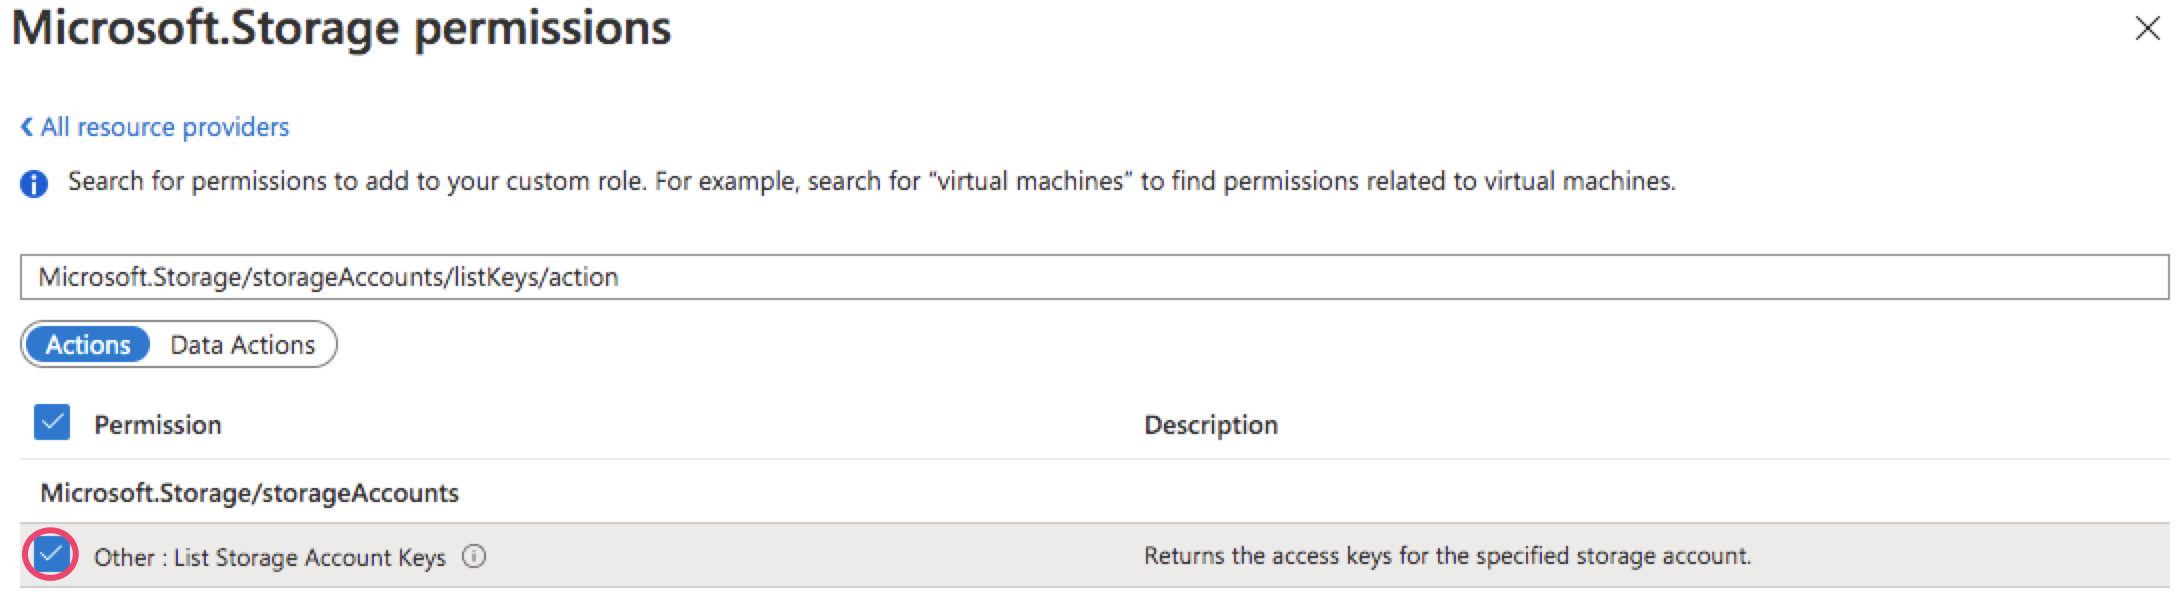
Click Add.
Clone a role
Clone a built-in* role (e.g., Reader or Storage Account Contributor) and then edit the JSON to include the required permissions.
Common Azure built-in roles
Built-in Role | ID |
|---|---|
Reader |
|
Contributor |
|
Virtual Machine Contributor |
|
Virtual Network Contributor |
|
Storage Account Contributor |
|
Web Plan Contributor |
|
SQL server Contributor |
|
SQL DB Contributor |
|
To modify permissions, open the JSON tab and update the JSON. The JSON body should look as follows:
{
    "properties": {
        "roleName": "<CUSTOM_ROLE_NAME>",
        "description": "",
        "assignableScopes": [
            "/subscriptions/<SUBSCRIPTION_ID_1>",
            "/subscriptions/<SUBSCRIPTION_ID_2>",
            "/subscriptions/<SUBSCRIPTION_ID_3>"
        ],
        "permissions": [
            {
                "actions": [
                    "Microsoft.Compute/virtualMachines/extensions/write",
                    "Microsoft.Storage/storageAccounts/listKeys/action"
                ],
                "notActions": [],
                "dataActions": [],
                "notDataActions": []
            }
        ]
    }
}
Replace <CUSTOM_ROLE_NAME> with your custom role name, and <SUBSCRIPTION_ID_1>, <SUBSCRIPTION_ID_2>,<SUBSCRIPTION_ID_3> in the section "AssignableScopes" with appropriate subscription IDs. You can add multiple scopes if needed.
Azure App Service Config Settings access
This custom role allows Cloudaware to read App Service Config Settings.
Required permissions
Microsoft.Web/sites/config/list/actionMicrosoft.Web/sites/read
Start from JSON (template)
Use the following JSON template:
{
    "properties": {
        "roleName": "<CUSTOM_ROLE_NAME>",
        "description": "<CUSTOM_ROLE_DESCRIPTION>",
        "assignableScopes": [
            "/subscriptions/<SUBSCRIPTION_ID>"
        ],
        "permissions": [
            {
                "actions": [
                    "Microsoft.Web/sites/config/list/Action",
                    "Microsoft.Web/sites/Read"
                ],
                "notActions": [],
                "dataActions": [],
                "notDataActions": []
            }
        ]
    }
}
Replace <CUSTOM_ROLE_NAME>, <CUSTOM_ROLE_DESCRIPTION>, and <SUBSCRIPTION_ID> with appropriate values.
Tagging permissions
This custom role allows Cloudaware to manage subscription tag names/values and apply/remove tags on resources.
Required permissions (RBAC actions)
Microsoft.Resources/subscriptions/tagNames/readMicrosoft.Resources/subscriptions/tagNames/writeMicrosoft.Resources/subscriptions/tagNames/deleteMicrosoft.Resources/subscriptions/tagNames/tagValues/readMicrosoft.Resources/subscriptions/tagNames/tagValues/writeMicrosoft.Resources/subscriptions/tagNames/tagValues/deleteMicrosoft.Resources/subscriptions/resourceGroups/readMicrosoft.Resources/tags/readMicrosoft.Resources/tags/writeMicrosoft.Resources/tags/delete
Start from JSON (template)
Use the following JSON template:
"properties": {
        "roleName": "<CUSTOM_ROLE_NAME>",
        "description": "<CUSTOM_ROLE_DESCRIPTION>",
        "assignableScopes": [
            "/subscriptions/<SUBSCRIPTION_ID>",
        ],
        "permissions": [
            {
                "actions": [
                    "Microsoft.Resources/subscriptions/tagNames/read",
                    "Microsoft.Resources/subscriptions/tagNames/write",
                    "Microsoft.Resources/subscriptions/tagNames/delete",
                    "Microsoft.Resources/subscriptions/tagNames/tagValues/read",
                    "Microsoft.Resources/subscriptions/tagNames/tagValues/write",
                    "Microsoft.Resources/subscriptions/tagNames/tagValues/delete",
                    "Microsoft.Resources/subscriptions/resourceGroups/read",
                    "Microsoft.Resources/tags/write",
                    "Microsoft.Resources/tags/delete",
                    "Microsoft.Resources/tags/read"
                ],
                "notActions": [],
                "dataActions": [],
                "notDataActions": []
            }
        ]
    }
Replace <CUSTOM_ROLE_NAME>, <CUSTOM_ROLE_DESCRIPTION>, and <SUBSCRIPTION_ID> with appropriate values.
Assign the role to Cloudaware
After the role exists, assign it at the appropriate scope:
Navigate to Access control (IAM) at the target scope.
Select + Add → Add role assignment.
Choose the custom role you created.
Select the assignee type:
User (native/manual collection scenarios)
Service principal/Managed identity (web app/API integration scenarios)
Open the Review + create tab, check the details, and click Create.
Update an existing Cloudaware custom role
Cloudaware may introduce new capabilities that require additional RBAC actions. Recommended update workflow:
Open the role definition: Subscriptions → Access control (IAM) → Roles → find your custom role.
Select the role → Edit → JSON.
Add the new actions provided by Cloudaware.
Click Review + update.
Creating or updating a custom role is an asynchronous operation. It can take a few minutes before the role appears in search results.