PagerDuty Notification
The integration allows Cloudaware to create and update incidents in PagerDuty using outbound webhooks functionality, map PagerDuty incidents to specific Cloudaware CMDB assets, and enrich PagerDuty incidents with CMDB data.
![]() To see how Cloudaware seamlessly integrates with PagerDuty in action, request a demo.
To see how Cloudaware seamlessly integrates with PagerDuty in action, request a demo.
Introduction
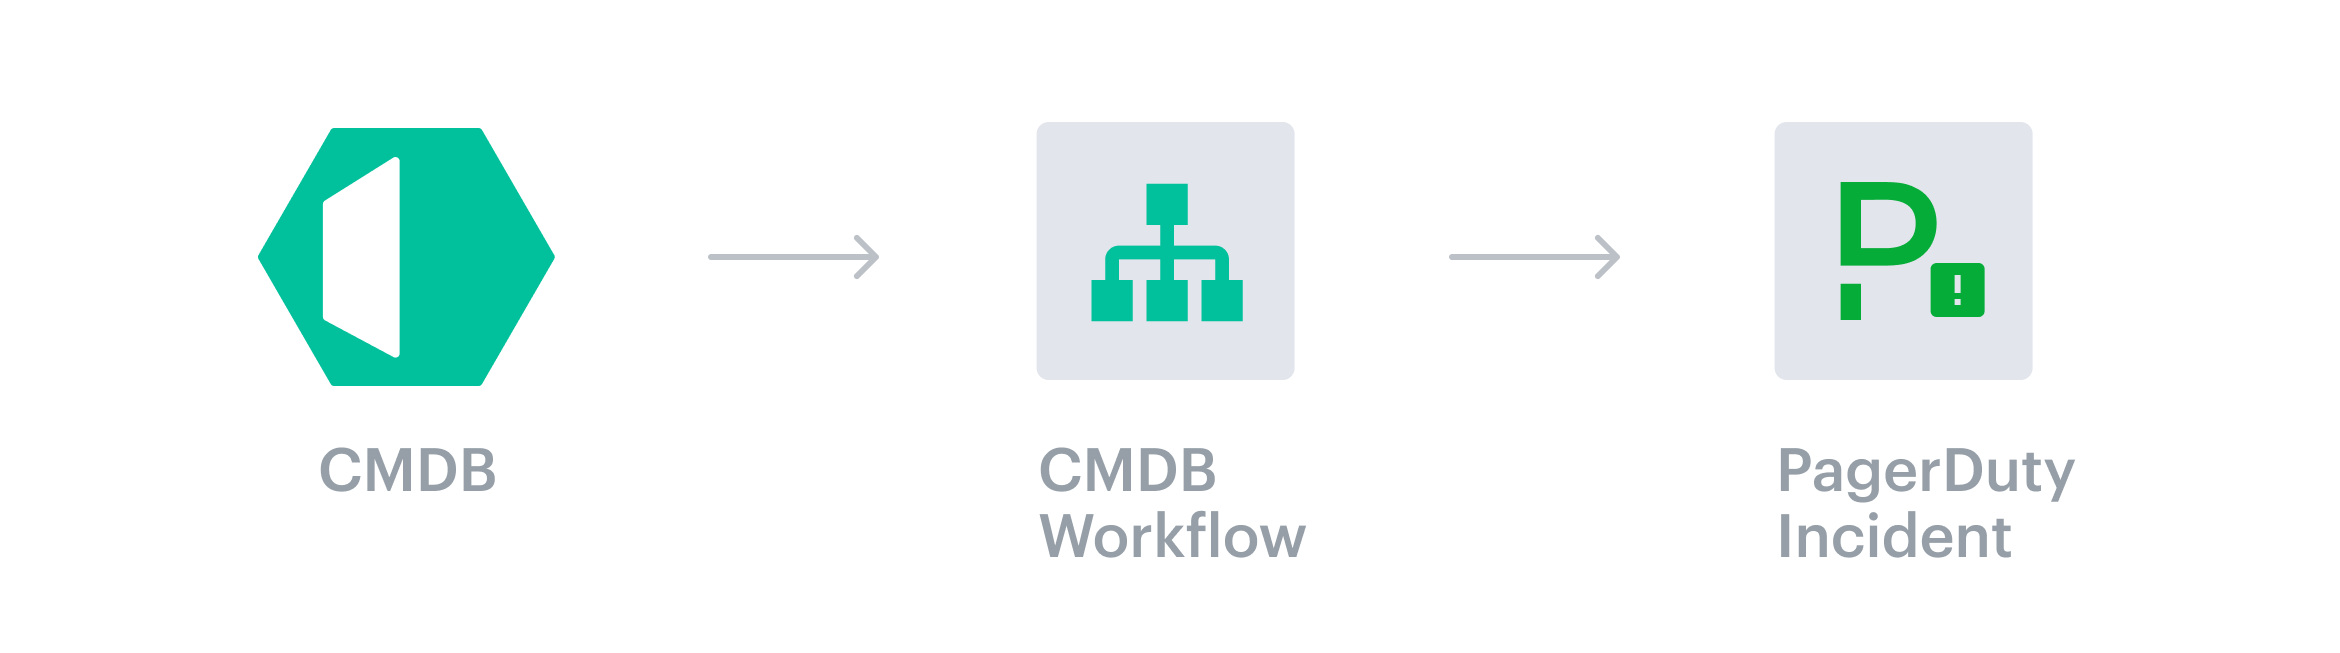
Cloudaware uses workflows to create a PagerDuty incident based on specific criteria and resolve the incident once the said criteria is back to normal (optional).
Sample use cases
Create a PagerDuty incident when an inappropriate configuration change is detected
Create a PagerDuty incident in a specific service when Cloudaware detects a spending or a CloudTrail anomaly
Update a PagerDuty incident when a critical vulnerability has been remediated
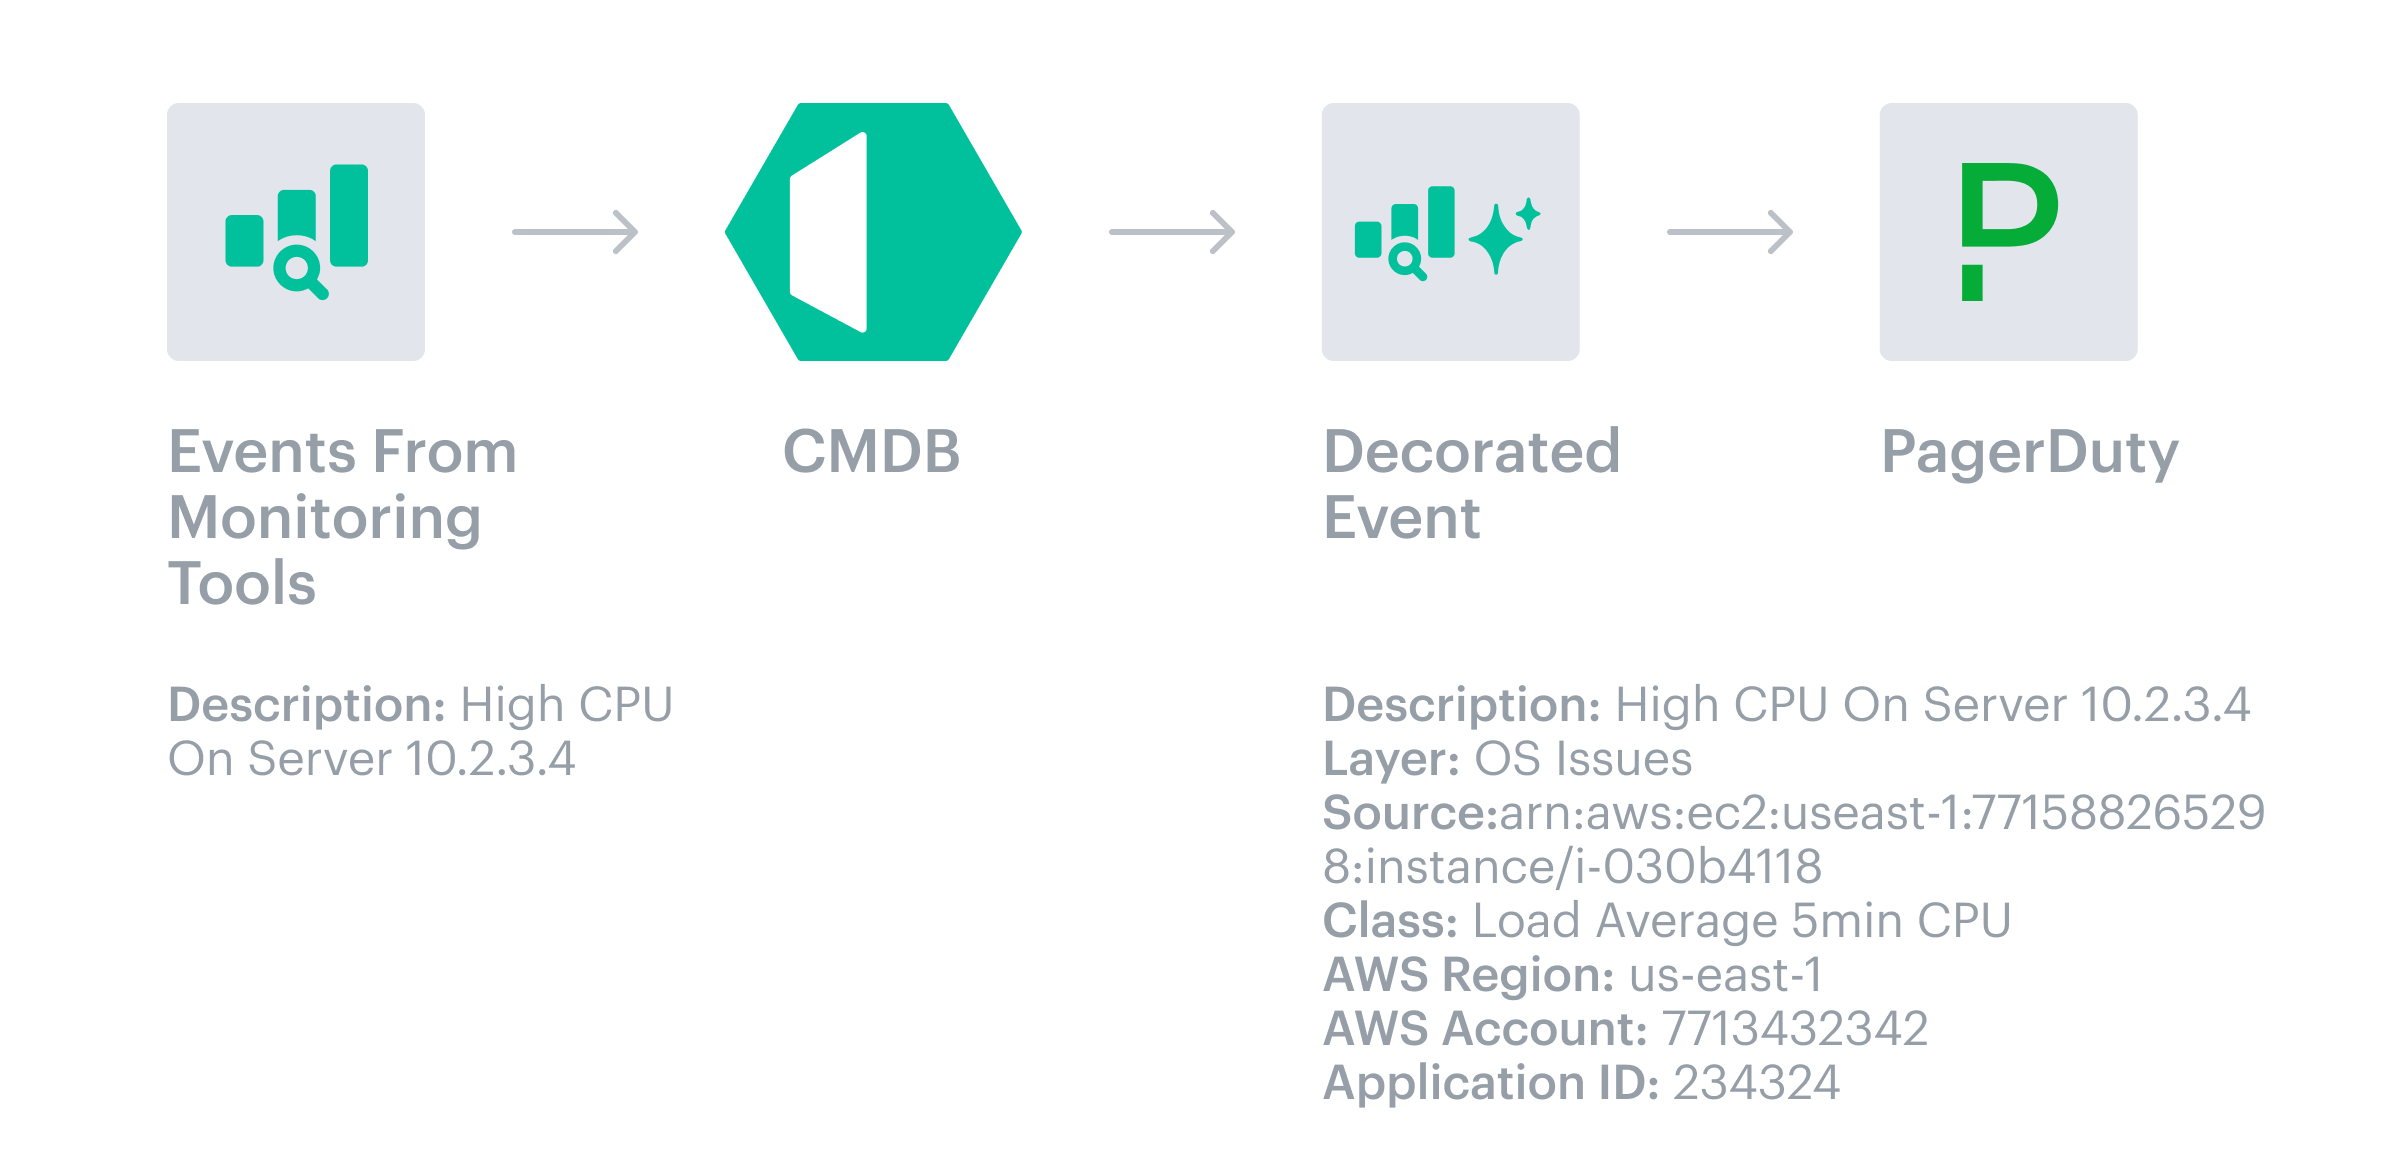
Event passthrough
Cloudaware can decorate events from third-party monitoring systems, such as Zabbix, New Relic, Splunk, etc., by sending them to Cloudaware first. Cloudaware enriches events with details like AWS Account ID or Azure Resource Group and tags so that PagerDuty can make more intelligent routing, suppression, and escalation decisions.
Set up the integration in Cloudaware
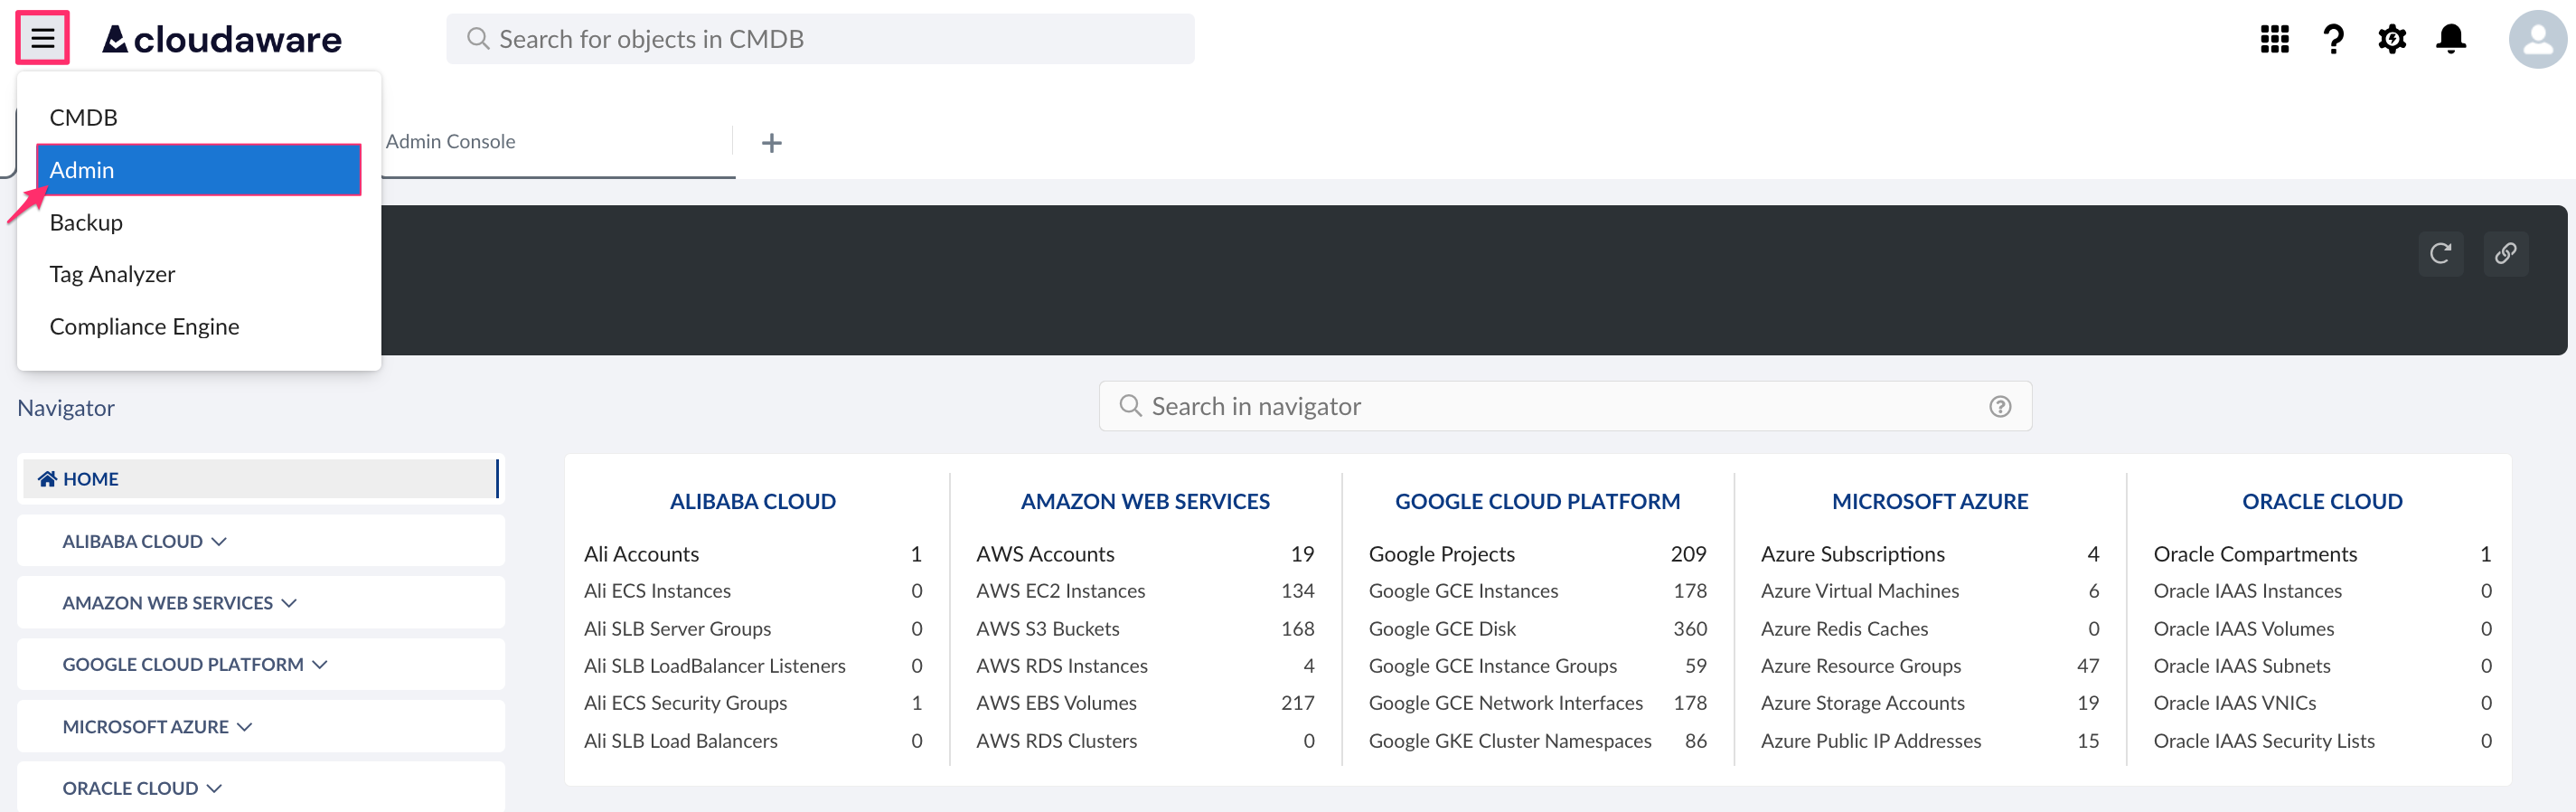
Log in to Cloudaware account → Admin.
Find PagerDuty Notification in Other Integrations. Click +Add.

Fill out the form:
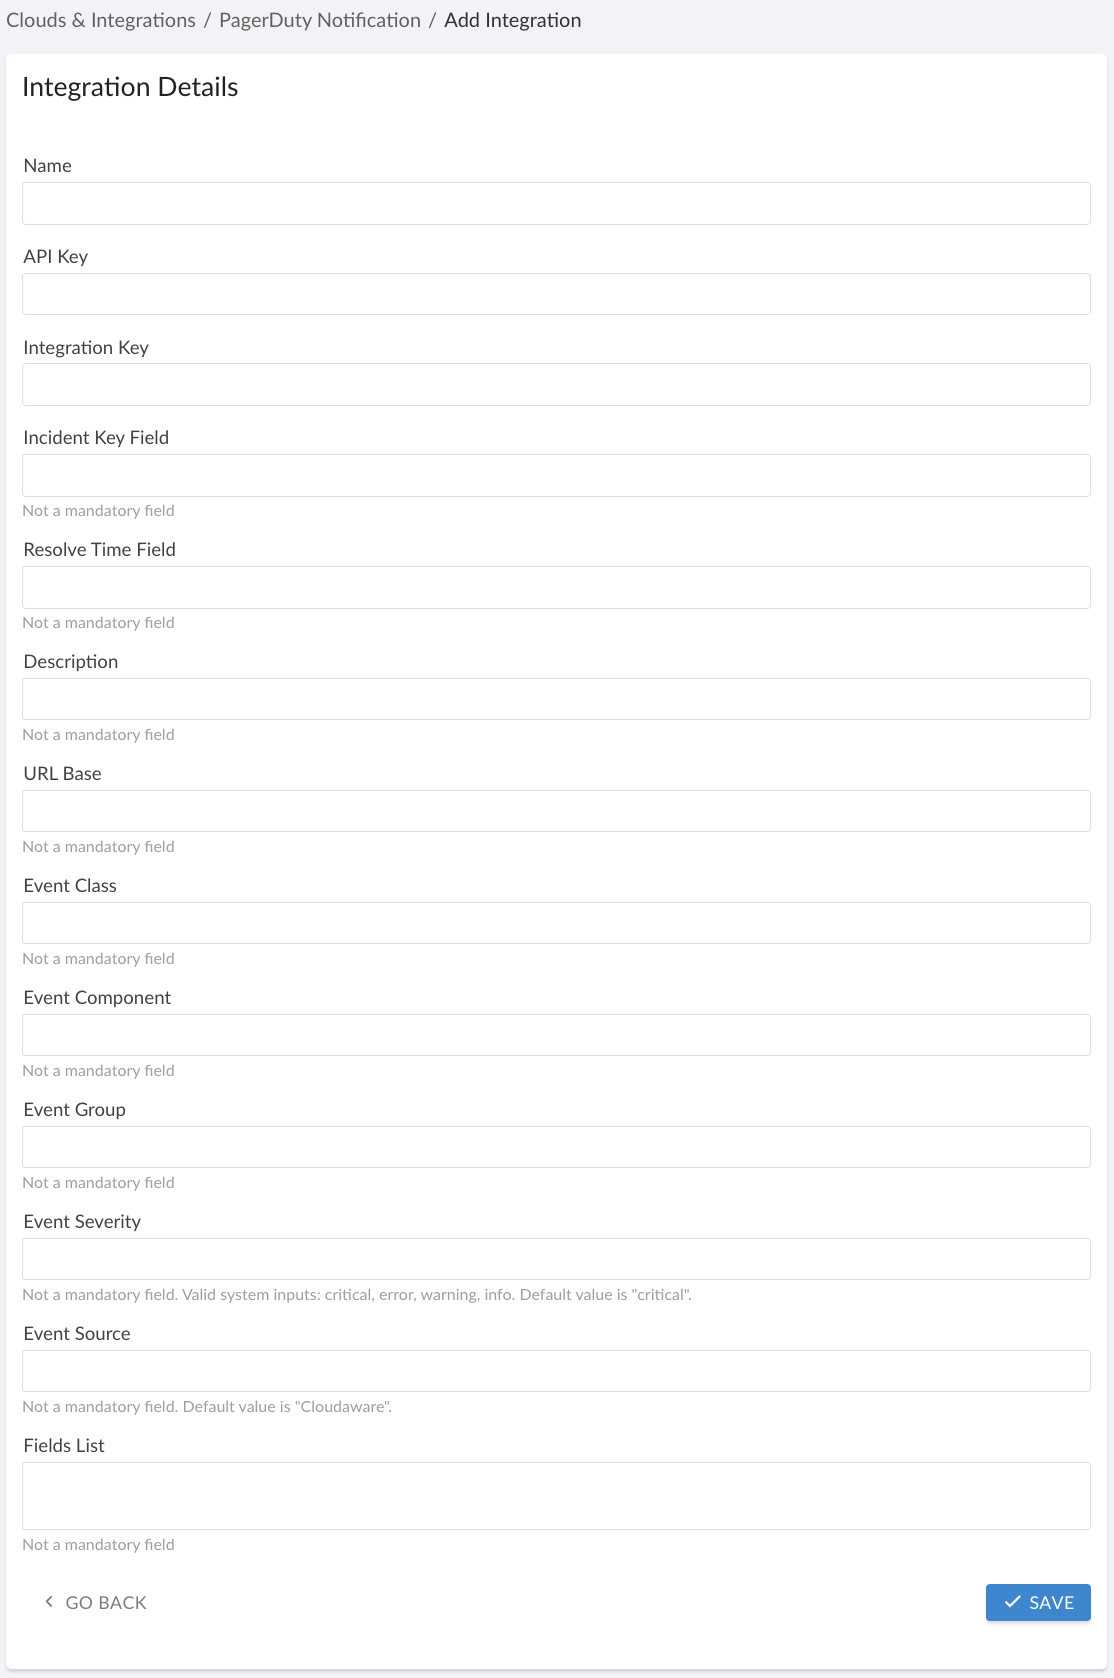
WHERE
Name - PagerDuty Notification integration name in Cloudaware
API Key - API Key generated in PagerDuty
If PagerDuty account is added to Cloudaware, copy the API Key used for this integration (check the guide PagerDuty Accounts).
Integration Key - Integration key of the monitored service (in PagerDuty, go to Service Directory → Service in question → the tab 'Integrations').
Incident Key Field* is used as a dedup_key. The values of this field must be unique for each PagerDuty incident created. PagerDuty uses this field to search for incidents when updating or editing them. If the Incident Key field is not specified, CA10__caUuid__c will be used by default to act as the incident identifier. However, the exact value for this field needs to be specified for every Cloudaware object that incidents are created for: go back to the main menu in your Cloudaware account → Setup → type Objects → select the object → locate the field 'CloudAware UUID' in the list and copy its API Name.
Resolve Time Field* will be used to trigger the button 'Resolve' on an incident in PagerDuty (e.g. CA10__closeDate__c: if this field is not blank, the incident will be resolved). If Resolve Time Field is not specified, incidents won't be resolved and closed automatically in PagerDuty.
Fields List* requires a list of fields that will be transmitted into a description of the incident in PagerDuty:
Use the line break symbol
CODE
| Prefix a field API Name with a
CODE
where |
*Type API names of fields in Incident Key Field, Resolve Time Field and Fields List exactly as they are on the object (e.g. CA10__caUuid__c, CA10__disappearanceTime__c, etc). To find API names, navigate in Cloudaware to Setup → 'Objects' → select the object → the section 'Custom Fields & Relationships' → locate the field's API name.
Check the integration details. Copy the Endpoint URL in the format https://inbound-dot-cloudaware-vm.appspot.com/inbound-message/pager-duty/{key} for further configuration.

Set up a workflow rule in Cloudaware
The workflow functionality triggers incidents in PagerDuty based on specific criteria in Cloudaware
Create a workflow rule with defined conditions and add an outbound message using the Endpoint URL from the PagerDuty Notification integration details. When the conditions are met, the workflow will trigger PagerDuty, creating a new incident for the monitored service.
Use case: Trigger a PagerDuty incident whenever an AWS EC2 instance status changes. To do this, create a workflow rule for the 'AWS EC2 Instance Status Event' object.
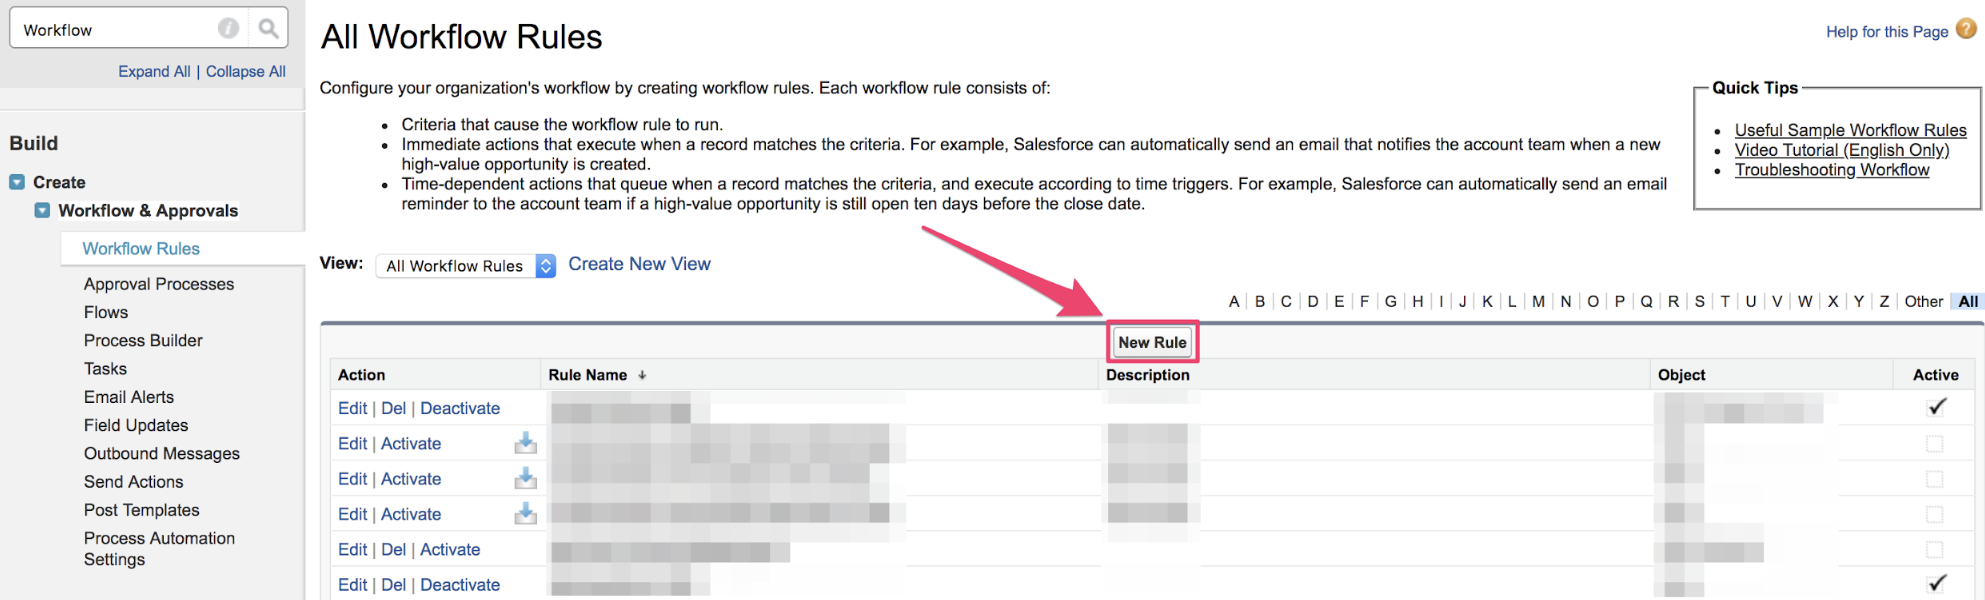
1. Log in to Cloudaware account → Setup.
2. In the Quick Find box start typing workflows to select Workflows & Approvals → Workflow Rules → New Rule:
3. Select the object for the rule to be applied to and click Next.
4. Add Rule Name (1), set Evaluation Criteria(2) and Rule Criteria(3). Add Filter Logic if necessary. Click Save & Next.
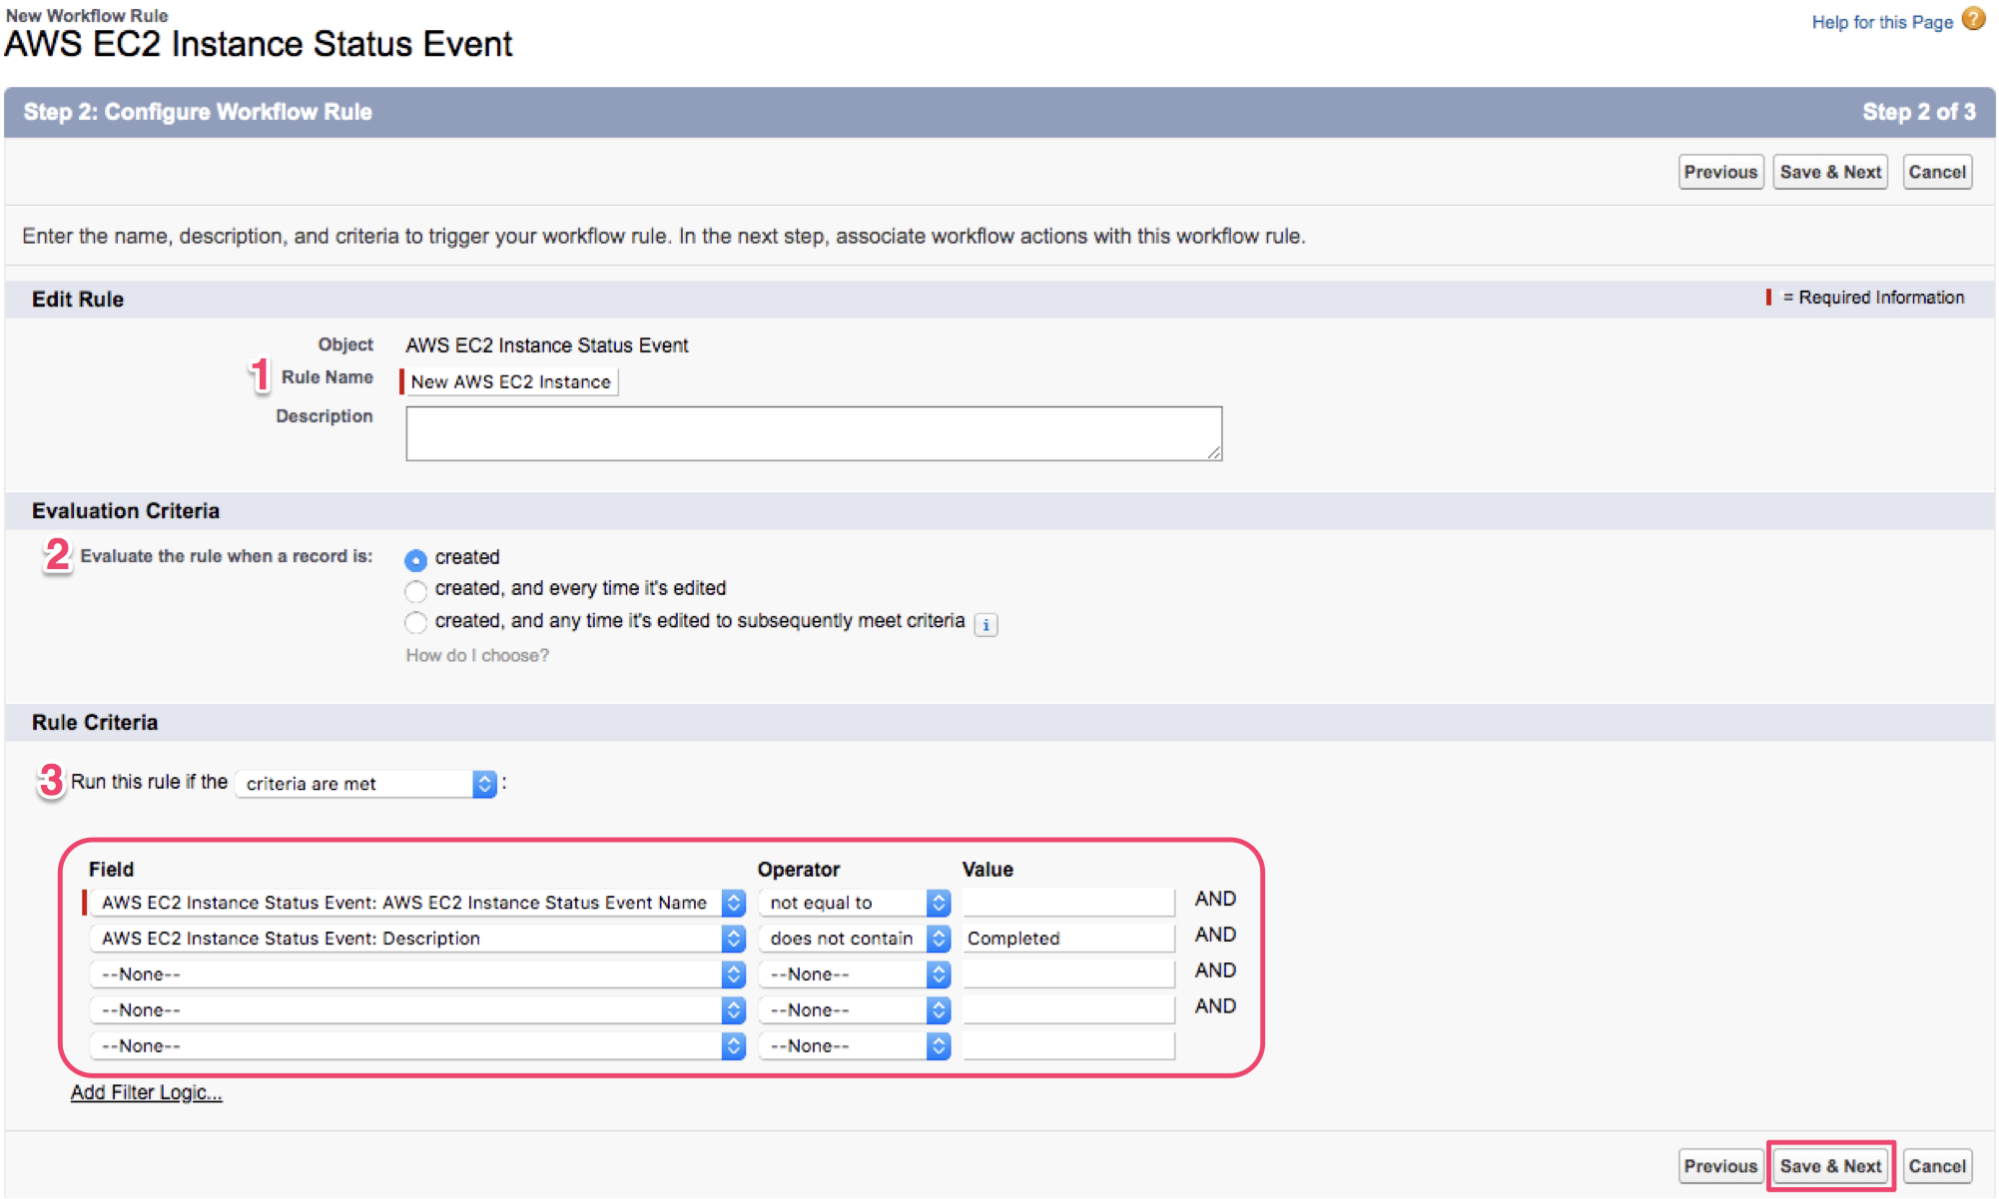
In this example we assume that the field 'AWS EC2 Instance Status Event Name' should not be blank so that the event is considered to be valid. The field 'Description' should not contain 'Completed'.
If these conditions are met, every time any AWS EC2 Instance status is changed, Cloudaware triggers the workflow rule to take into action creating a new incident in PagerDuty.
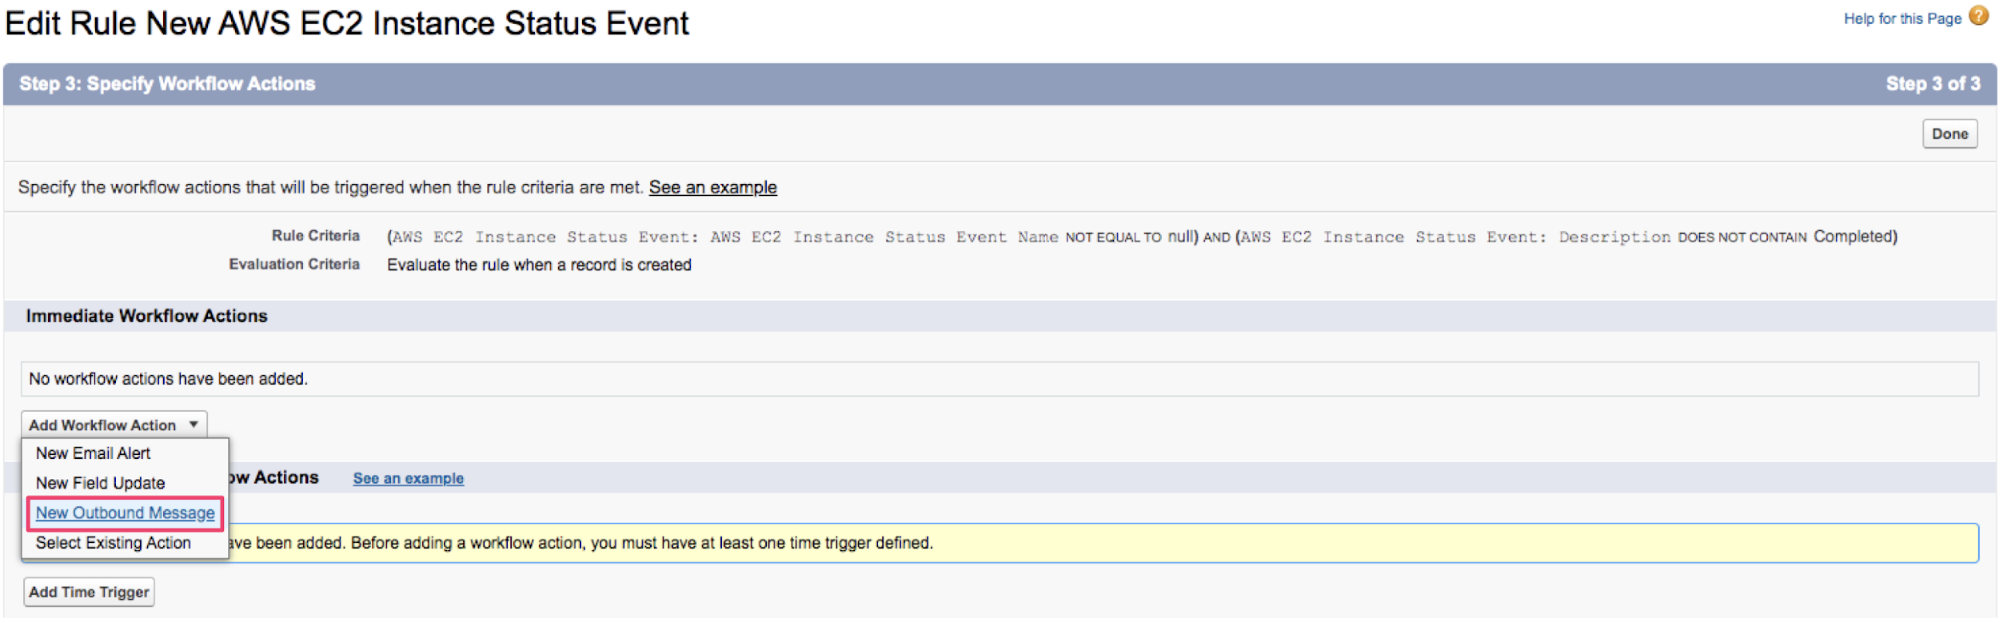
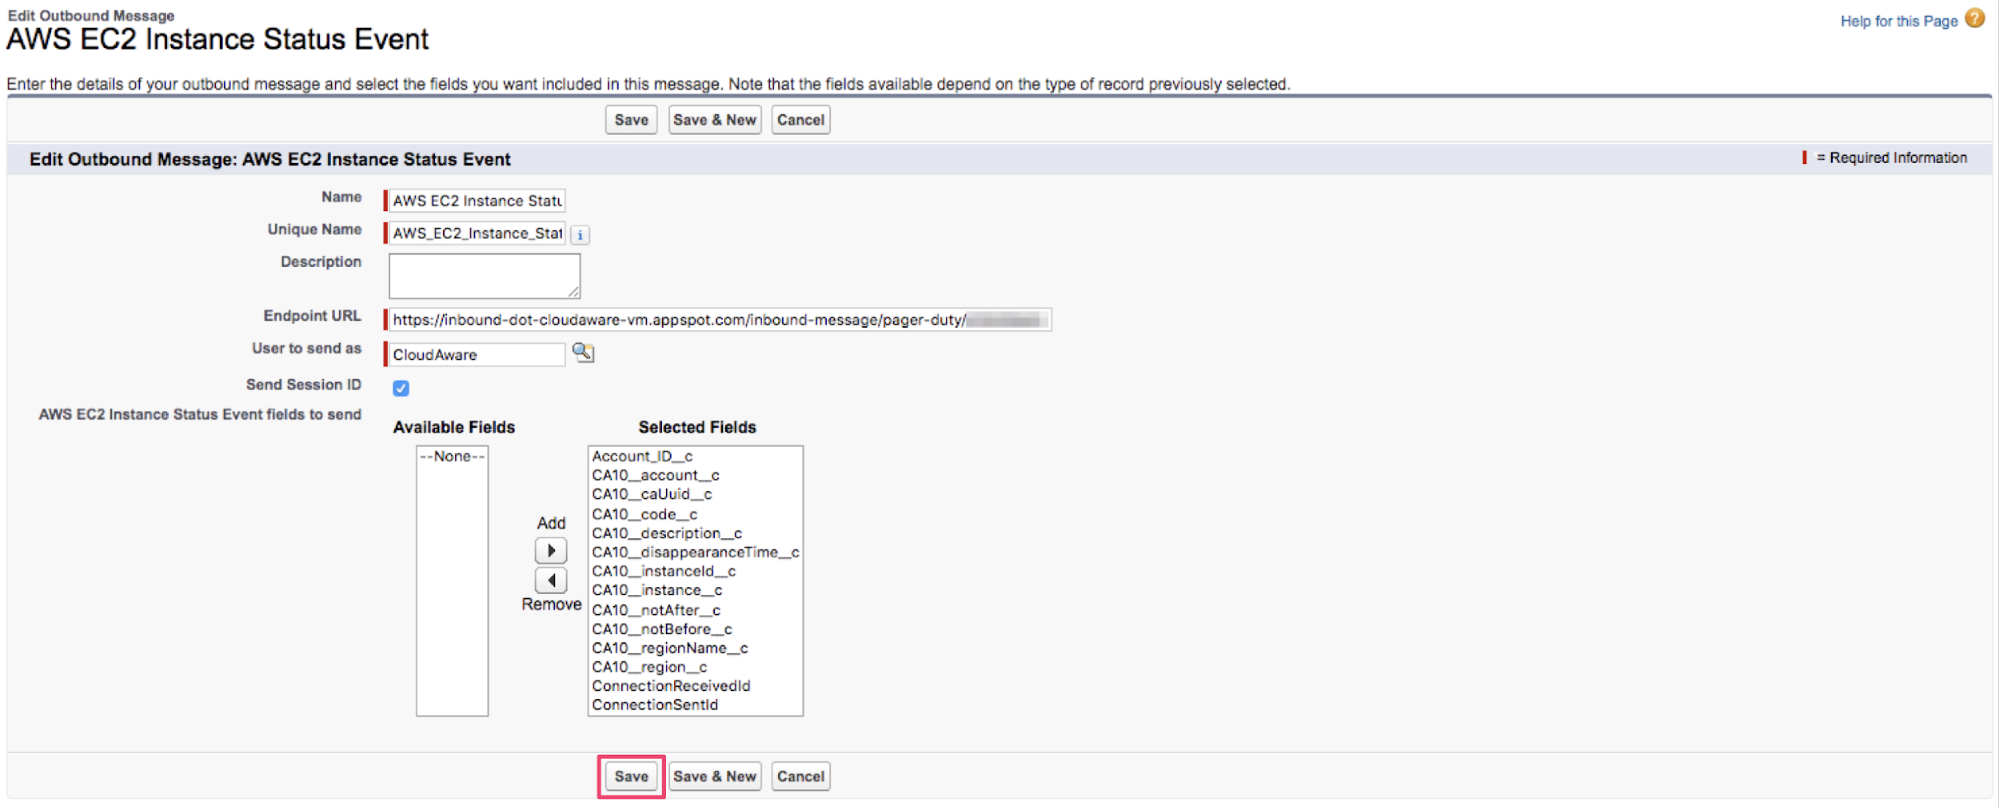
5. Add Workflow Action → New Outbound Message:
6. Fill out your Outbound Message details. Paste the URL copied earlier (https://inbound-dot-cloudaware-vm.appspot.com/inbound-message/pager-duty/{key}) in Endpoint URL.
7. Select Available Fields to be displayed in a PagerDuty incident. Click Save.
Ensure that API Name of CloudAware UUID field (e.g. CA10__caUuid__c) matches the API Name used as a value for Incident Key Field in the integration setup form.
8. Review the workflow and click Done.
9. Activate the workflow clicking Activate.
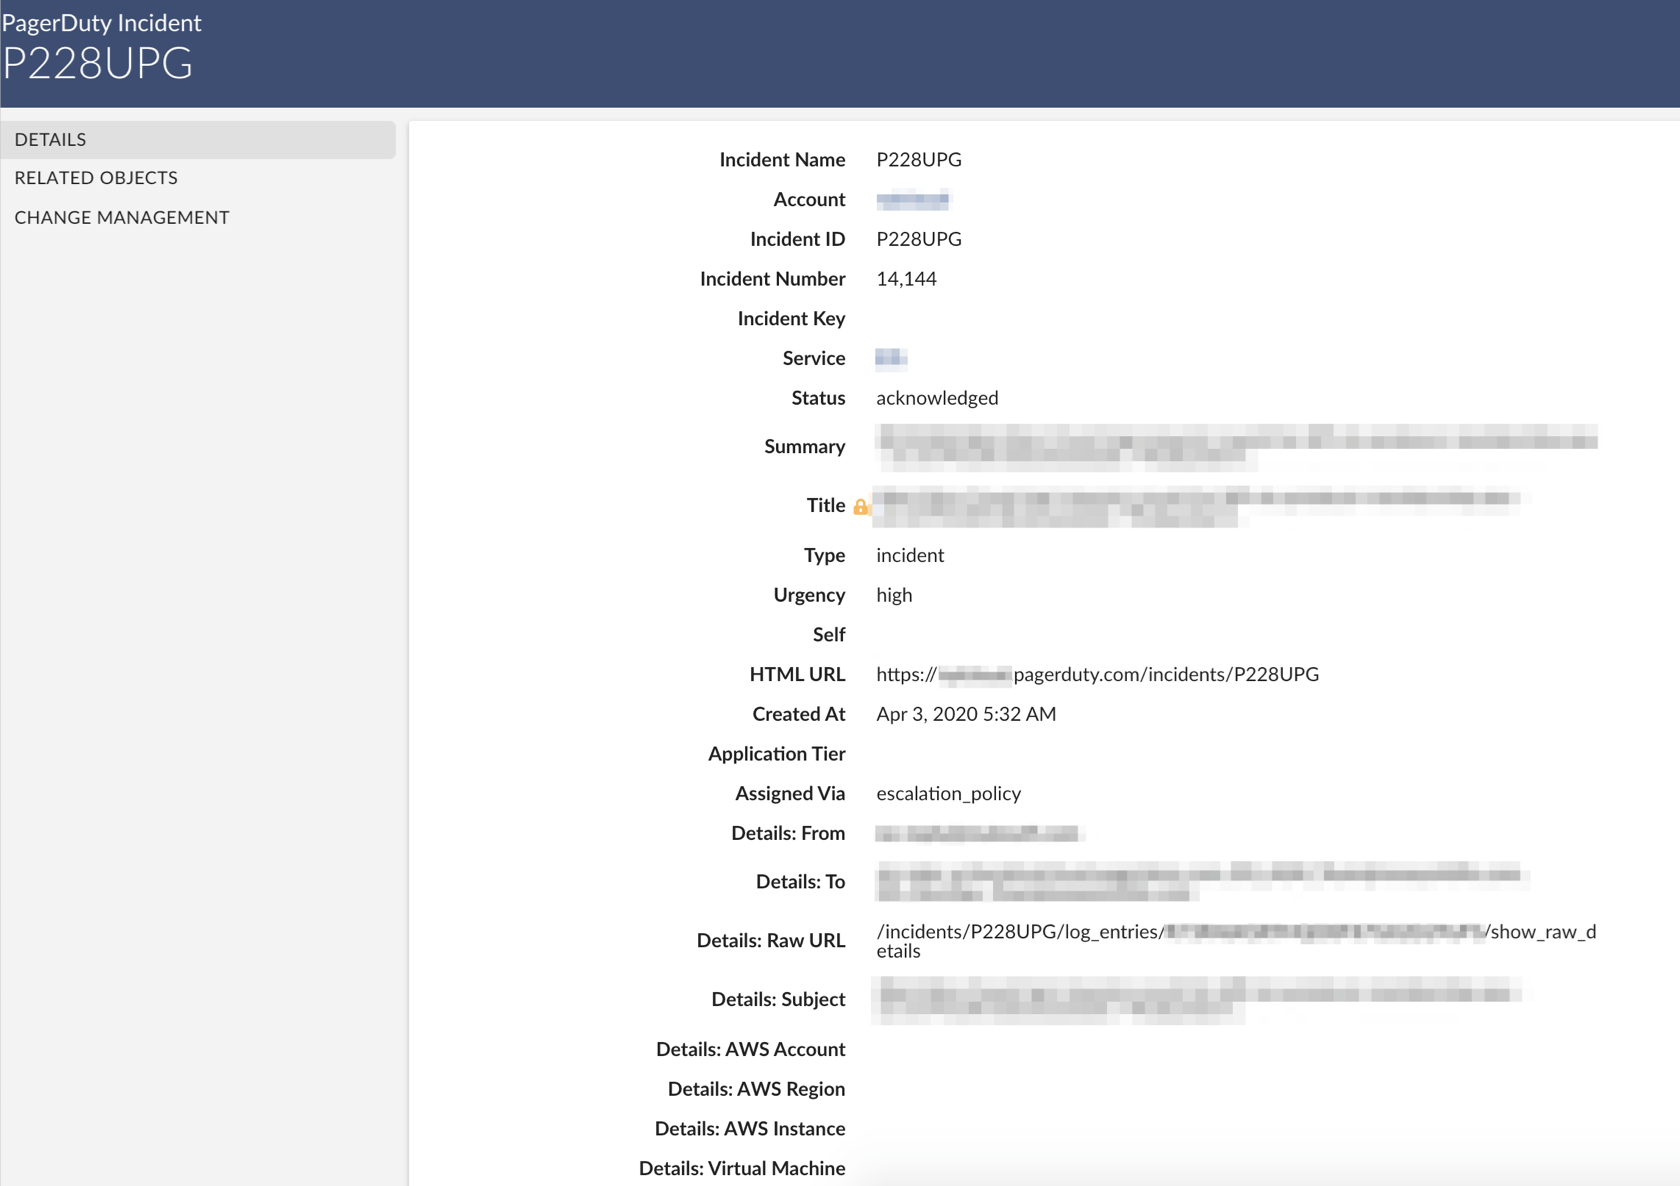
PagerDuty incident in Cloudaware CMDB
Cloudaware parses PagerDuty incidents, allowing customers to gain visibility of events. Here is a sample PagerDuty incident in Cloudaware: