
Salesforce CLI And API Setup
Cloudaware is built on force.com, meaning a customer gets a dedicated Salesforce instance when a Cloudaware account is registered. This guide explains how to set up and use the Salesforce CLI, a powerful command-line interface that simplifies development and build automation.
Install Salesforce CLI
Download and install the Salesforce CLI.
Open Terminal (macOS/Linux) or Command Prompt (Windows). Run the
sfdxorsxcommand (see versions).
Ensure that the Salesforce CLI is installed successfully. Read more
Create a Private Key and Self-Signed Digital Certificate
The JWT-based authorization flow requires a digital certificate and a private key to sign the certificate. The digital certificate is uploaded to the custom connected app used for JWT-based authorization.
This process creates two files:
server.key – Private key. Used when authorizing an org with the
force:auth:jwt:grantcommand.server.crt – Digital certificate. Uploaded when creating the connected app.
Steps:
Install OpenSSL if it is not already installed. To check, run
which openssl.In Terminal, create a directory to store the files and navigate to it:
mkdir /Users/jdoe/JWTcd /Users/jdoe/JWT
WHEREjdoeis a placeholder for the username of your user accountGenerate a private key and store it in the server.key file:
CODEopenssl genrsa -des3 -passout pass:xxxx -out server.pass.key 2048 openssl rsa -passin pass:xxxx -in server.pass.key -out server.keyWHERE
xxxx– a password with a minimum of 4 characters. Newer versions of OpenSSL may require more complex passwords.
You can delete the server.pass.key file if it is no longer needed.Generate a certificate signing request using
server.key. Store the certificate signing request in the server.csr file.CODEopenssl req -new -key server.key -out server.csrEnter the information about your company when prompted.
Generate a self-signed digital certificate:
CODEopenssl x509 -req -sha256 -days 365 -in server.csr -signkey server.key -out server.crt
Create a Connected App in Salesforce
Log in to Cloudaware → Setup.
Search for Apps in the Quick Find bar. Under External Client Apps, select Settings → New Connected App.
Set a name and a contact email for the connected app. The API name will be auto-populated.
Expand the ‘API (Enable OAuth Settings)' section and check the box 'Enable OAuth Settings’.
For Callback URL, use
http://localhost:1717/OauthRedirect.
Check the box Use digital signatures. Click Choose File and upload the server.crt file that contains your digital certificate.
Under ‘Selected OAuth Scopes’, choose the following:
Access and manage your data (api)
Perform requests at any time (refresh_token, offline_access)
Provide access to your data via the Web (web)
Click Save → Continue.Review Connected App details. Click Manage.
Click Edit Policies. Under 'OAuth Policies', select 'Admin approved users are pre-authorized' in Permitted Users. Click OK in the popup message. Click Save.
Search for Apps in the Quick Find bar → Connected Apps → Manage Connected Apps. Select the created app.
Under 'Profiles', click Manage Profiles and select the profiles that will have access to the app. Note that CloudAware Collector Only and CloudAware Administrator must be selected. Click Save.
Optional: to allow all users access the app using their credentials in CLI: select the created connected app → Edit policies → in the 'OAuth Policies' section, select 'All users may self-authorize'.
To authorize user access for an existing app, contact the app creator and request a certificate.
Read more about Connected Apps
Authorize a Salesforce Org for Use with Salesforce CLI
Run the following command in Terminal (remove the single quotes):
sfdx force:auth:jwt:grant -u 'username' -f 'path_to_key' -i 'consumer_key' -a 'alias'WHERE
-u – authentication username (go to Setup → under ADMINISTRATION on the left, select Users → Users → select the user → copy Username)
-f – path to the private key file created earlier
-i – consumer key of the connected app created earlier (go to Setup → under PLATFORM TOOLS on the left, select Apps → Connected Apps → Manage Connected Apps → select the app → copy the value from 'Consumer Key')
-a – alias for the authenticated org (simple string)

Your Salesforce org is now authorized for use with the Salesforce CLI.
Execute a SOQL Query
SOQL queries against Cloudaware objects and fields require using API names.
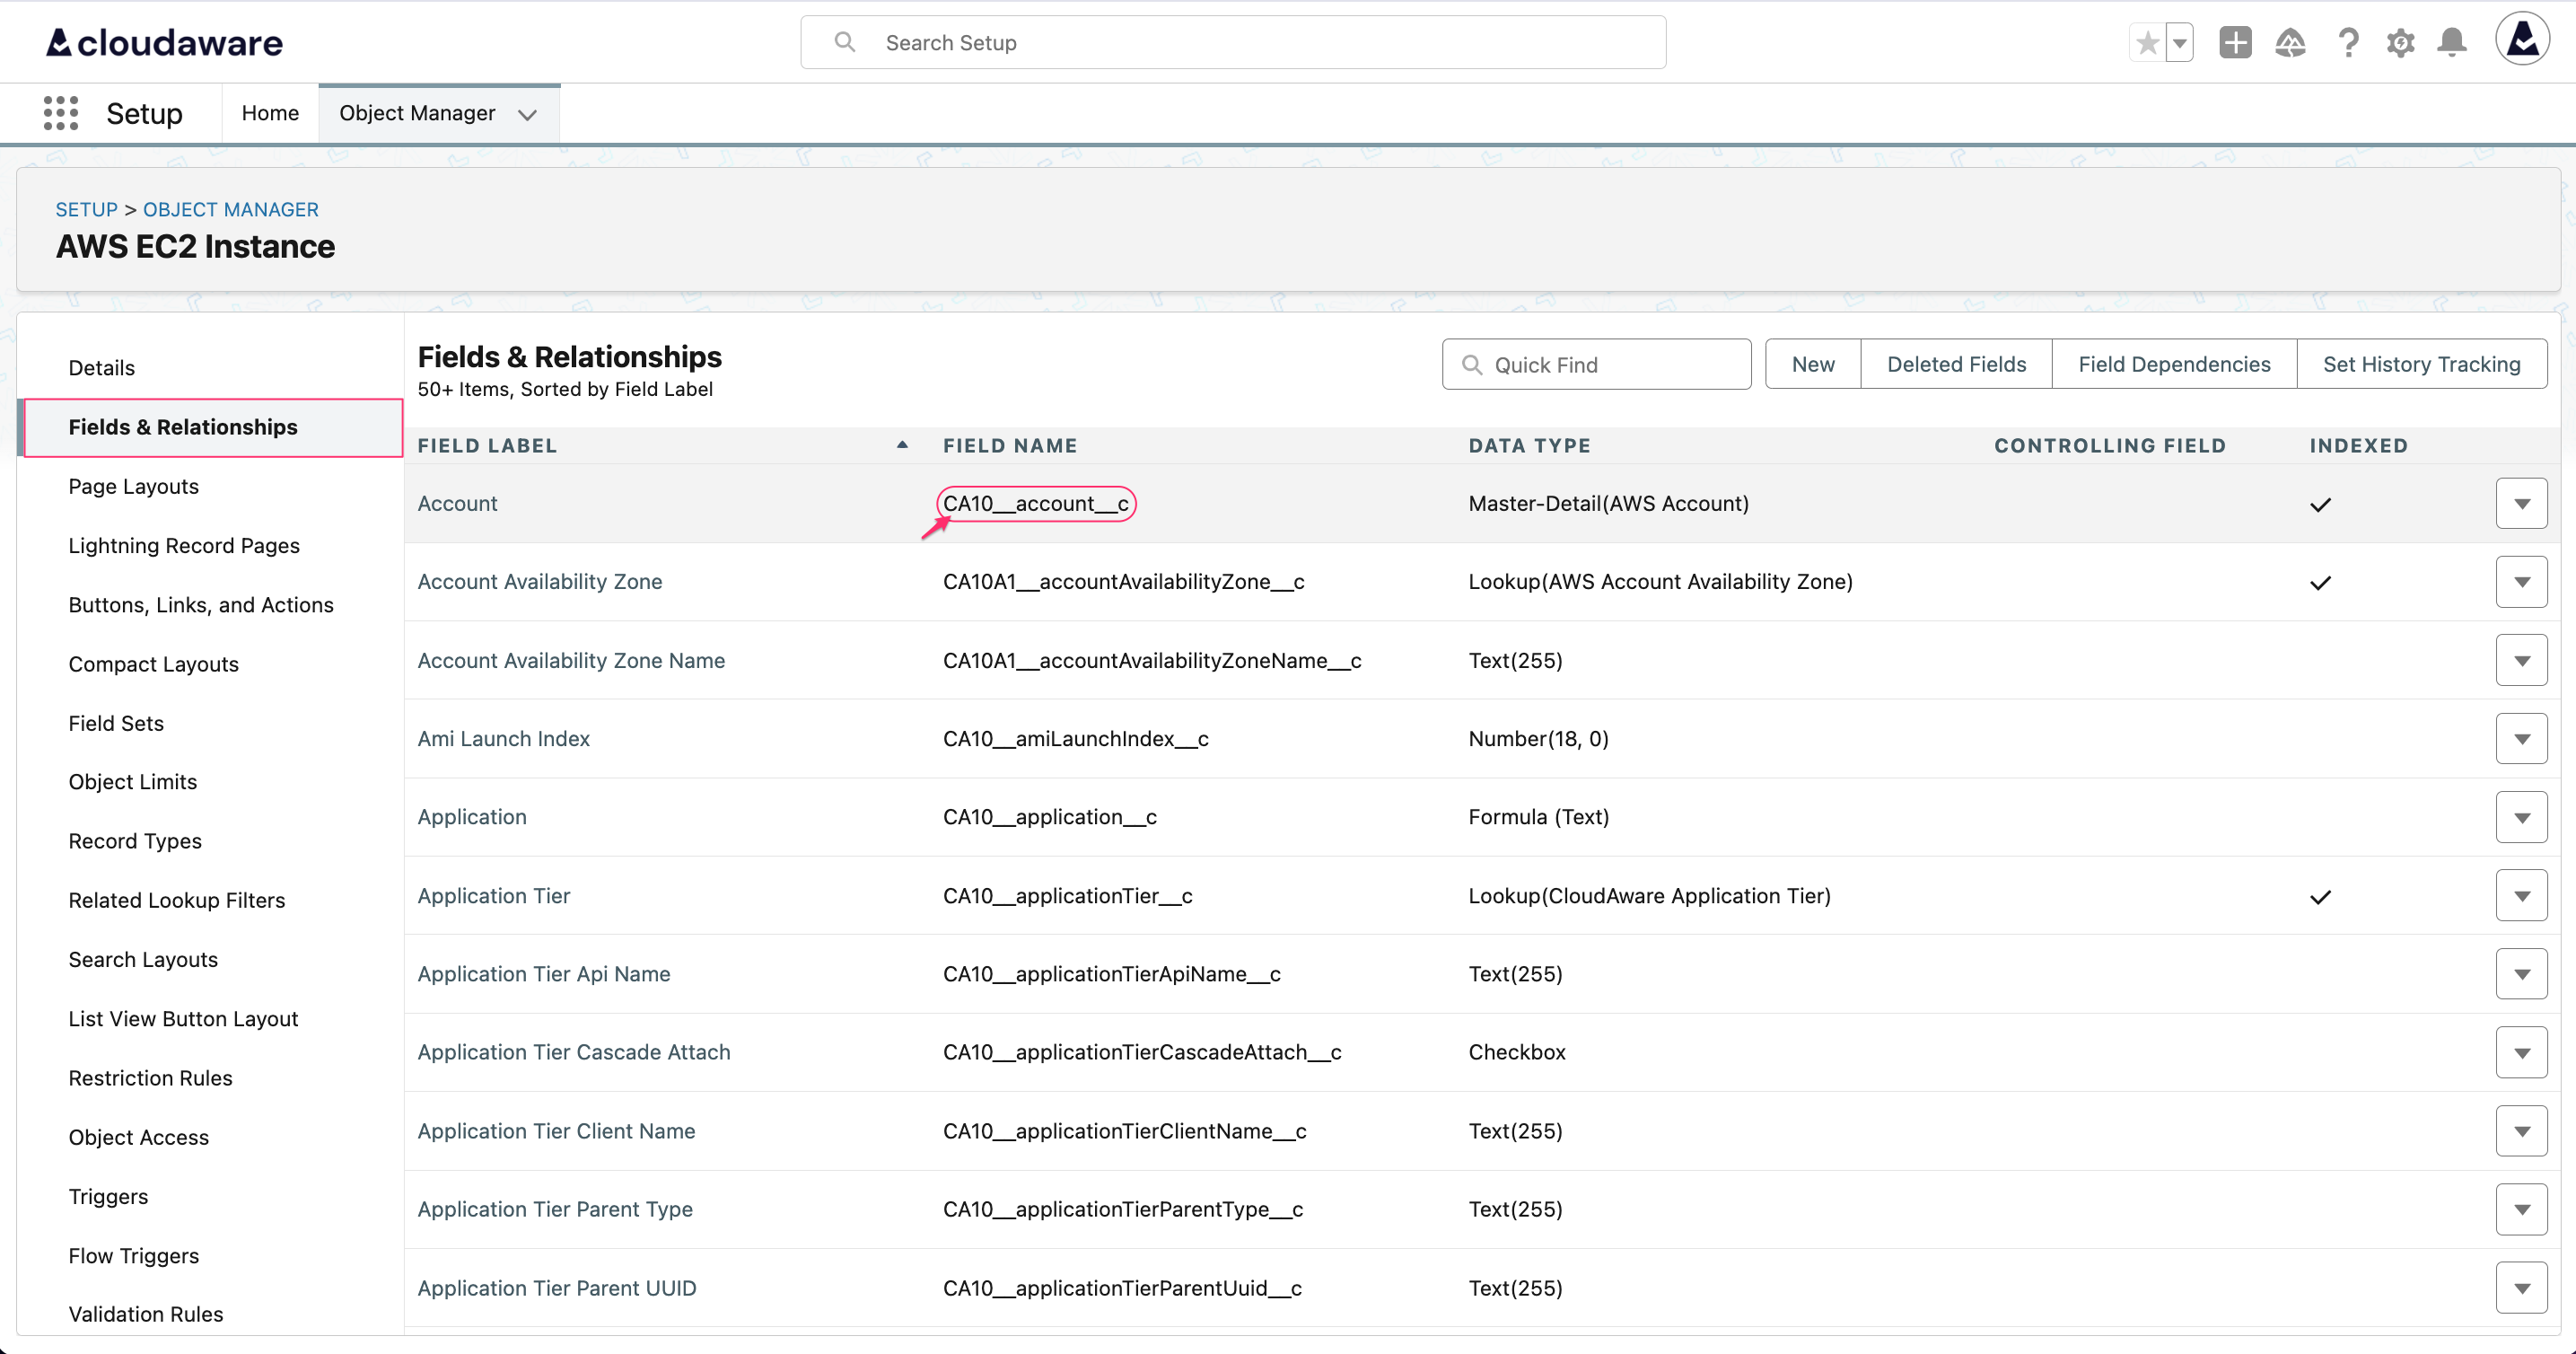
To find API names: go to Setup → Object Manager → select the object and check API Name in ‘Details’.

To find field API names, select the object → click the ‘Fields & Relationships’ tab. Find the field and check its API Name in the ‘FIELD NAME’ column:
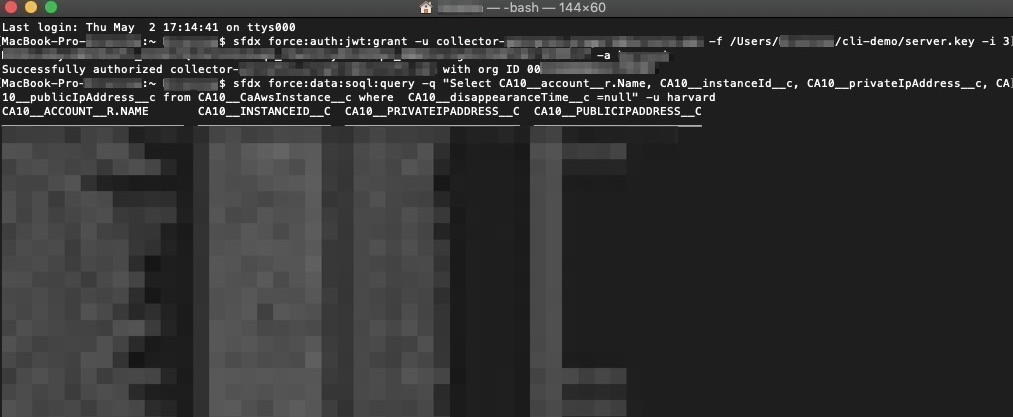
Here is an example query to return AWS EC2 instances that are not deleted from AWS, including AWS Accounts, Private IPs, and Public IPs:
sfdx force:data:soql:query -q "SELECT CA10__account__r.Name, CA10__instanceId__c, CA10__privateIpAddress__c, CA10__publicIpAddress__c FROM CA10__CaAwsInstance__c WHERE CA10__disappearanceTime__c = null" -u 'aliasWHERE the value of -u parameter should be replaced by -a value which was set before in the step ‘Authorize a Salesforce Org for Use with Salesforce CLI’ (remove the single quotes)
More information on Salesforce CLI is available here.
Set up API
Get your access token:
CODEsfdx force:org:display -u orgAliasThis is your Authorization Bearer token. Make curl and rest API calls using this token.
Note your Instance URL. You can see examples here.

Here is a Cloudaware-specific example to retrieve the list of IP addresses:
CODEcurl https://cloudaware-0000.cloudforce.com/services/data/v20.0/query/?q=SELECT+CA10__privateIpAddress__c%2C+CA10__associationPublicIp__c+from+CA10__CaAwsNetworkInterface__c -H 'Authorization: Bearer 00D1U00000130CD/!AQwAQN7gCP78KDezrjUpFMsEIOTsTEItsL53UkLa5ZvrU6bENuT2Jj5oSWzKGD4IopBsrX0p1pv0wRczXK.'WHERE
cloudaware-0000is a placeholder for your Salesforce Org ID
Tips:
Avoid!in the access token with/.
Use single quotes around the-Hvalue.
Use a URL-encoded request URL.
For more information, see Salesforce documentation on Working with Records and Working with Searches and Queries.
Load Custom Data to CMDB Using CLI
Assume we have a two-column dataset containing the EC2 instance IDs and a custom attribute ‘Demo Version’:
instanceID | Demo Version |
|---|---|
i-XXXXXXXXXXXXXXXXA | 3.4 |
i-XXXXXXXXXXXXXXXXB | 3.7 |
… | … |
i-XXXXXXXXXXXXXXXXZ | 3.2 |
Extract instanceID and Salesforce ID using CLI.
To create a Salesforce-side dataset, run the following CLI command:CODEsfdx force:data:soql:query -q "SELECT Id, CA10__instanceID__c CA10__CaAwsInstance__c WHERE CA10__disappearanceTime__c = null" -u 'username'WHERE
usernameis your Salesforce username (remove the single quotes)
If you are not sure how to create a custom field on an existing object (for example, AWS EC2 Instance or CloudAware Physical Server), see Create a Custom Field.View CMDB current data.
Here is an example:
Salesforce ID | instanceID |
|---|---|
a0X4P00000KUkVSUA1 | 3.4 |
a0X4P00000KUkUTUA1 | 3.7 |
… | … |
a0X4P00000LJsniUAD | 3.2 |
Use sorting and merging commands to create the final dataset.
In the merged dataset, records are matched byinstanceID. TheinstanceIDitself does not need to be re-imported.
Salesforce ID | Demo Version |
|---|---|
a0X4P00000KUkVSUA1 | 3.4 |
a0X4P00000KUkUTUA1 | 3.7 |
… | … |
a0X4P00000LJsniUAD | 3.2 |
Run the following command to upload the merged dataset:
sfdx force:data:bulk:upsert -s EC2_Instances -f ./path/to/file.csv -i Salesforce ID