
Jira Accounts & Actions
This guide explains how to add a Jira account for auto-discovery of Jira issues and to configure actions for Cloudaware to create issues in Jira based on specified criteria.
![]() To see how Cloudaware seamlessly integrates with Jira in action, request a demo.
To see how Cloudaware seamlessly integrates with Jira in action, request a demo.
Introduction
Cloudaware offers several key capabilities for integrating with Atlassian Jira:
Auto-discovery and import of Jira issues, and associating them with CMDB CIs
Creating tickets in Jira when specific conditions are met in Cloudaware (new incident, policy violation, vulnerability scan, etc. is found) and adding comments to these tickets if the conditions change
Configure auto-discovery of Jira issues in Cloudaware CMDB
Add Jira account to Cloudaware
Log in to Cloudaware account → Admin.
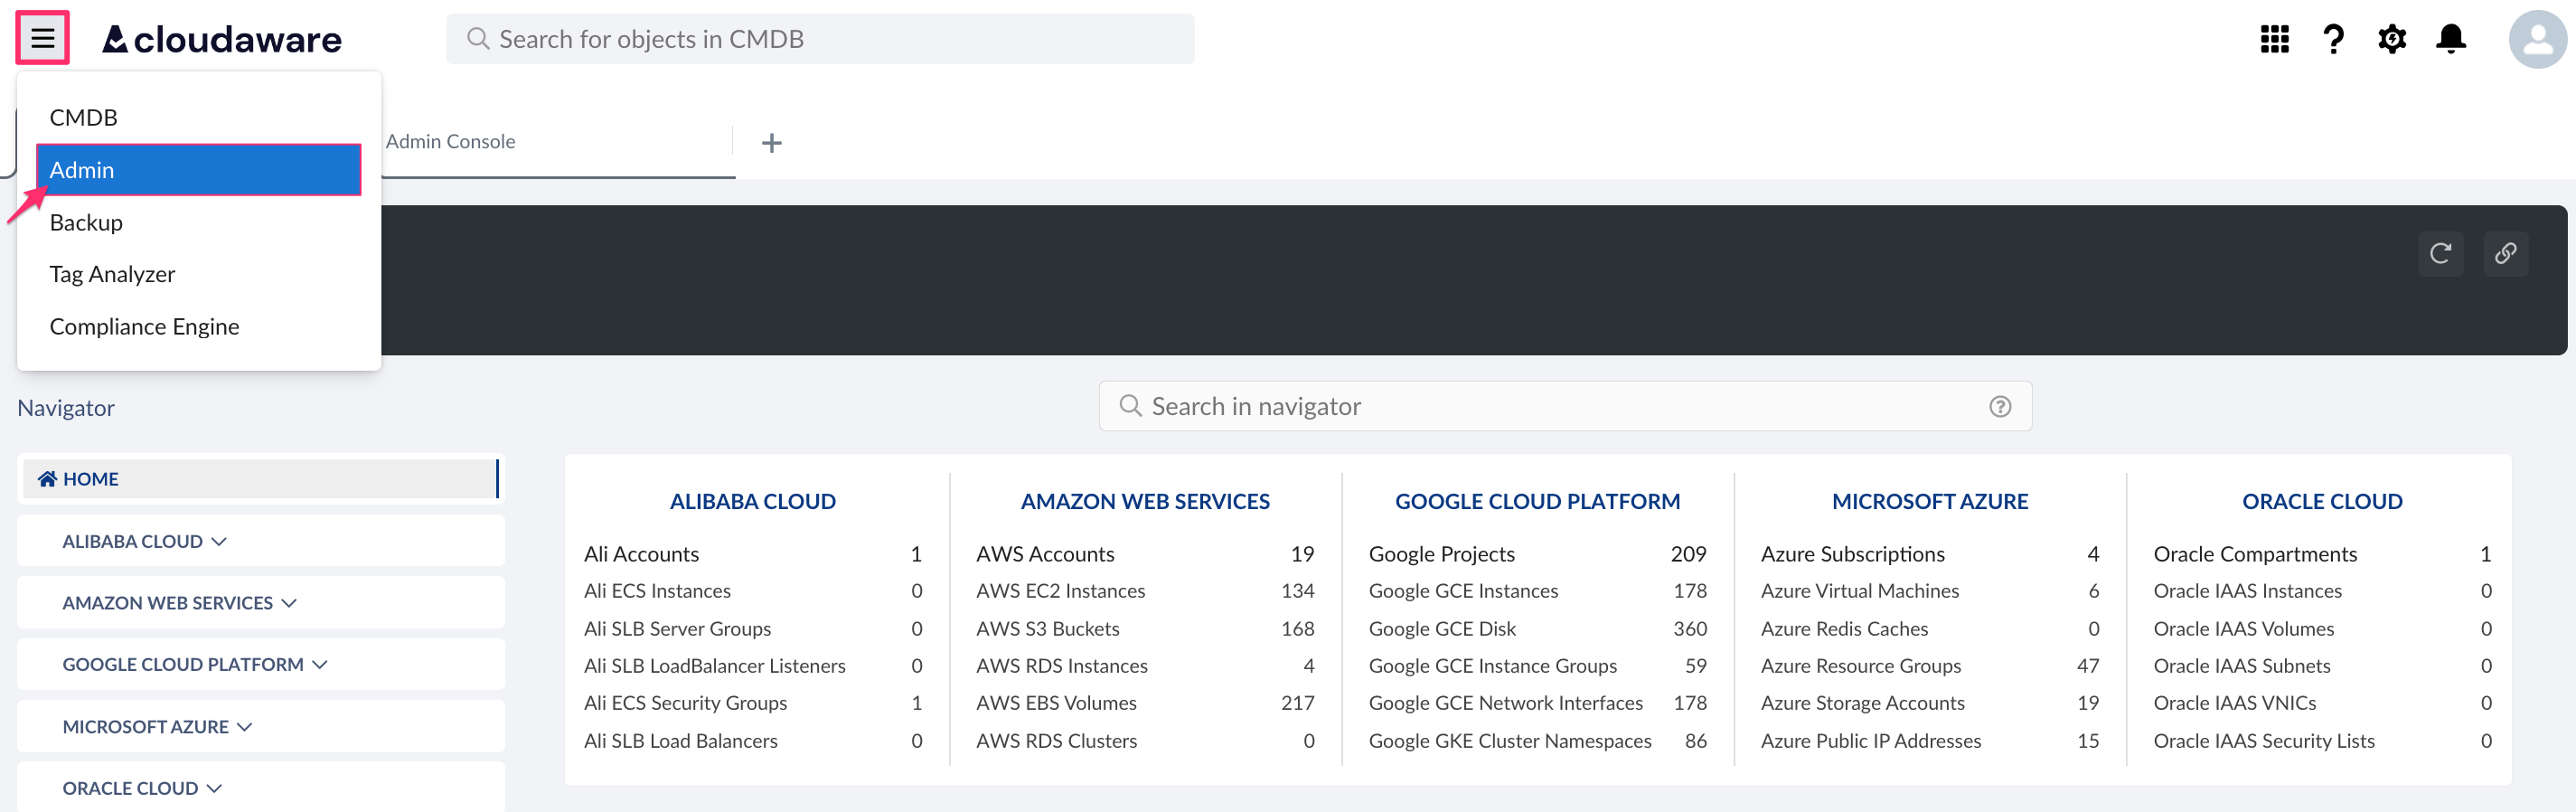
Find Jira Accounts & Actions in the list of Cloud Integrations. Click +Add.

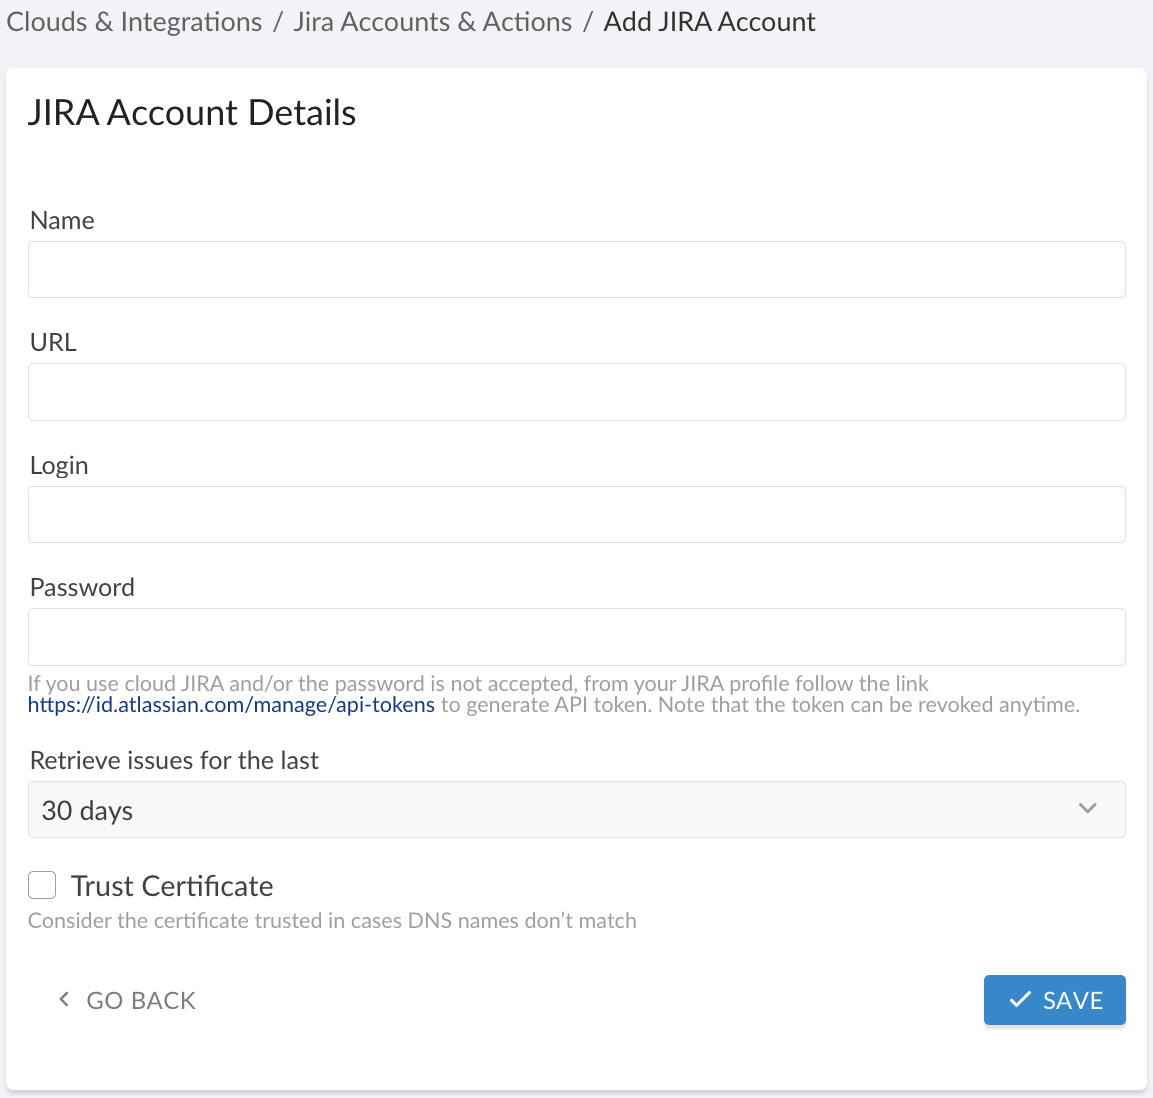
Fill out the form:
WHERE
Name - a meaningful name for Jira integration, e.g. Prod Jira
URL - Jira URL in the format https://jira.companyname.com
Password - Jira password (for cloud version of Jira, use a token)
Ensure that the user whose credentials are used in the form has the appropriate level of access. All Jira projects that are visible for this user will be collected by Cloudaware.
Retrieve issues for the last - select a time period from the drop-down list
Trust Certificate - check this check box only if Jira runs on a private network and TunHub gateway has been set up by Cloudaware (in this case, the URL will be in the format https://tunhub.cloudaware.com:12345)
Click Save.
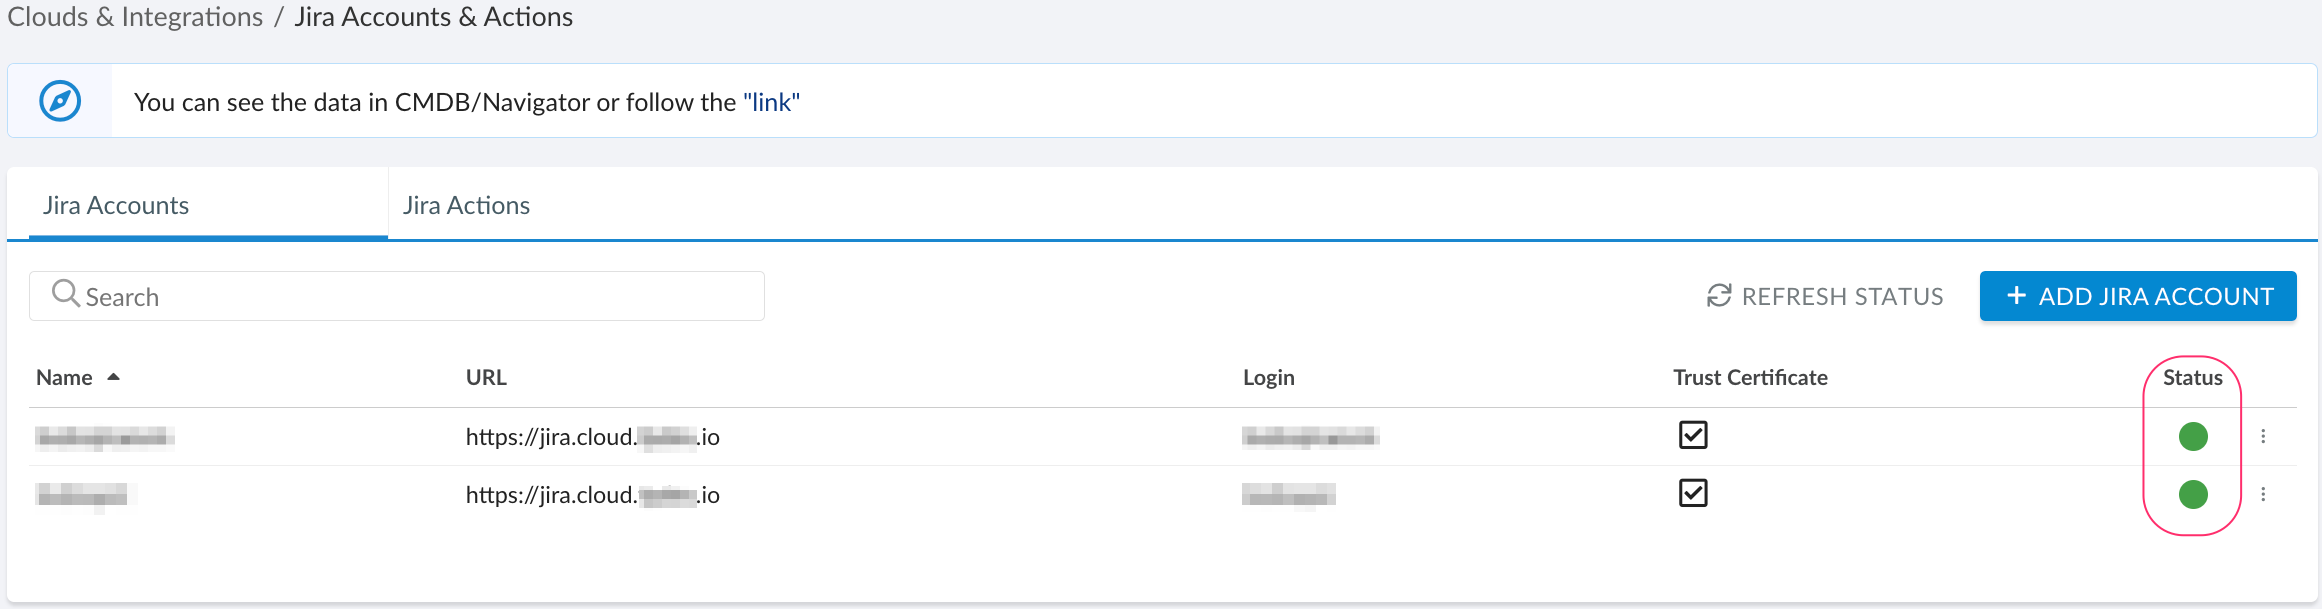
The green light in 'Status' means that Jira account has been successfully added. If there is a red light, please contact support@cloudaware.com.
Create custom fields in Jira
For Cloudaware to automatically associate discovered Jira issues with CMDB CIs, add the following custom fields* in Jira:
Object Type
Object Identifier
Object identifier is a cloud provider ARN for that object, for example:
Object Type: AWS ELB Load Balancer
Object Identifier (example): arn:aws:elasticloadbalancing:us-east-1:111111111111:loadbalancer/admin-s1-Elb-111XXX1XXXXXX
*The custom Jira field should be a text/string.
Set the values for custom fields manually or using internal Jira processes.
Configure auto-creation of Jira issues from Cloudaware
Cloudaware sends an outbound message to Jira whenever specific criteria are met, which will automatically create a Jira issue in the appropriate Jira project. Cloudaware can also post a comment to your Jira issue once the conditions that have triggered the ticket creation change.
Use case: A security team needs a Jira issue created for a specific project whenever Cloudaware detects a high-risk vulnerability. The team also requires notifications when a vulnerability is marked as fixed to minimize manual work in checking and closing Jira issues. Posting a comment on the issue could serve as an effective trigger for bulk-closing tickets.
Manage permissions and create fields in Jira
Grant Cloudaware the
user/project: ADD_COMMENTSpermission.Log to the Cloudaware account and navigate to Setup → Objects.
Select the object for which Jira issues should be created for (for example, CloudAware Vulnerability Scan).
Review the section 'Custom Fields & Relationships' to define fields that should be displayed in an issue's description. For our use case, the following fields are used: Priority, Risk, Severity, CVSS Number, Host, Port, Protocol, Description, Disappearance Time.
When creating fields in Jira, use Field Label names from Cloudaware, as fields names must match.
Set up Jira Actions integration in Cloudaware
Log in to Cloudaware account → Admin.

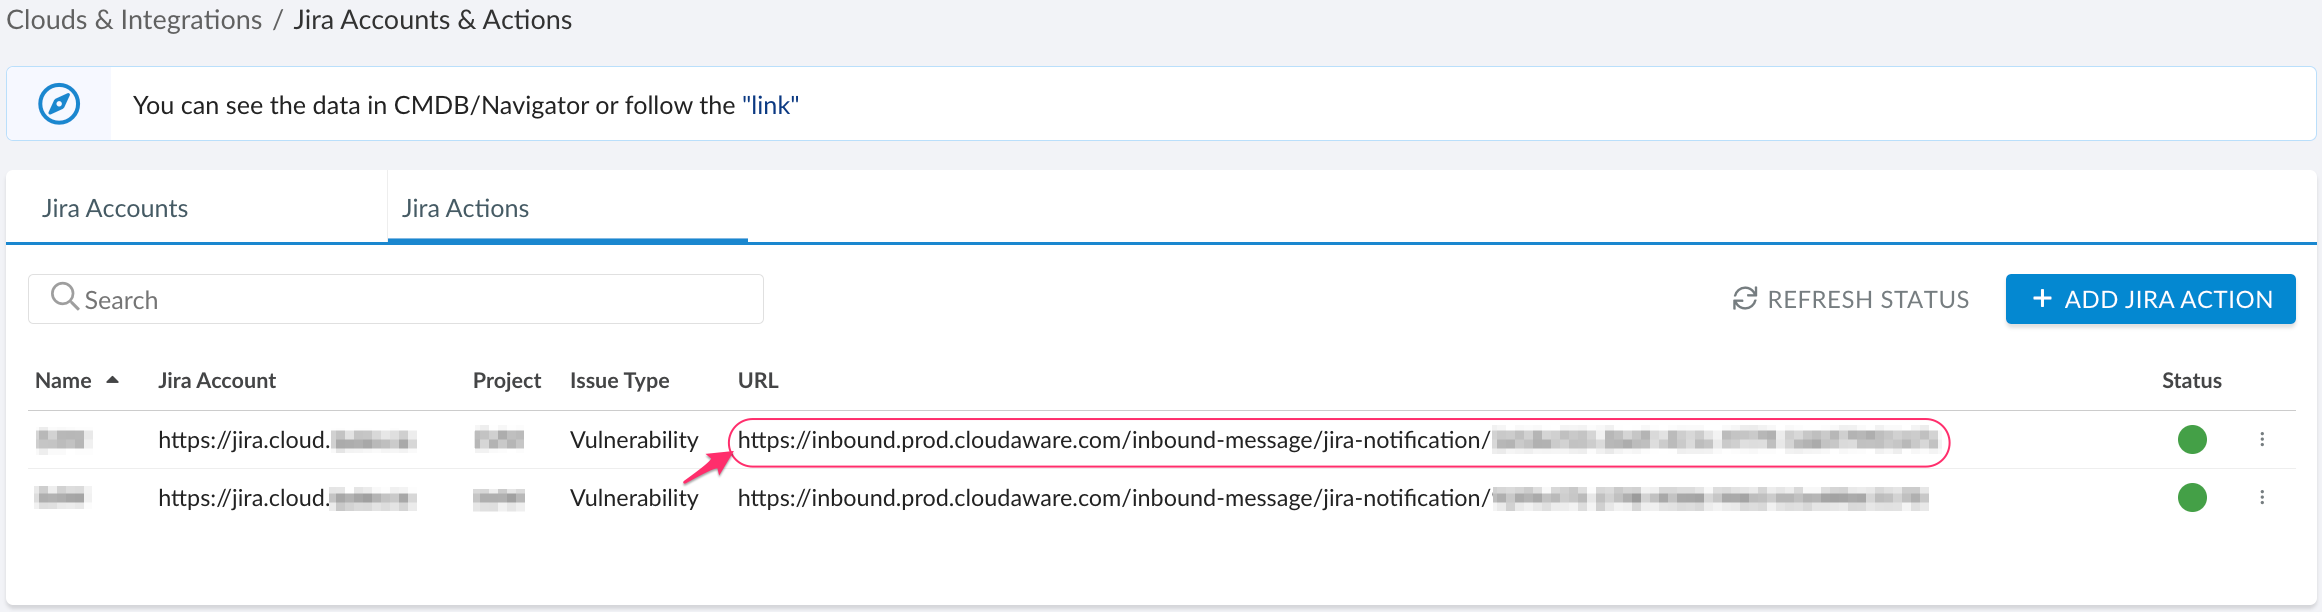
Find Jira Accounts & Actions in the list of Cloud Integrations, click N CONFIGURED*.

*Note that Jira account must be added to Cloudaware before setting up Jira actions.
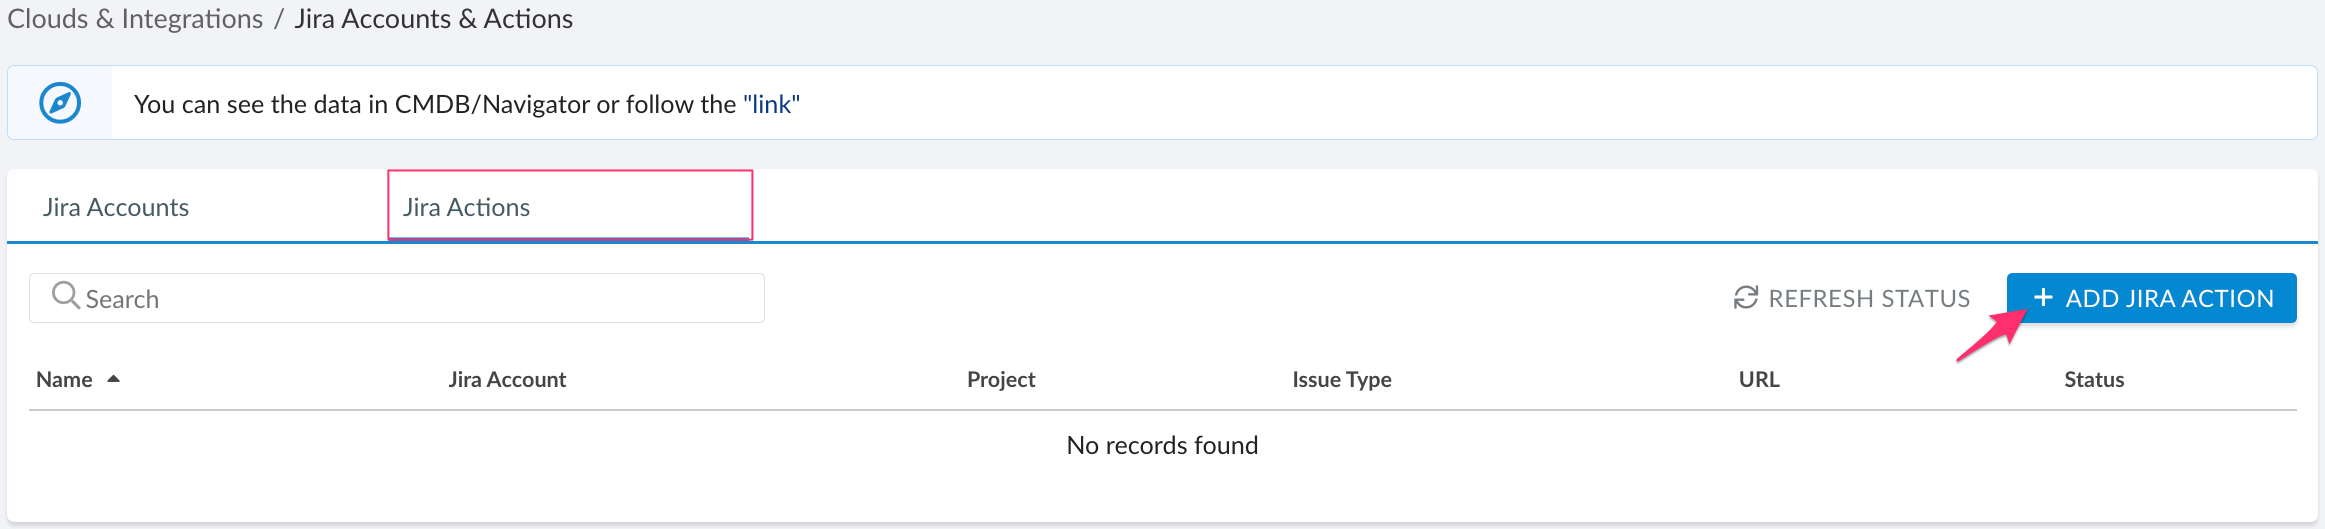
Select the tab 'Jira Actions'. Click +ADD JIRA ACTION.
Fill out the form:
.png?inst-v=9b979181-a8d5-452c-8e35-dd6c69019cbf)
WHERE
Name - a meaningful name for Jira action, e.g. New Vulnerability Detected
Jira Account - select the pre-configured Jira account
Project - select the Jira project where issues will be created in
Issue Type - select the issue type (issue types are managed in Jira)
Summary - a summary of Jira issues (in this example, we use sObject.Name to display the full name of CloudAware Vulnerability Scan)
Description - a description to be added to the Jira issue body
Comment - text to be displayed as a Cloudaware comment
For our use case, we usesObject.CA10disappearanceTime__c, whereCA10disappearanceTime__cis the API Name of the field showing the date and time when the vulnerability was deleted from the scanner.
Pay attention to using expression fields. The data type of the value returned depends on the elements used in the expression. Here below are sample outputs:
Expression | Output |
|---|---|
test | test |
sObject.Name | 'the name of this field in your org' |
'sObject.Name' | sObject.Name |
'Hey, ' + sObject.Name | Hey, 'the name of this field in your org' |
Field List - list the fields to be displayed in a Jira issue and Cloudaware comment
Use API names for fields. The integration must include all the fields you plan to use in notifications. The order you choose for the fields will be reflected in a Jira issue.
Click Save.
Copy and save the URL as it is required for further configuration in Cloudaware.
Set up Cloudaware workflows to create issues and post comments in Jira
Once you have configured Jira Action, set up two different workflow rules - for creating a Jira issue (1) and adding a comment (2).
1. Workflow Rule for Jira issue creation:
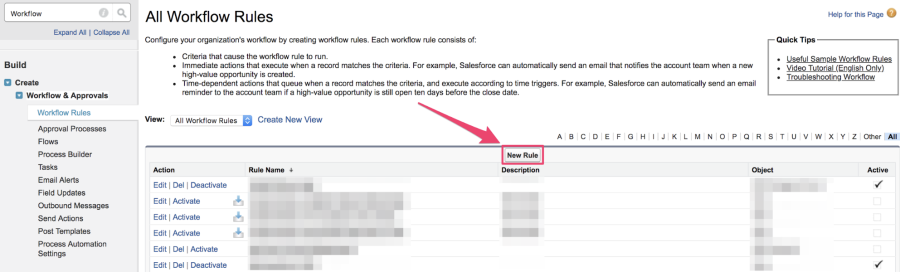
From Cloudaware Admin go to Setup → Create → Workflows & Approvals → Workflow Rules → New Rule:
Select the object. In our use case we are using CloudAware Vulnerability Scan. Click Next.
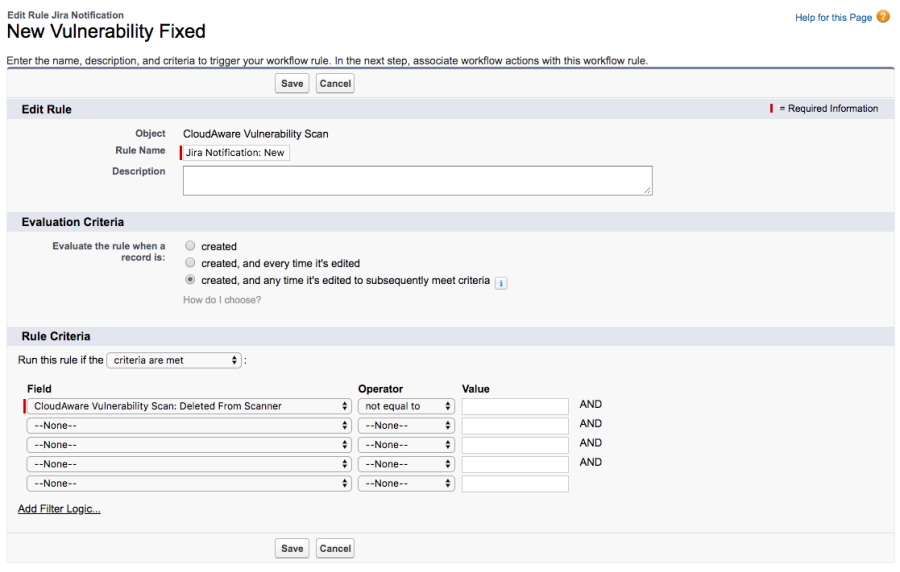
Add Rule Name, set Evaluation Criteria and Rule Criteria as shown below:
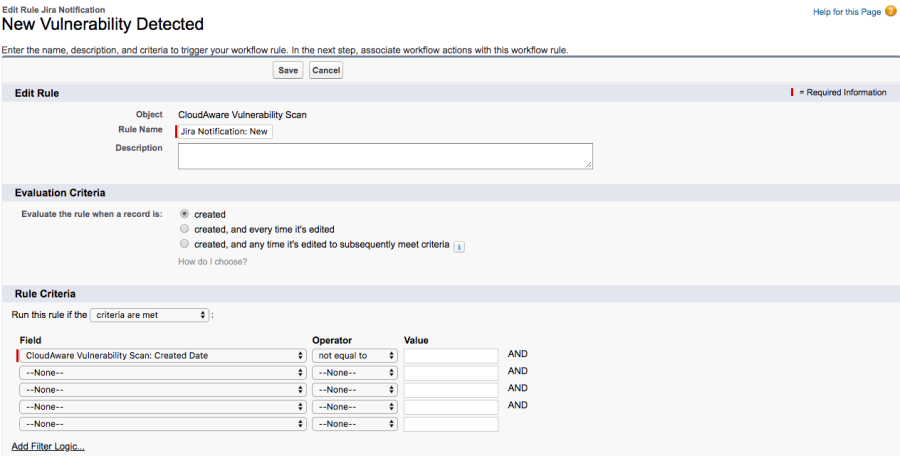
Click Save&Next.
Add Workflow Action → New Outbound Message:
Object: CloudAware Vulnerability Scan
Name: Jira Notification: New Vulnerability Detected
Endpoint URL: paste the URL copied from the integration's details
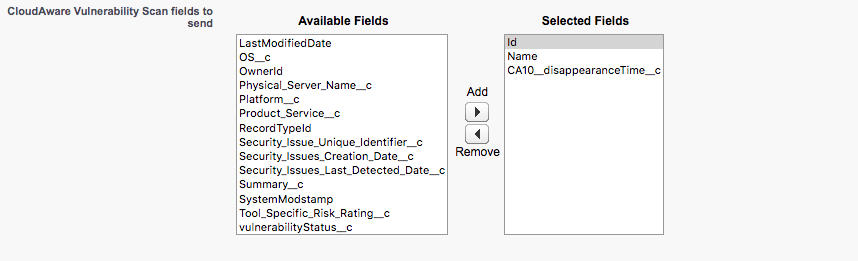
Select the fields to be displayed as set up in the Integration details:
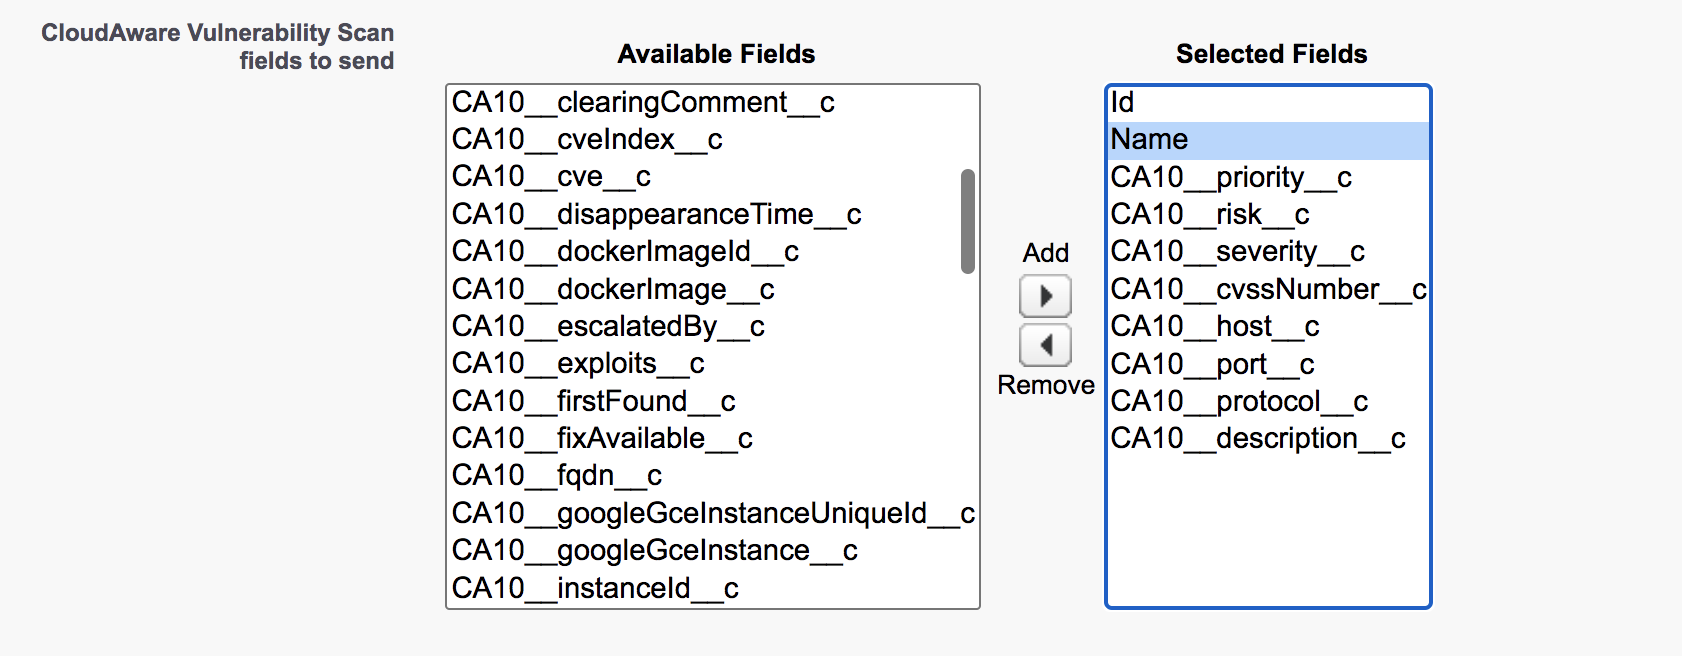
Note that Name is a mandatory field.
Click Done. Click Activate to activate your workflow.
2. Workflow Rule for posting a comment in Jira issue:
Go back to Workflow Rules → New Rule.
Select the object. In our use case we are using CloudAware Vulnerability Scan. Click Next.
Add Rule Name, set Evaluation Criteria and Rule Criteria as shown below:
Click Save&Next.
Add Workflow Action → New Outbound Message:
Object: CloudAware Vulnerability Scan
Name: Jira Notification: Vulnerability Fixed
Endpoint URL: paste the URL copied from the integration's details
Select the fields to be displayed as set up in the Integration details:
Click Done. Click Activate to activate your workflow.
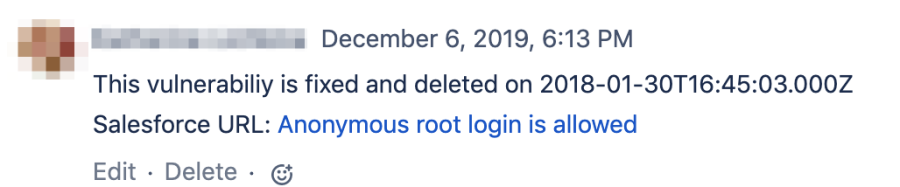
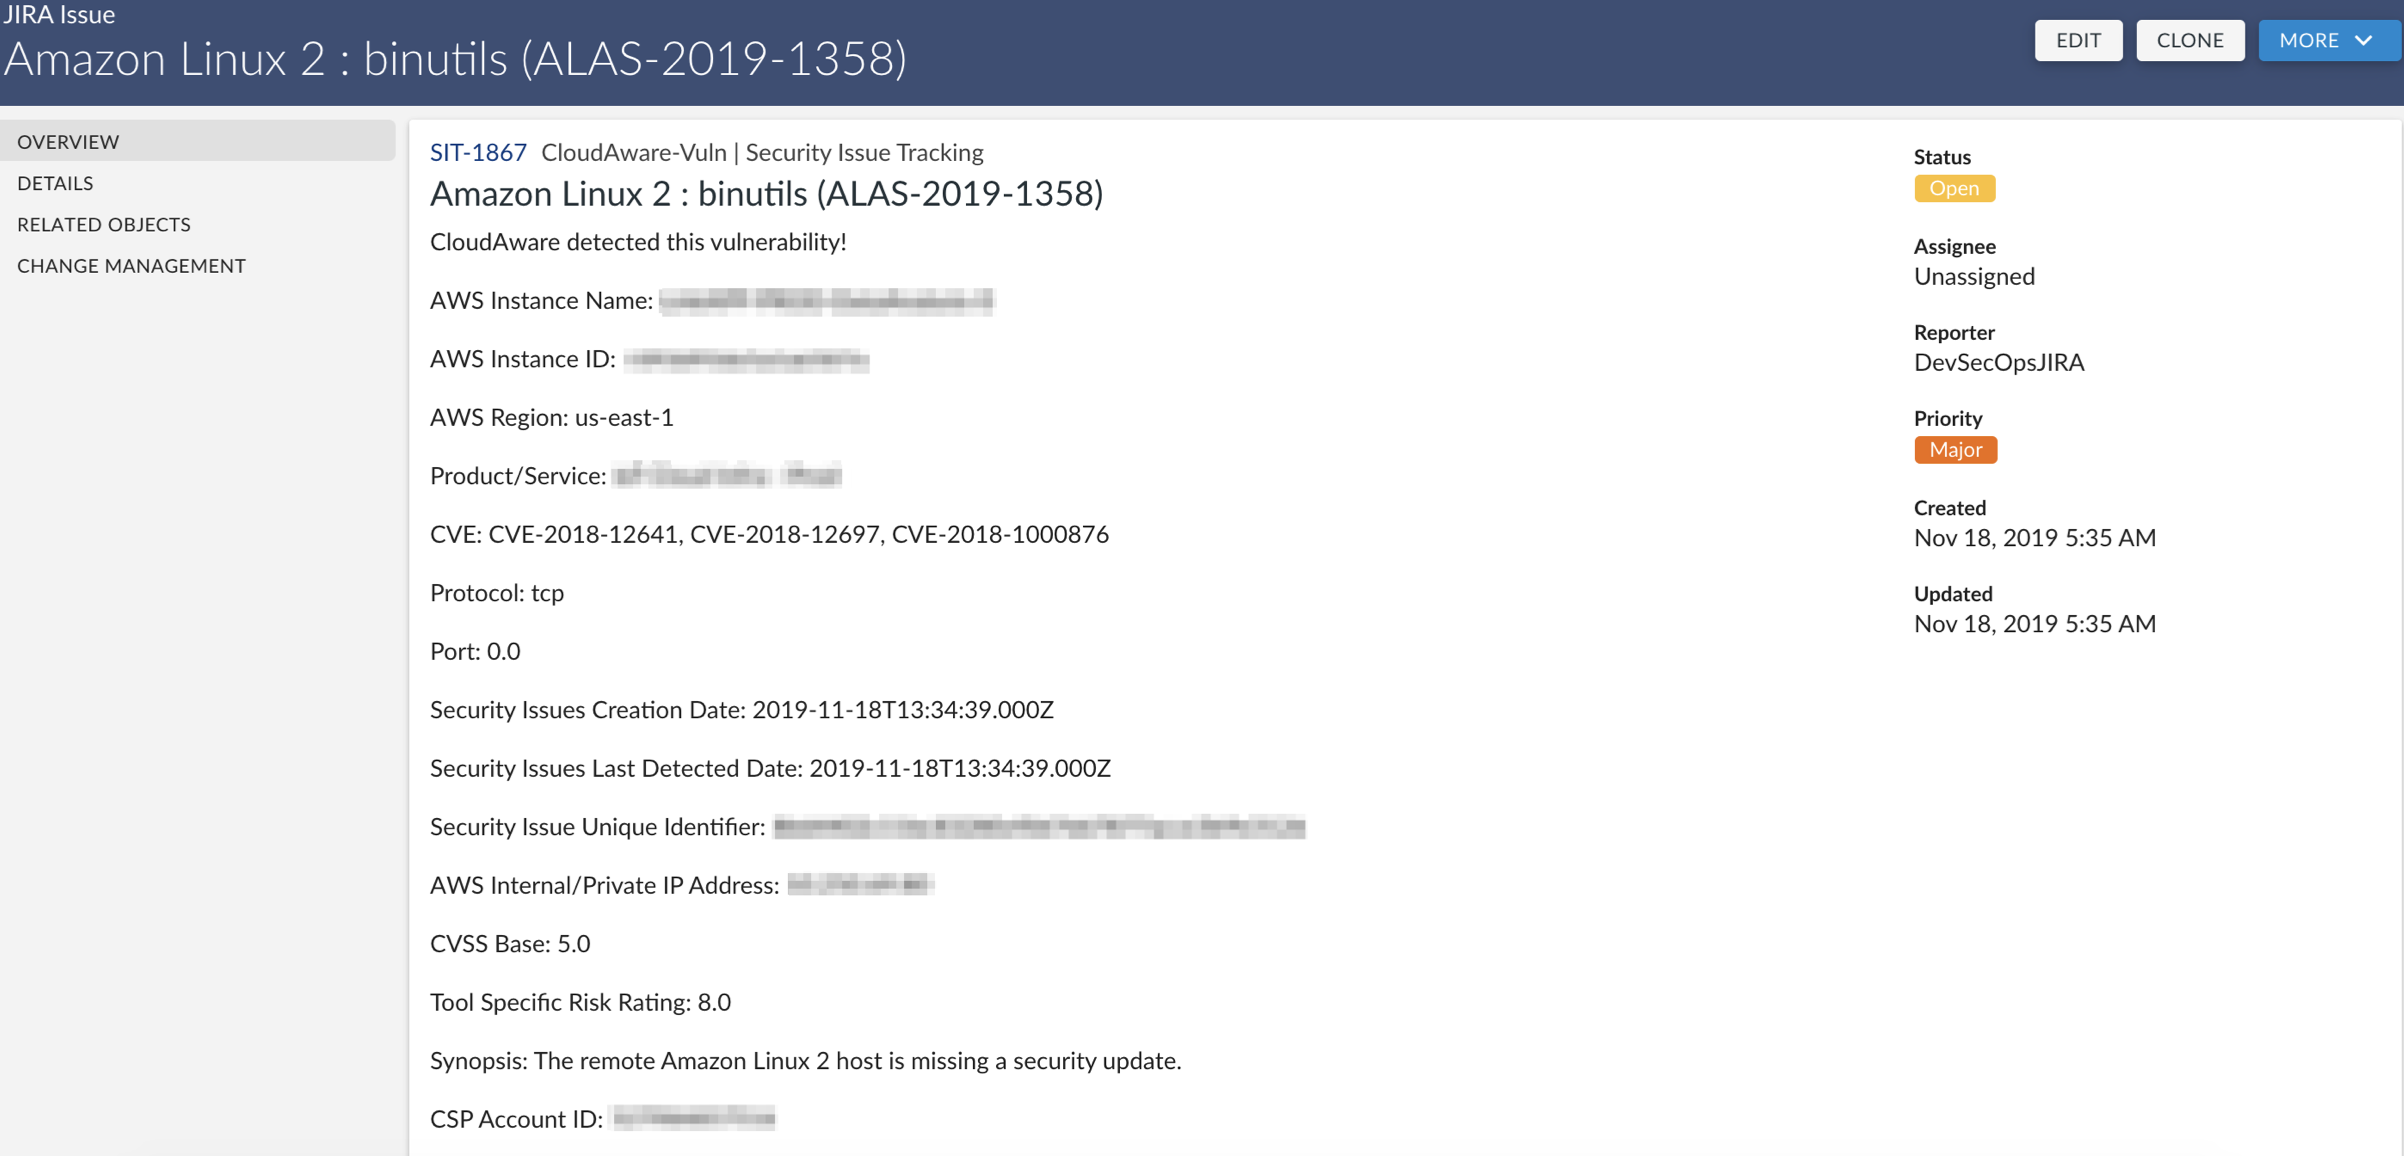
Jira issue example | Cloudaware comment example |
|---|---|
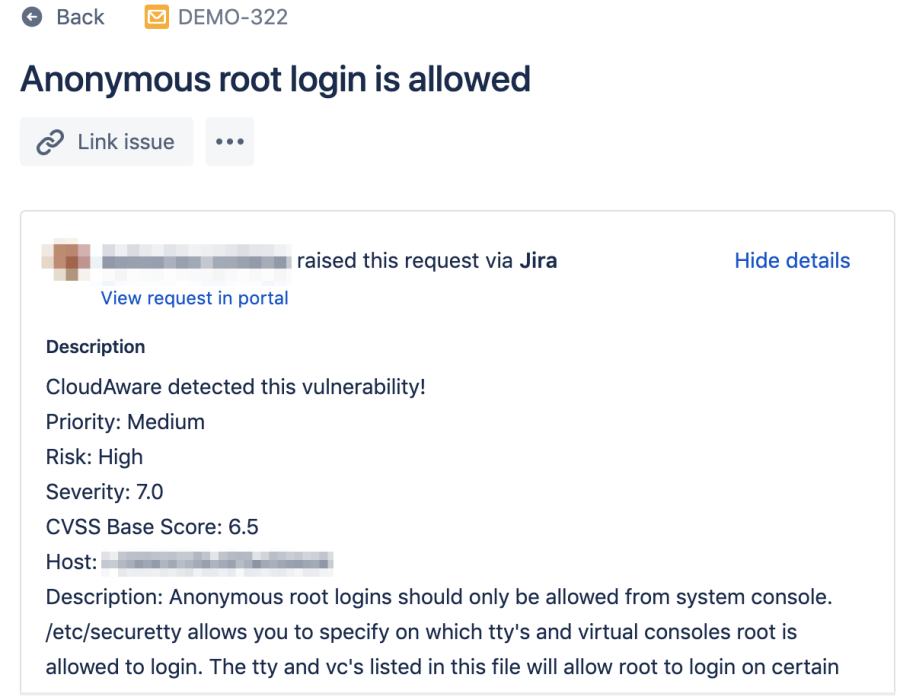 |  |
Jira issue in Cloudaware CMDB |
|---|
 |
Bulk close Jira issues with Cloudaware comments
Based on our use case, we can consider all issues with a comment as not requiring further actions since a vulnerability the Jira issue informs of has been fixed.
Follow these steps to configure automatic change of issue status to 'Resolved':
In your Service Desk project select Project settings → Automation.
Select Add rule.
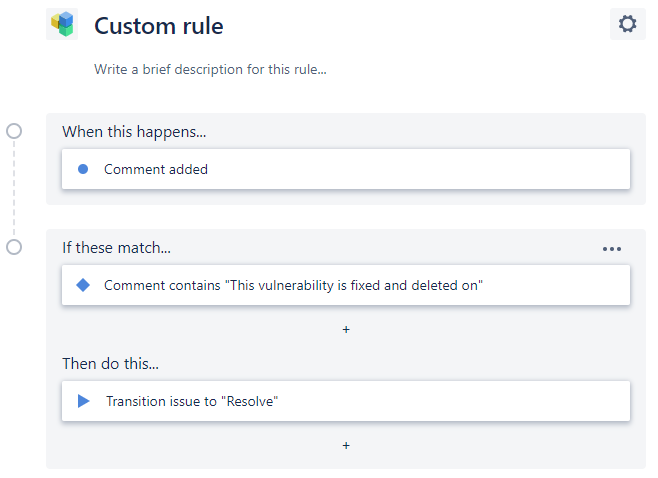
Select Custom rule from the list, then select Next.
Give your custom rule a name and a description.
Configure your rule by defining the WHEN, IF, and THEN fields:
5.1. When comment added
5.2. If comment contains This vulnerability is fixed and deleted on
5.3. Then transition issue to status "Resolved"
Populate custom fields in Jira
This option requires having custom fields Object Type, Object Identifier and fields that were created for Jira actions.
Based on our use case, we can consider having all custom field values populated automatically. This will also provide a great visibility in Cloudaware CMDB as each Jira issue will be linked to a CMDB record.
Follow these steps to configure automatic update of fields Object Type and Object Identifier.
Object Type
To populate this field, ensure that fields indicating the resource name or ID are created (e.g. AWS EC2 Instance ID, Physical Server, AWS IAM User).
Create a custom text field 'Object Type'.
In your Service Desk project select Project settings → Automation.
Select Add rule.
Select 'Custom rule' from the list, then select Next.
Give your custom rule a name and a description.
Specify:
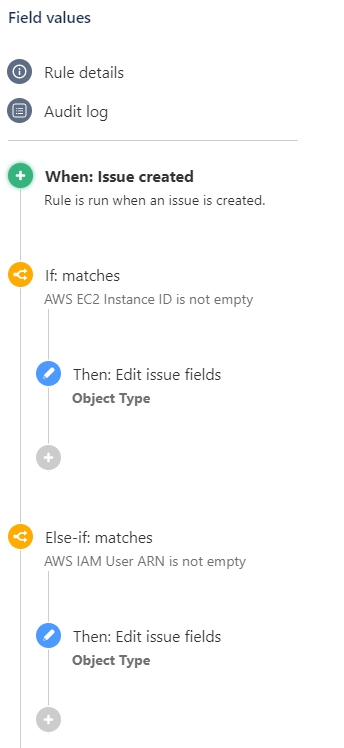
7.1. WHEN: Issue created
7.2. Choose If/Else block
7.3. Add the condition, e.g.:
IF 'AWS EC2 Instance ID' field is not empty then edit 'Object Type' field with 'AWS EC2 Instance'
IF 'AWS EC2 Instance Name' field is not empty then edit 'Object Type' field with 'AWS EC2 Instance'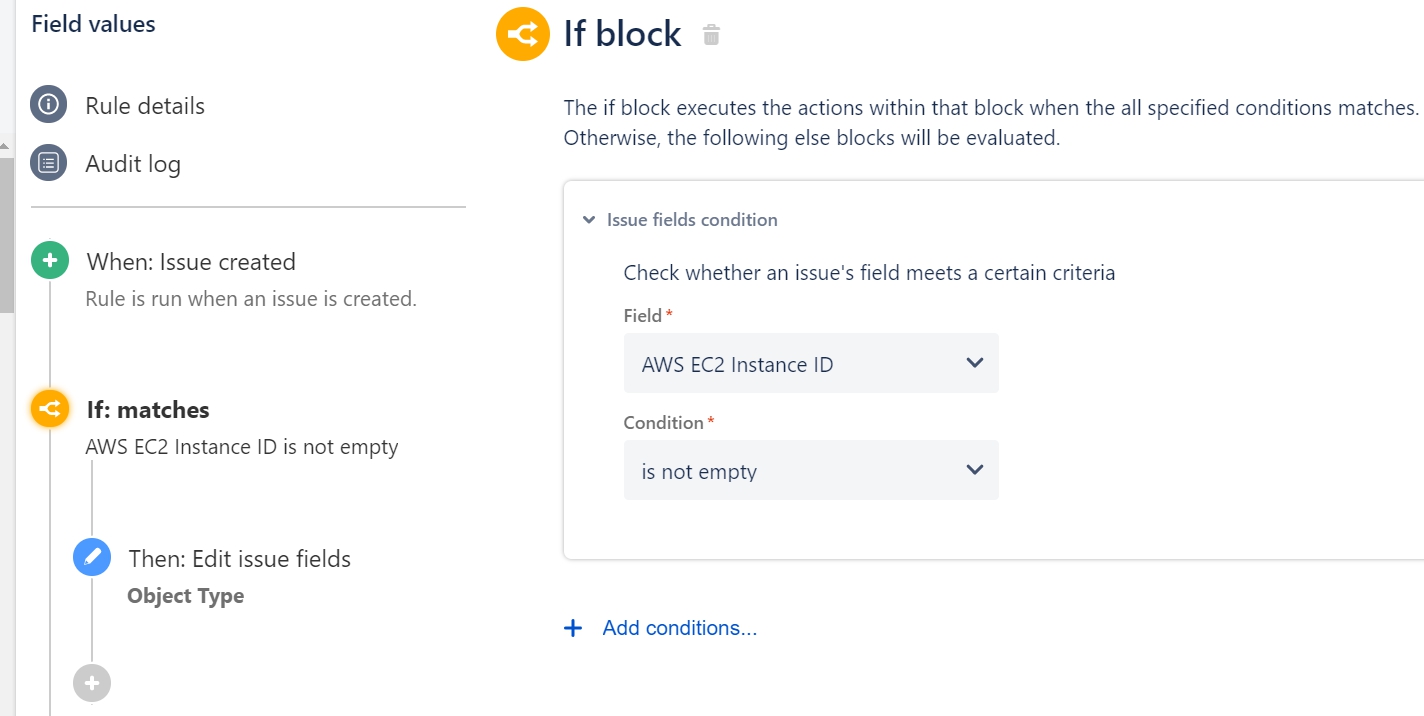
7.4. Add the second condition:
ELSE - IF 'AWS IAM User ARN' field is not empty then edit 'Object Type' field with 'AWS IAM User'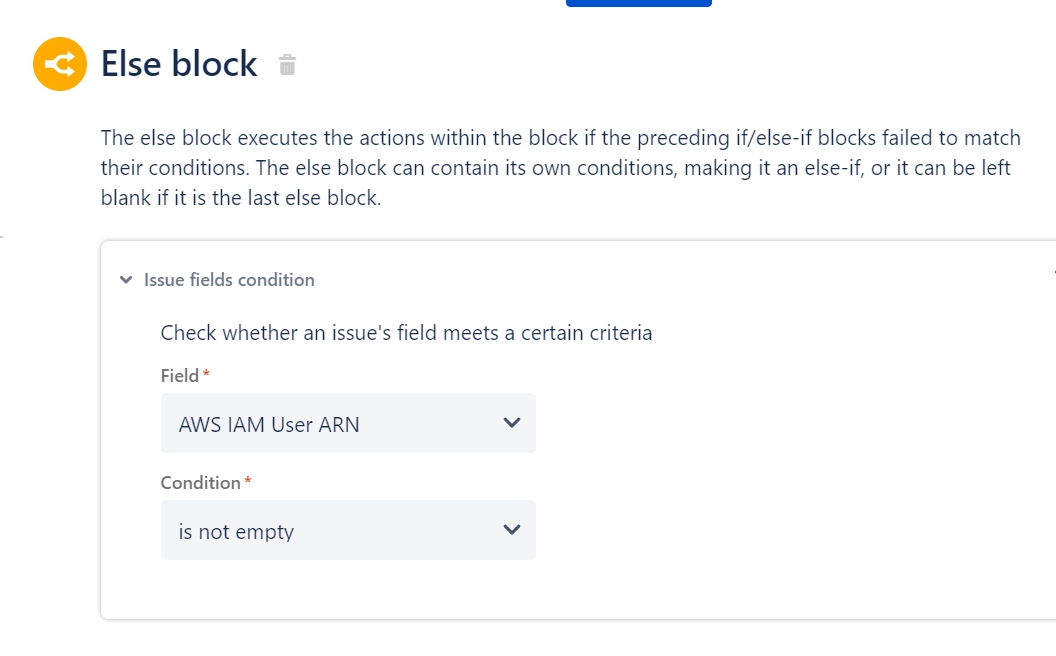
The automation summary will look the following:
Object IdentifierTo populate this field, ensure that fields indicating the resource ID are created (e.g. AWS EC2 Instance ID, AWS IAM User ARN).
Create a custom text field 'Object Identifier'.
In your Service Desk project select Project settings → Automation.
Select Add rule.
Select 'Custom rule' from the list, then select Next.
Give your custom rule a name and a description.
Specify:
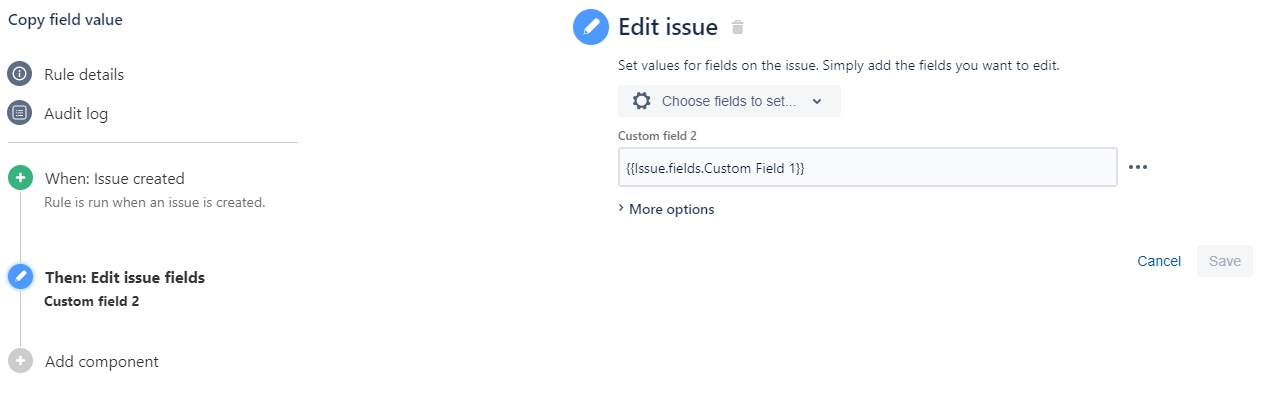
7.1. WHEN: Issue created
7.2. THEN: Edit issue fields. Paste the following condition as the value of the field 'Object Identifier':CODE{{Issue.fields.Custom_Field_name}}where Custom_Field_ is the name of the field under question (e.g. AWS EC2 Instance ID, AWS IAM User ARN)
The automation summary will look the following:
Once you set the automation for both Object Type and Object Identifier, make sure to add these fields to the Jira issue.