
ServiceNow Guide
ServiceNow is a cloud-based software platform for IT Service Management (ITSM) using intelligent workflows.
Introduction
Cloudaware is capable of both pushing data on-demand into ServiceNow and acting as a repository ServiceNow can pull on a regular basis. While there are dozens off the shelf tools offering integration between ServiceNow and Salesforce, none of them is required for Cloudaware/Salesforce and ServiceNow to exchange data.
Architecture

This architecture can support the following use cases:
Cloudaware forwards a change request into ServiceNow
ServiceNow retrieves a list of violations from Cloudaware and saves them as incidents.
The following SOAP roles are supported on both sides:
CODE
| Can perform all SOAP operations. |
CODE
| Can insert new records. |
CODE
| Can delete existing records. |
CODE
| Can query, insert, and delete records on the qs. |
CODE
| Can query record information. |
CODE
| Can query record information and update records. |
CODE
| Can run scripts that specify a .do endpoint. |
CODE
| Can update records. |
Prerequisites
Follow these steps before setting up the integration in ServiceNow and Cloudaware.
Create a user in Cloudaware/Salesforce.
Add the IP from which you connect ServiceNow from into the trusted IP range in Cloudaware/Salesforce.
Export Partner WSDL from Cloudaware/Salesforce.
Create Salesforce User
1) Log in to your Cloudaware account.
2) Go to Setup in the main menu under your username.
3) In the Quick Find box enter Users, and then select Users. Click New User.
4) Name the user appropriately, e.g. ServiceNow Collector. Enter the email address and a unique username in the form of a email address. By default, the username is the same as the email address.
5) Select a User License, which determines which profiles are available for the user: Salesforce/Salesforce Platform.
6) Select a standard User Profile, which specifies the user’s minimum permissions and access settings: CloudAware User/Standard Platform User.
7) Check the box 'Generate new password and notify user immediately' to have the user's login name and a temporary password emailed to the new user.
Add IP into Trusted IP Range in Salesforce
1) Go back to Setup.
2) In the Quick Find box enter Security Controls, and then select Network Access. Click New.
3) Add Start IP Address and End IP Address. Click Save.
Export Partner WSDL
1) Go back to Setup.
2) In the Quick Find box enter API, and select API.
3) Locate Partner WSDL. Click Generate Partner WSDL.
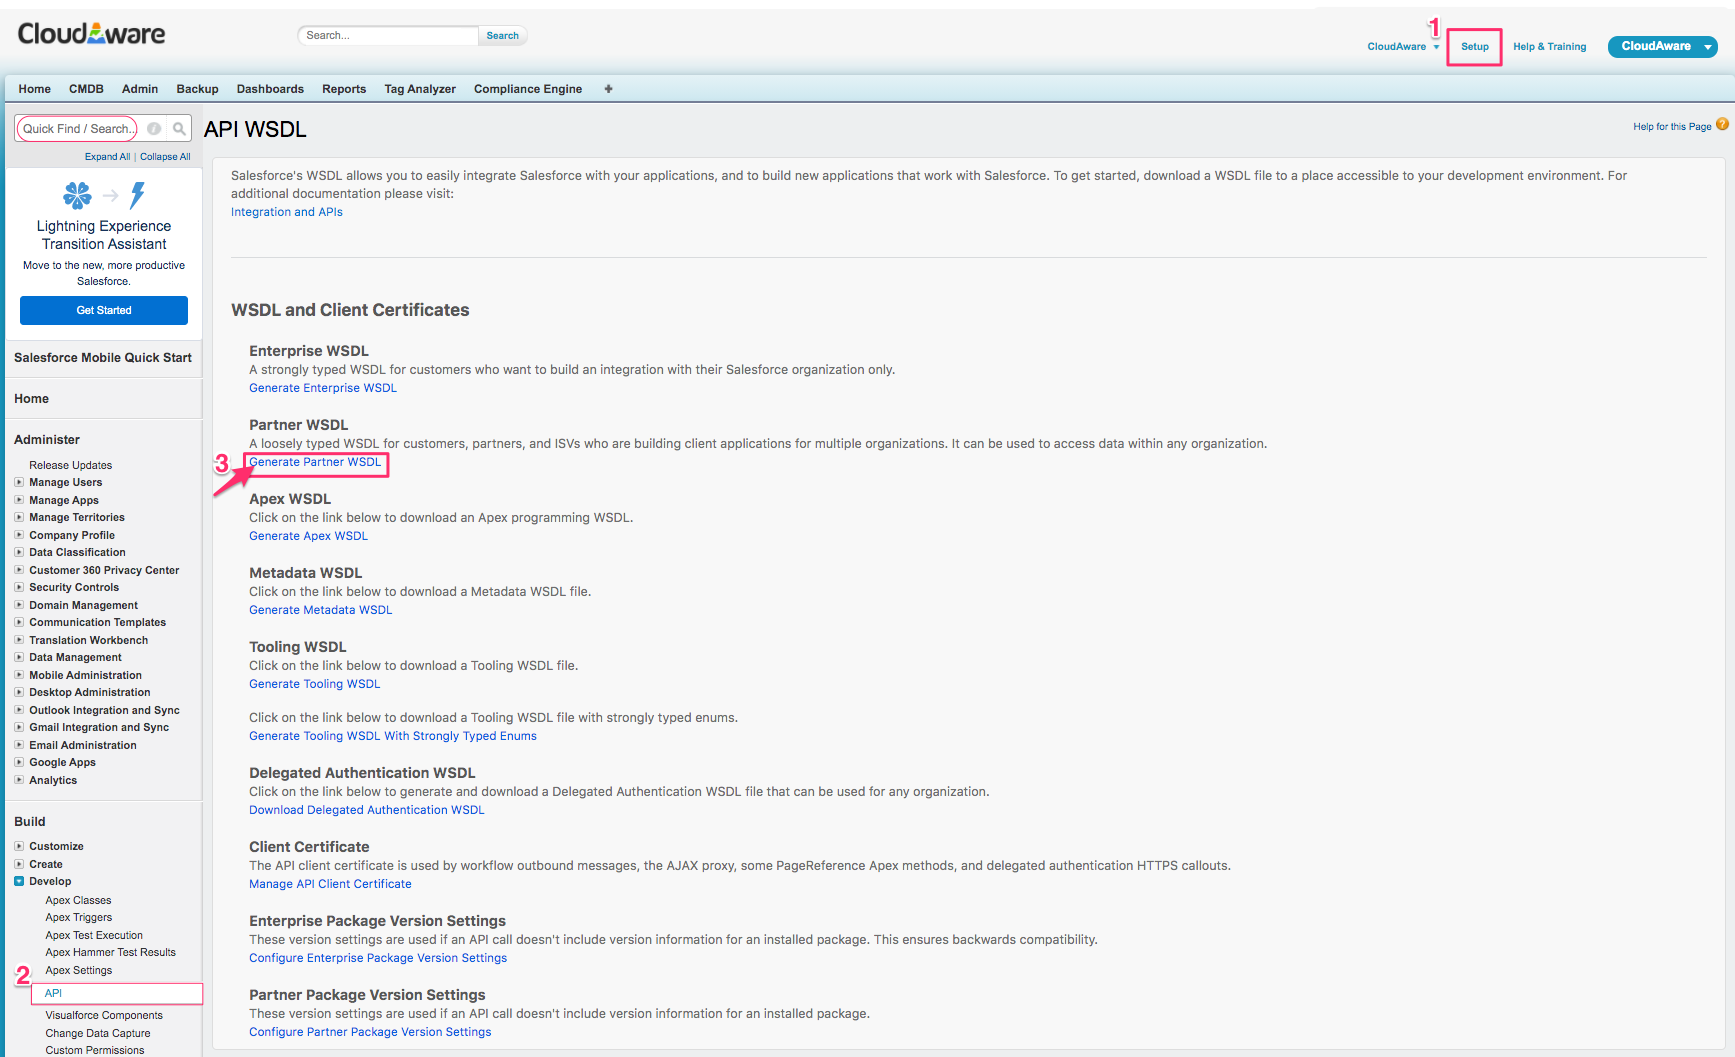
4) Save the generated WSDL XML file to your workstation.
ServiceNow Setup
This is by far the most common way Cloudaware data is populated into CMDB. It allows ServiceNow administrators to have fine control over mapping of objects collected from Cloudaware into ServiceNow. The steps to configure this are as follows:
Upload WSDL to ServiceNow System SOAP Outbound Messages.
Configure scripts to export whatever from Cloudaware into ServiceNow.
Upload WSDL To ServiceNow
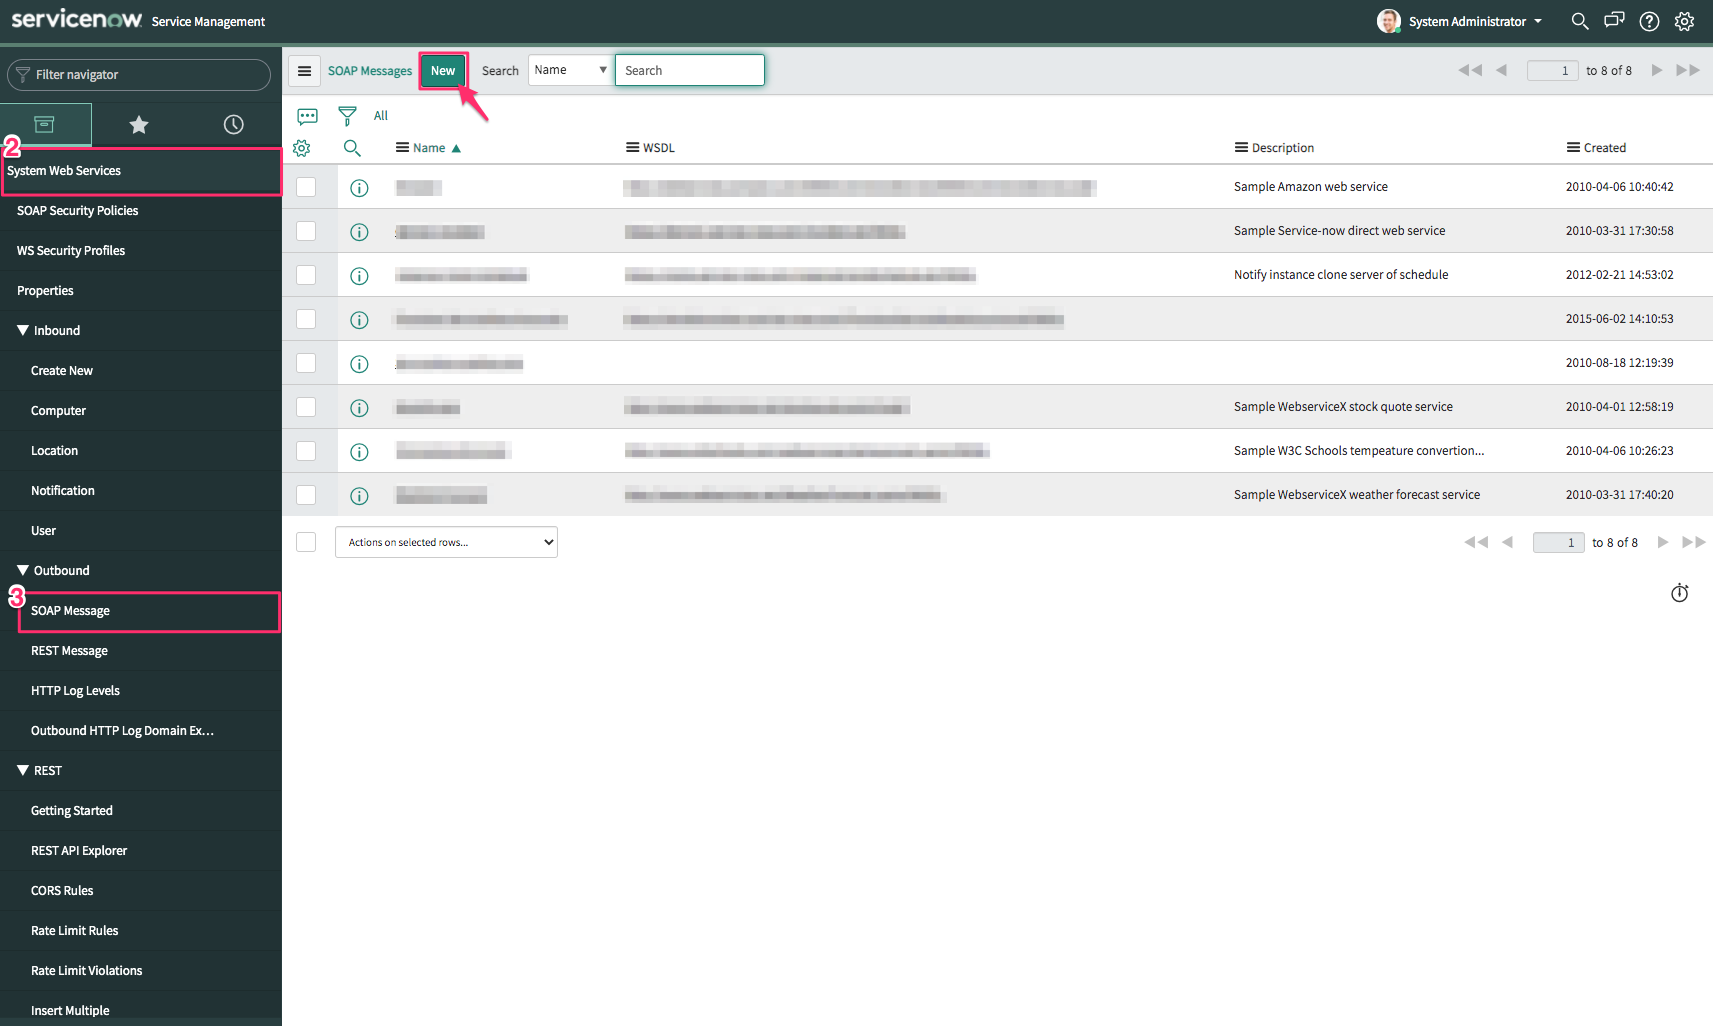
1) Log in to your ServiceNow instance.
2) Go to System Web Services.
3) Navigate to Outbound → SOAP Message. Click New.
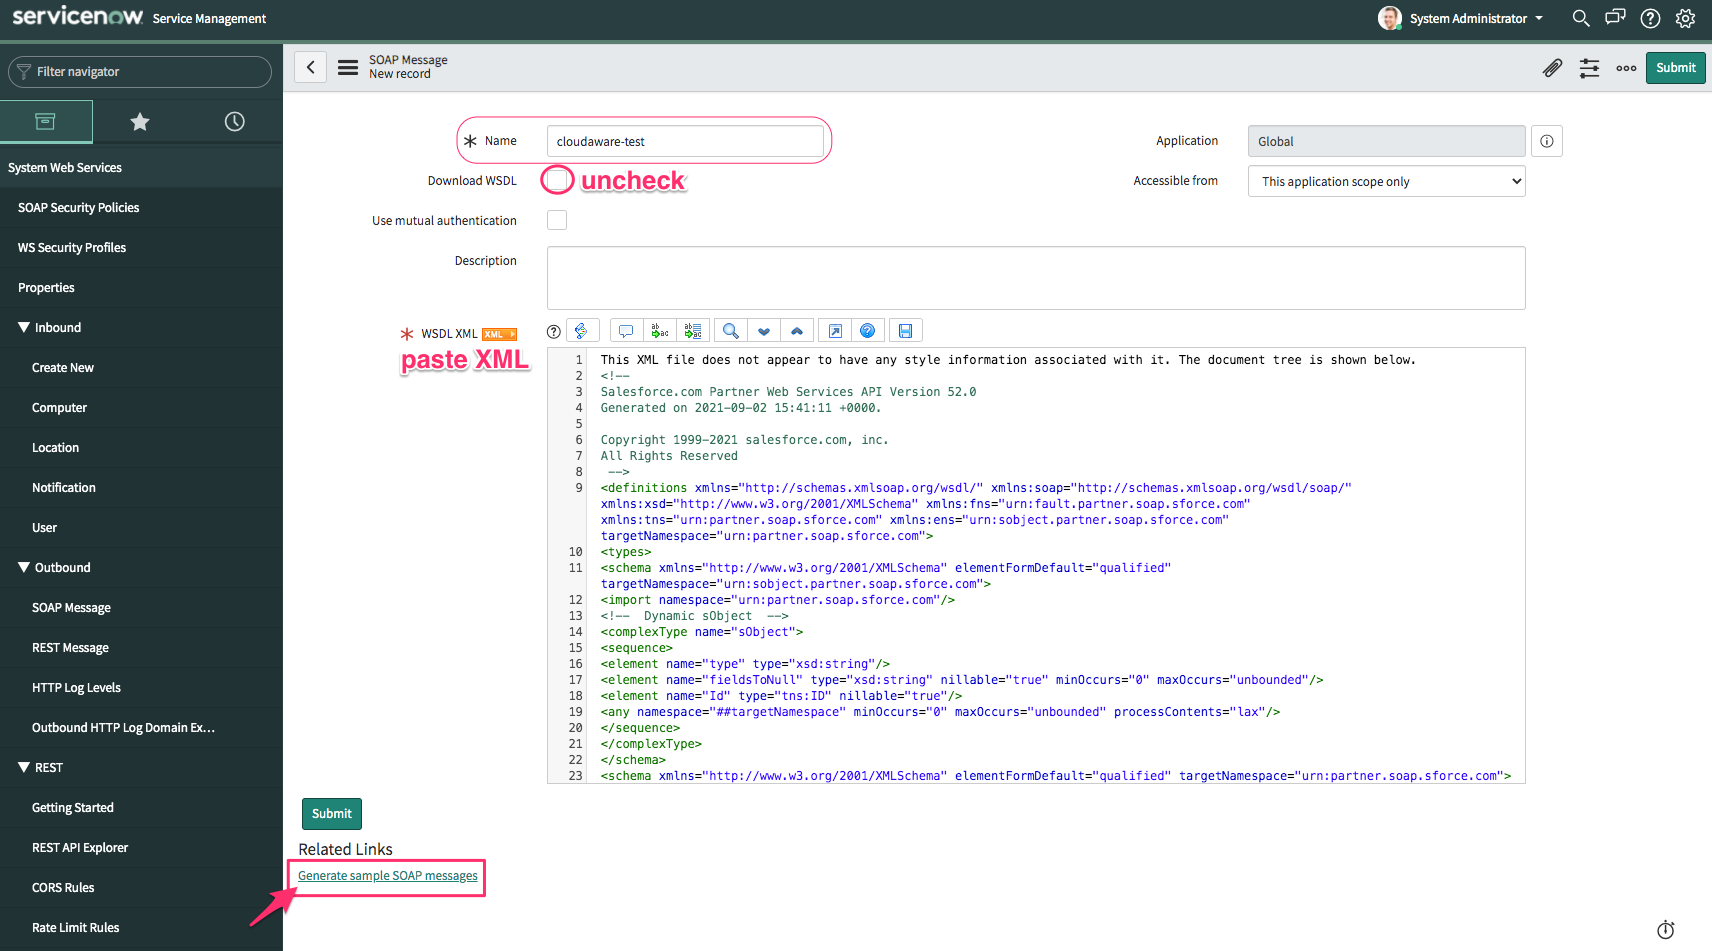
4) In Outbound SOAP Message form:
Set up a meaningful name
Uncheck the box 'Download WSDL'
Paste XML from the step Export Partner WSDL
Click Generate sample SOAP Messages.
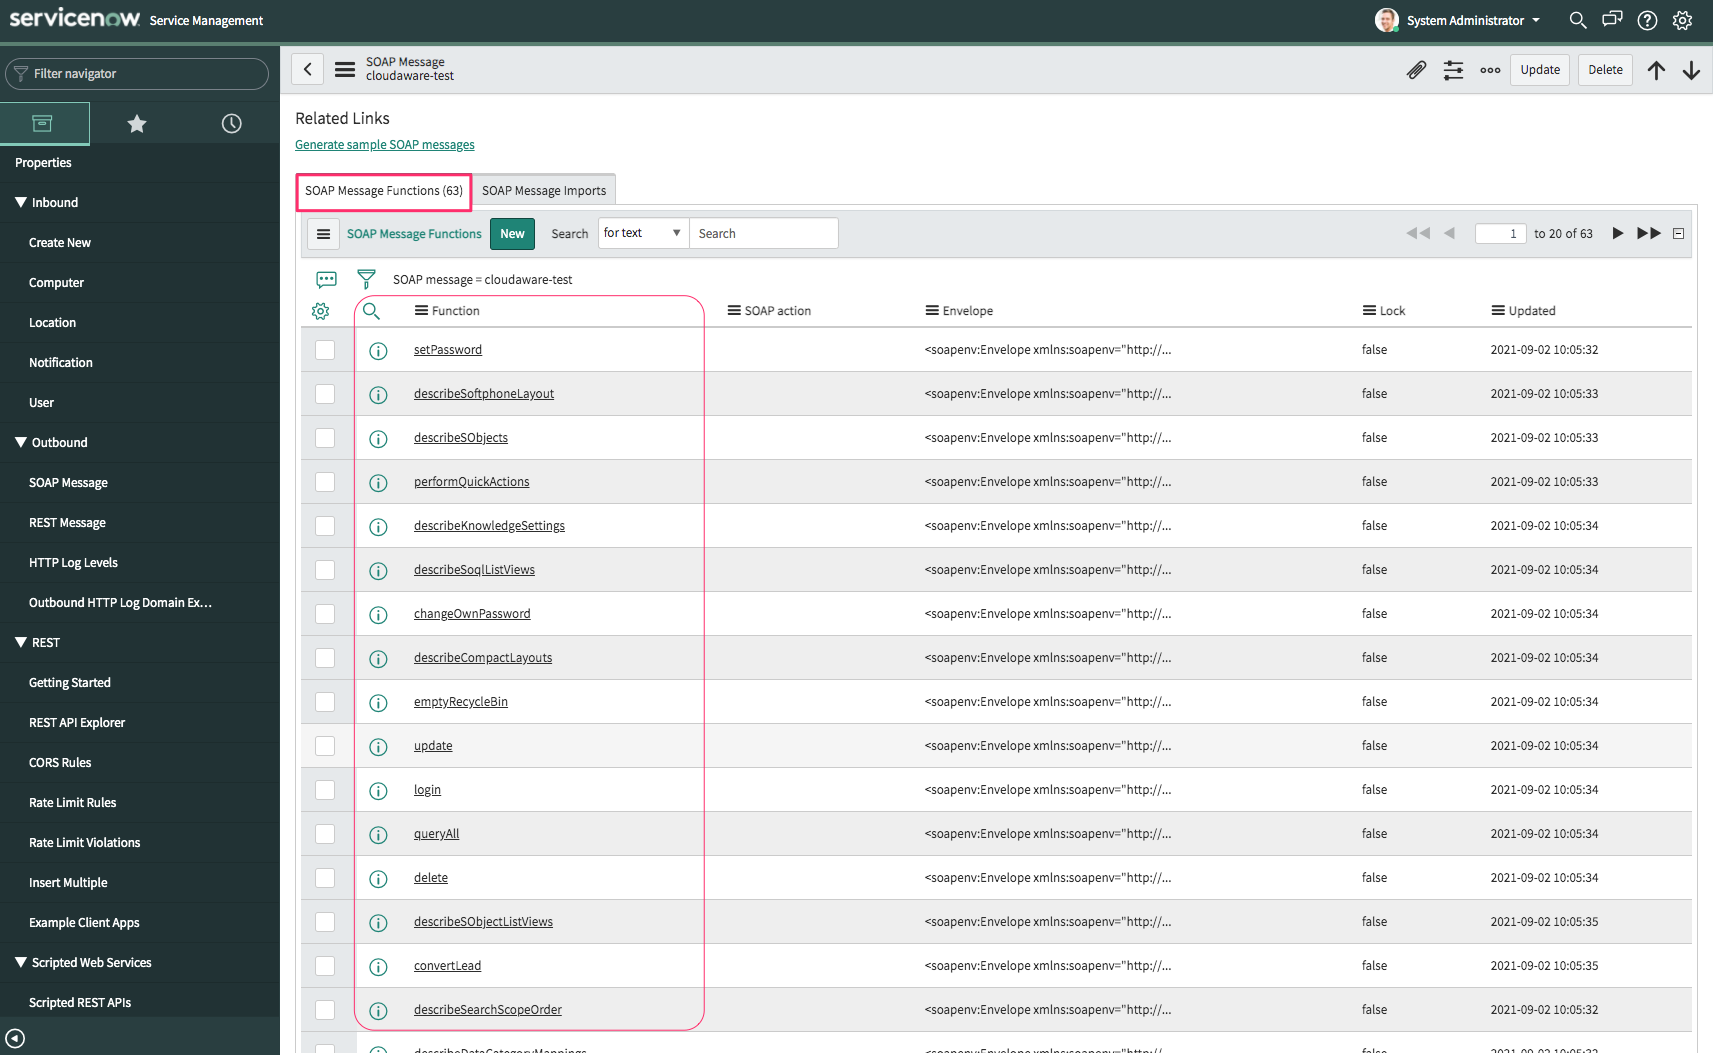
If WSDL has been imported successfully, you will be able to see SOAP Message Functions. Please allow some time to all functions appear. Note that the number of SOAP message functions can change over time.
Getting Cloudaware/Salesforce SessionID
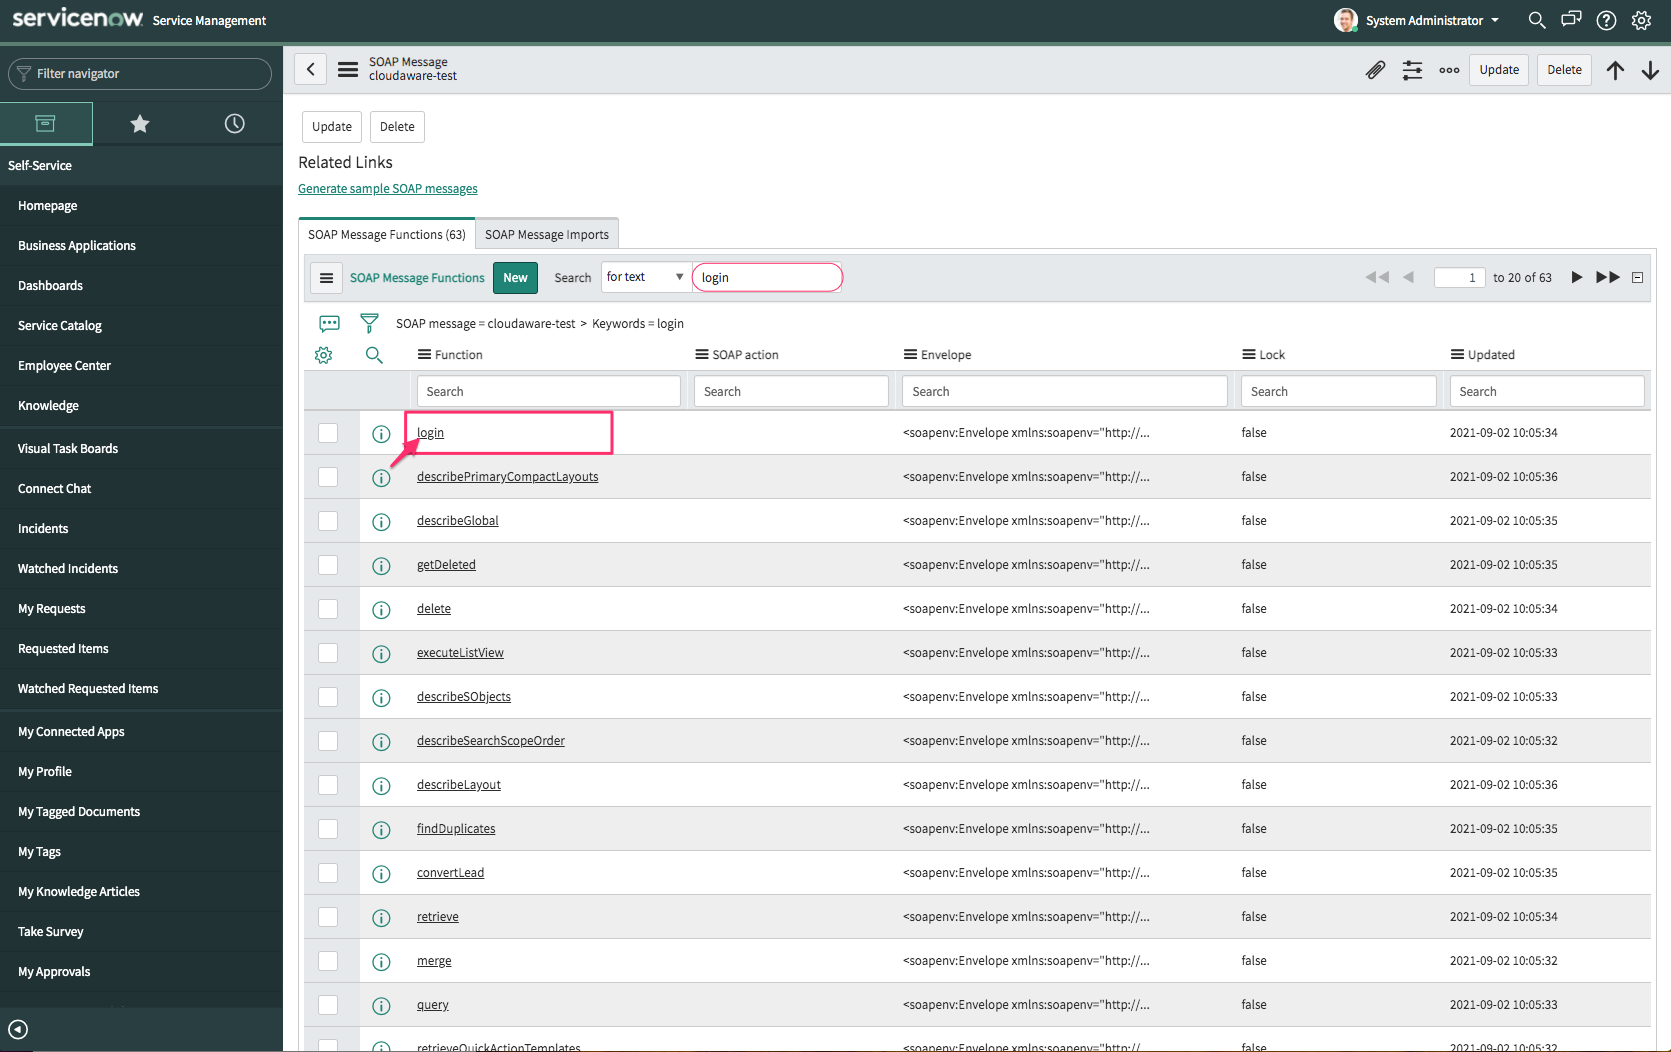
All data retrieval operations from Cloudaware should be started with obtaining a session ID. To obtain session ID, execute the login outbound SOAP message.
Locate and select the login outbound message:
Once in the login message form, add Username and Password+SecurityToken* as password into the Envelope message body. For example, if the password is qwerty and the token is token, the required password will be qwertytoken.
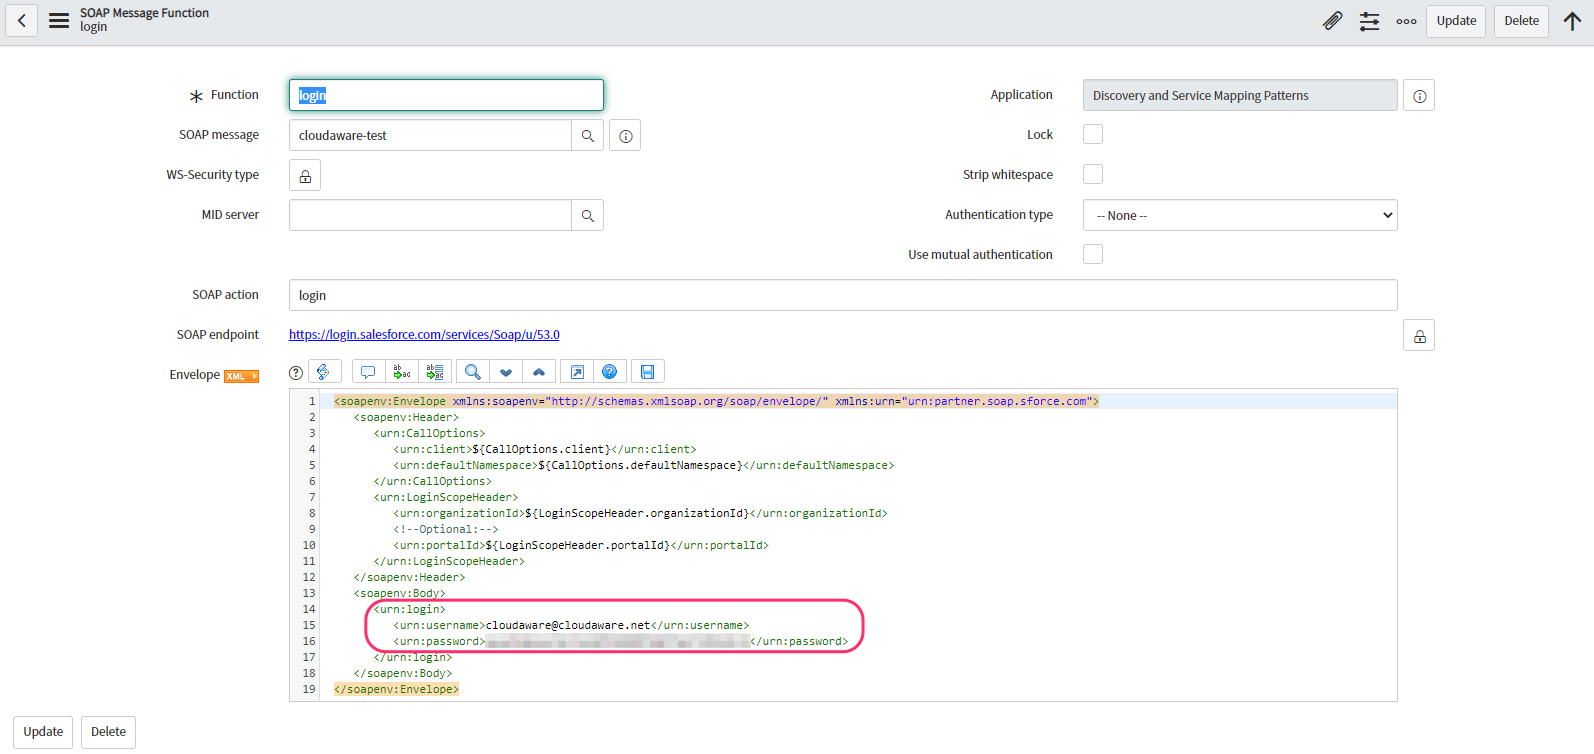
*To generate a security token that should be added to the password, log into Salesforce as ServiceNow Collector user (see the step Create Salesforce User above). Under your user pic click Settings. Select Personal → Reset My Security Token → click Reset Security Token. Check the email to get a new security token. NOTE: The token reset must be done only for the collector user that was created specifically for this integration!
Click Test. You must receive an HTTP 200 response before proceeding.
Copy values of <serverUrl> and <sessionId>:
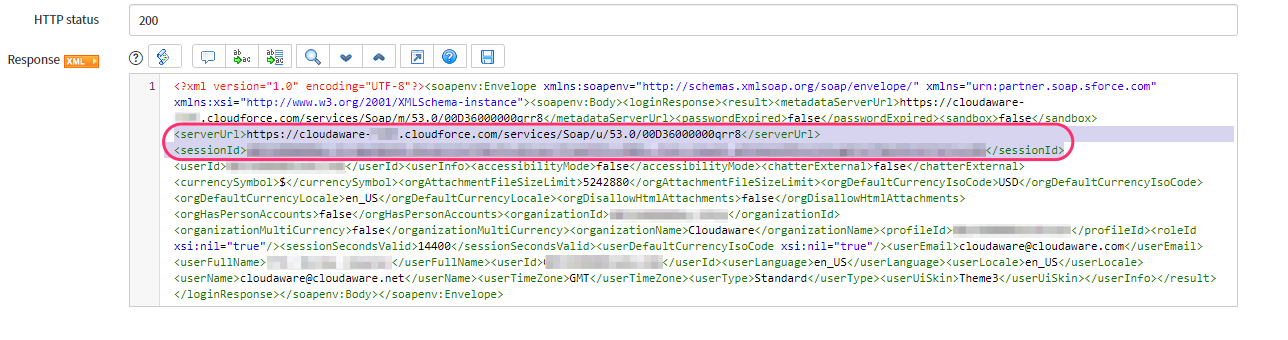
Save the values as they will be required later.
Querying and Inserting Data
After the login request is successful, you are able to retrieve any data stored in Cloudaware/Salesforce into ServiceNow into any ServiceNow object. For example, you can retrieve objects such as:
EC2 Load Balancers as EC2 Load Balancer in ServiceNow
Cloudaware Policy Violations as ServiceNow Incidents
Cloudaware Changes as ServiceNow Change Requests
Under Outbound SOAP Messages go to Functions. Select query:

Click the Lock sign to edit the SOAP endpoint URL. Insert the link copied from <serverUrl> earlier.
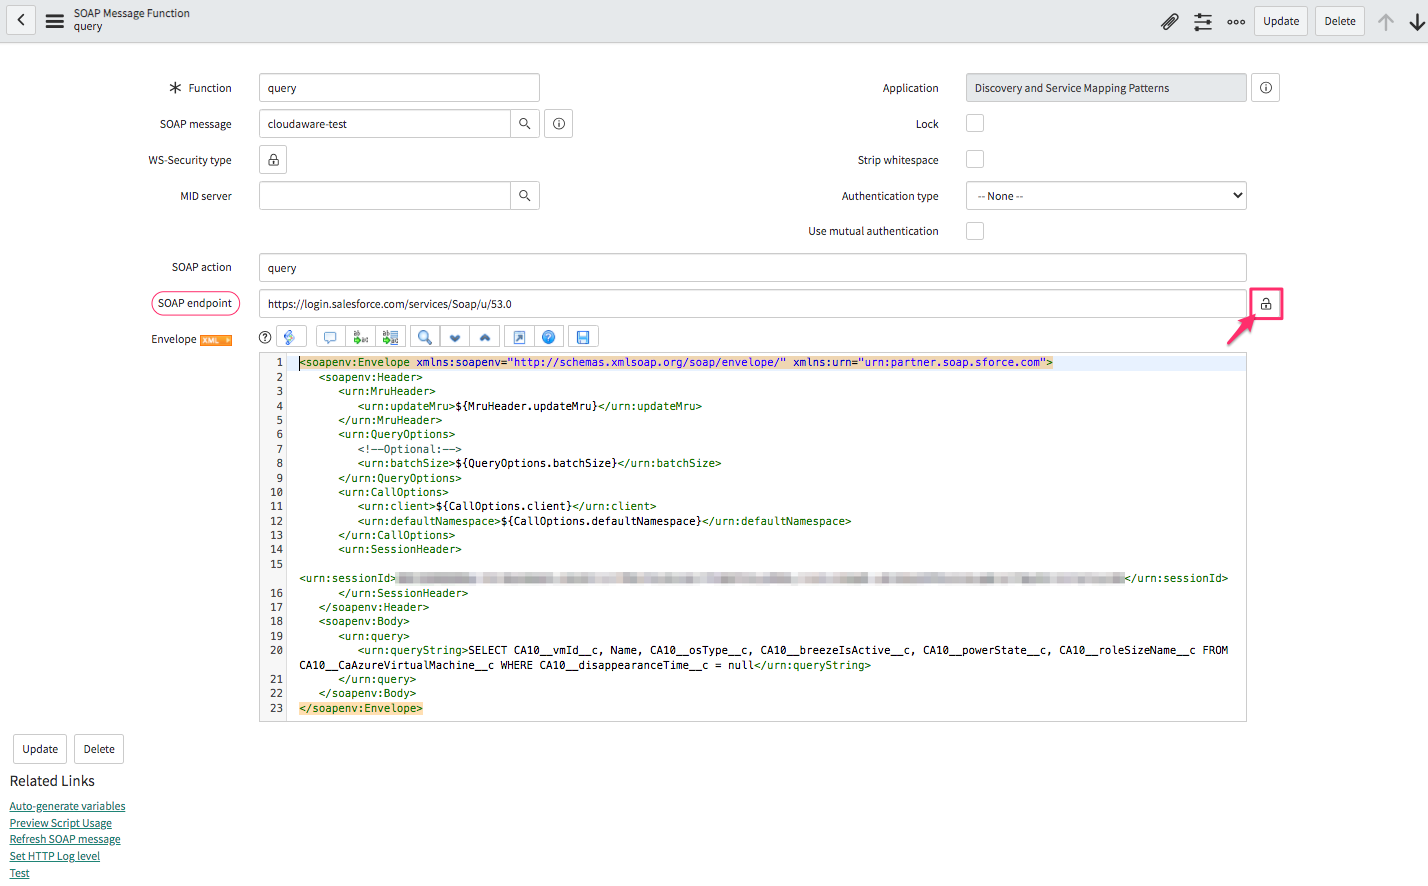
Remove the following query part starting from <urn:MruHeader> to <urn:SessionHeader> in the Envelope body message:
      <urn:MruHeader>
         <urn:updateMru>${MruHeader.updateMru}</urn:updateMru>
      </urn:MruHeader>
      <urn:QueryOptions>
         <!--Optional:-->
         <urn:batchSize>${QueryOptions.batchSize}</urn:batchSize>
      </urn:QueryOptions>
      <urn:CallOptions>
         <urn:client>${CallOptions.client}</urn:client>
         <urn:defaultNamespace>${CallOptions.defaultNamespace}</urn:defaultNamespace>
      </urn:CallOptions>
The Envelope body message should look like below:
<soapenv:Envelope xmlns:soapenv="http://schemas.xmlsoap.org/soap/envelope/" xmlns:urn="urn:partner.soap.sforce.com">
   <soapenv:Header>

      <urn:SessionHeader>
         <urn:sessionId>SAMPLESESSIONID</urn:sessionId>
      </urn:SessionHeader>
   </soapenv:Header>
   <soapenv:Body>
      <urn:query>
         <urn:queryString>SELECT CA10__vmId__c, Name, CA10__osType__c, CA10__breezeIsActive__c, CA10__powerState__c, CA10__roleSizeName__c FROM CA10__CaAzureVirtualMachine__c WHERE CA10__disappearanceTime__c = null</urn:queryString>
      </urn:query>
   </soapenv:Body>
</soapenv:Envelope>
WHERE SAMPLESESSIONID is a placeholder for your session id copied from <sessionId>
Type the query after urn:queryString to specify data that will be extracted (see the example below). Click Test.

You can use different queries to extract different pieces of data from Cloudaware. Here are some examples:
AWS EC2 Instance:
SELECT CA10__instanceId__c, Name, CA10__platform__c, CA10__instanceType__c FROM CA10__CaAwsInstance__c LIMIT 10Azure Virtual Machine:
SELECT CA10__vmId__c, Name, Subscription_Name__c, CA10__osType__c, CA10__breezeIsActive__c, CA10__powerState__c, CA10__roleSizeName__c FROM CA10__CaAzureVirtualMachine__c WHERE CA10__disappearanceTime__c = nullvCenter Virtual Machine:
SELECT Name, CA10V__virtualMachineId__c, CA10V__hostId__c, CA10V__powerState__c, CA10V__cpuCount__c, CA10V__memorySizeMiB__c FROM CA10V__CaVCenterVirtualMachine__c WHERE CA10V__disappearanceTime__c = nullMore samples:
SELECT Id, Name, CA10__subject__c FROM CA10__CaPolicyViolation__c LIMIT 10 SELECT Id, Subject FROM Case SELECT Id, Name, CA10__accountId__c FROM CA10__CaAwsAccount__c SELECT Id, Name, CA10__arn__c, CA10__mfaEnableDate__c, CA10__lastLoginDateTime__c FROM CA10__CaAwsUser__c For a reference list of all fields, contact your account manager via tam@cloudaware.com or download Enterprise WSDL from the step Export Partner WSDL.
Note that a query returns 500-2000 records depending on batch size. More about limits
Cloudaware Setup
1. Log in to your Cloudaware account. Сlick Admin in the main menu under your username.
2. Locate ServiceNow in the list of Issue Management tools. Click +Add.

3. Fill out the form and click Save.
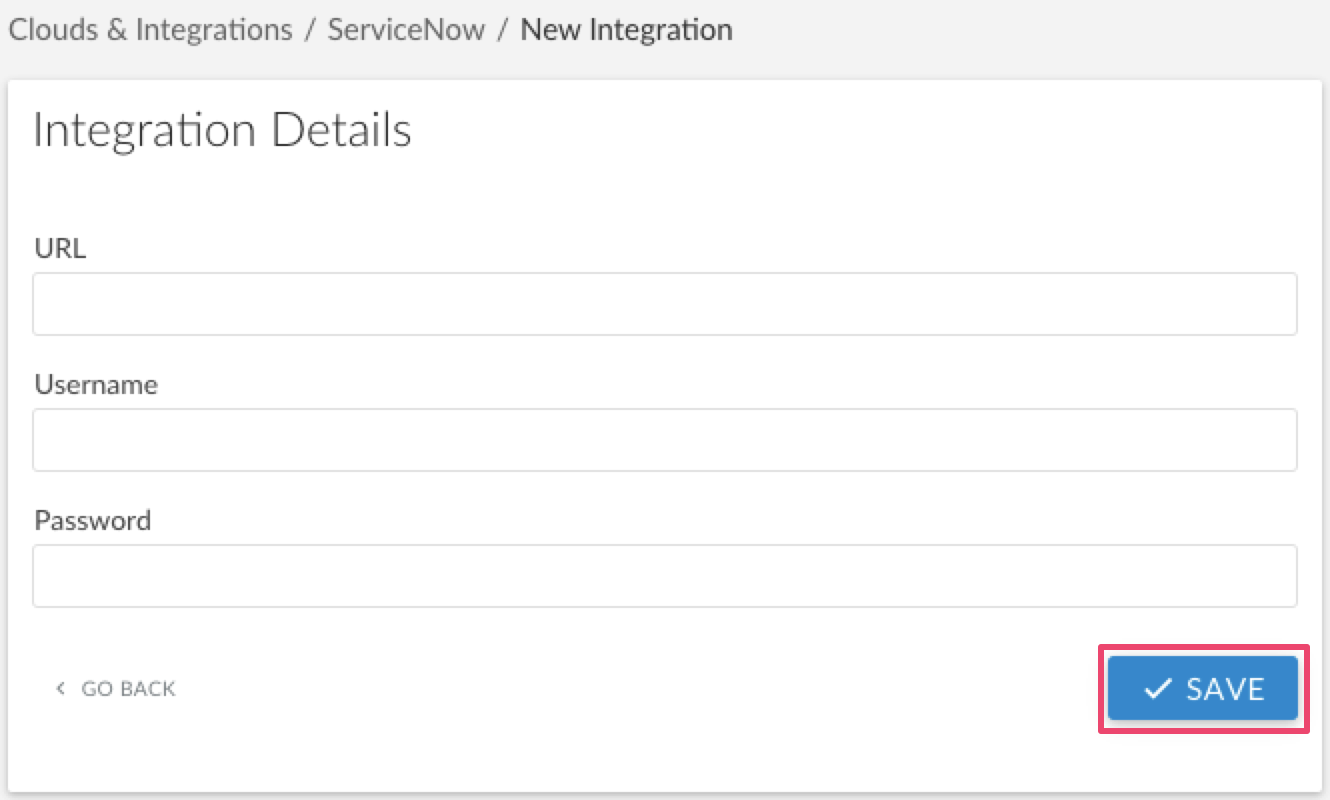
URL - insert the URL to your ServiceNow instance
4. The green light in 'Status' means that ServiceNow account has been successfully added. If there is red light, please contact support@cloudaware.com.

Cloudaware can also initiate API calls to ServiceNow from inside Cloudaware workflows, triggers and actions. For example, when a change request is made in Cloudaware, we can submit it in real time to ServiceNow using an outbound message within Cloudaware. The outbound message functionality of Cloudaware is described here.
Contrary to the previous example, Inbound SOAP Messages can be configured in ServiceNow and referenced in Cloudaware.