Rally Notification
Rally is an enterprise-class platform that is purpose-built to scale agile development practices. This guide explains how to configure the creation of Rally Defects based on specific criteria in Cloudaware.
![]() To see how Cloudaware seamlessly integrates with Rally in action, request a demo.
To see how Cloudaware seamlessly integrates with Rally in action, request a demo.
Add a Rally server
Log in to Cloudaware → Admin.

Find Rally Notification in Other Integrations. Click +ADD.

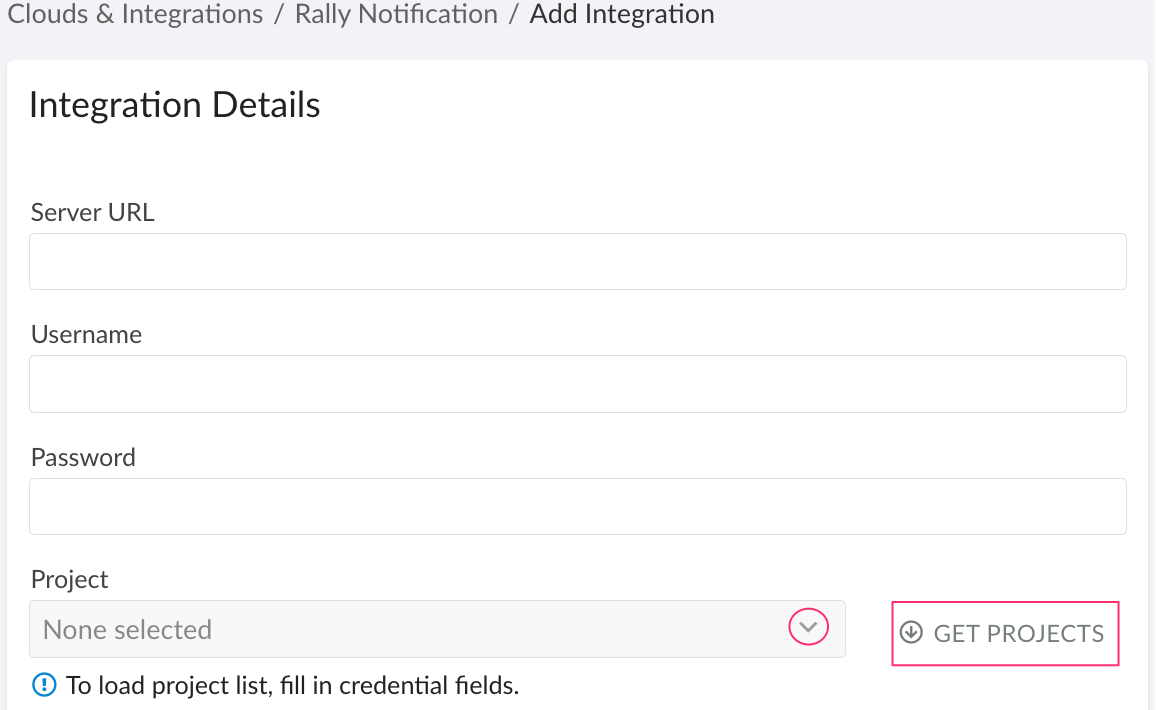
Fill out the form:
WHERE
Server URL – for SaaS Rally, use the server URL in the formathttps://rally1.rallydev.com/(US) orhttps://eu1.rallydev.com/(EU) depending on location; for on-prem Rally, use the public server URL
Username – the Rally username
Password – the Rally password
Click GET PROJECTS. Select a Rally project from the drop-down list.
Set up a Defect details that will be displayed in Rally: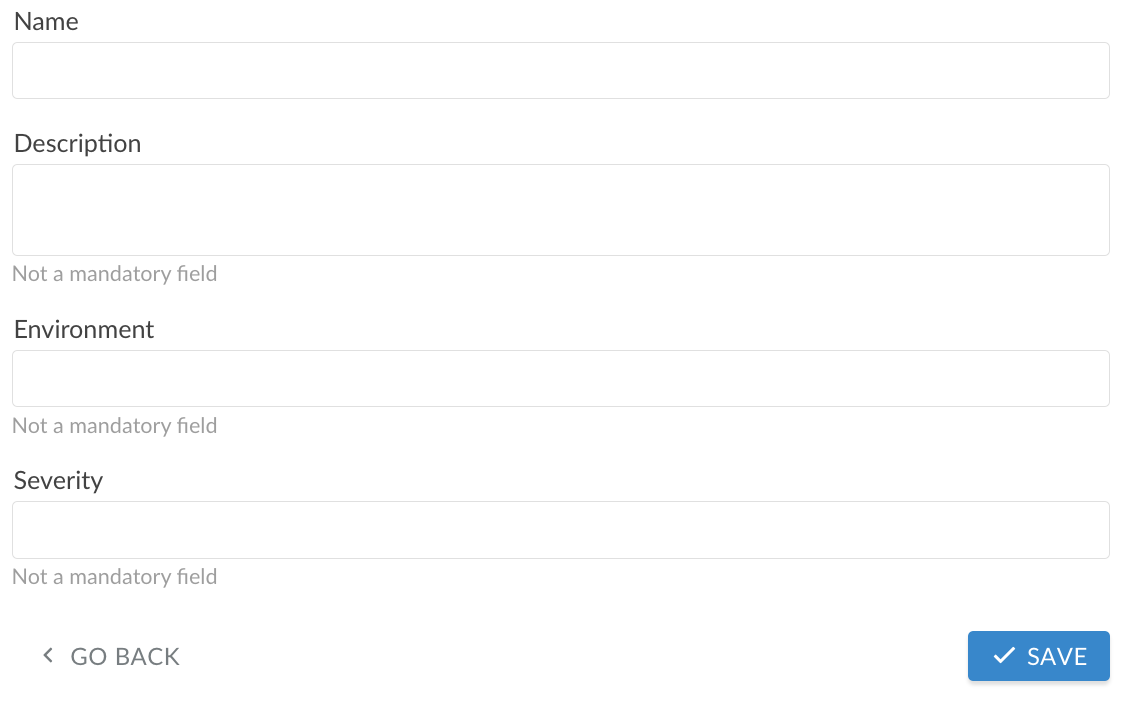
WHERE
Name – a descriptive name for the Rally Defect, e.g. New compliance violation
Description – the Defect description in.htmlformat
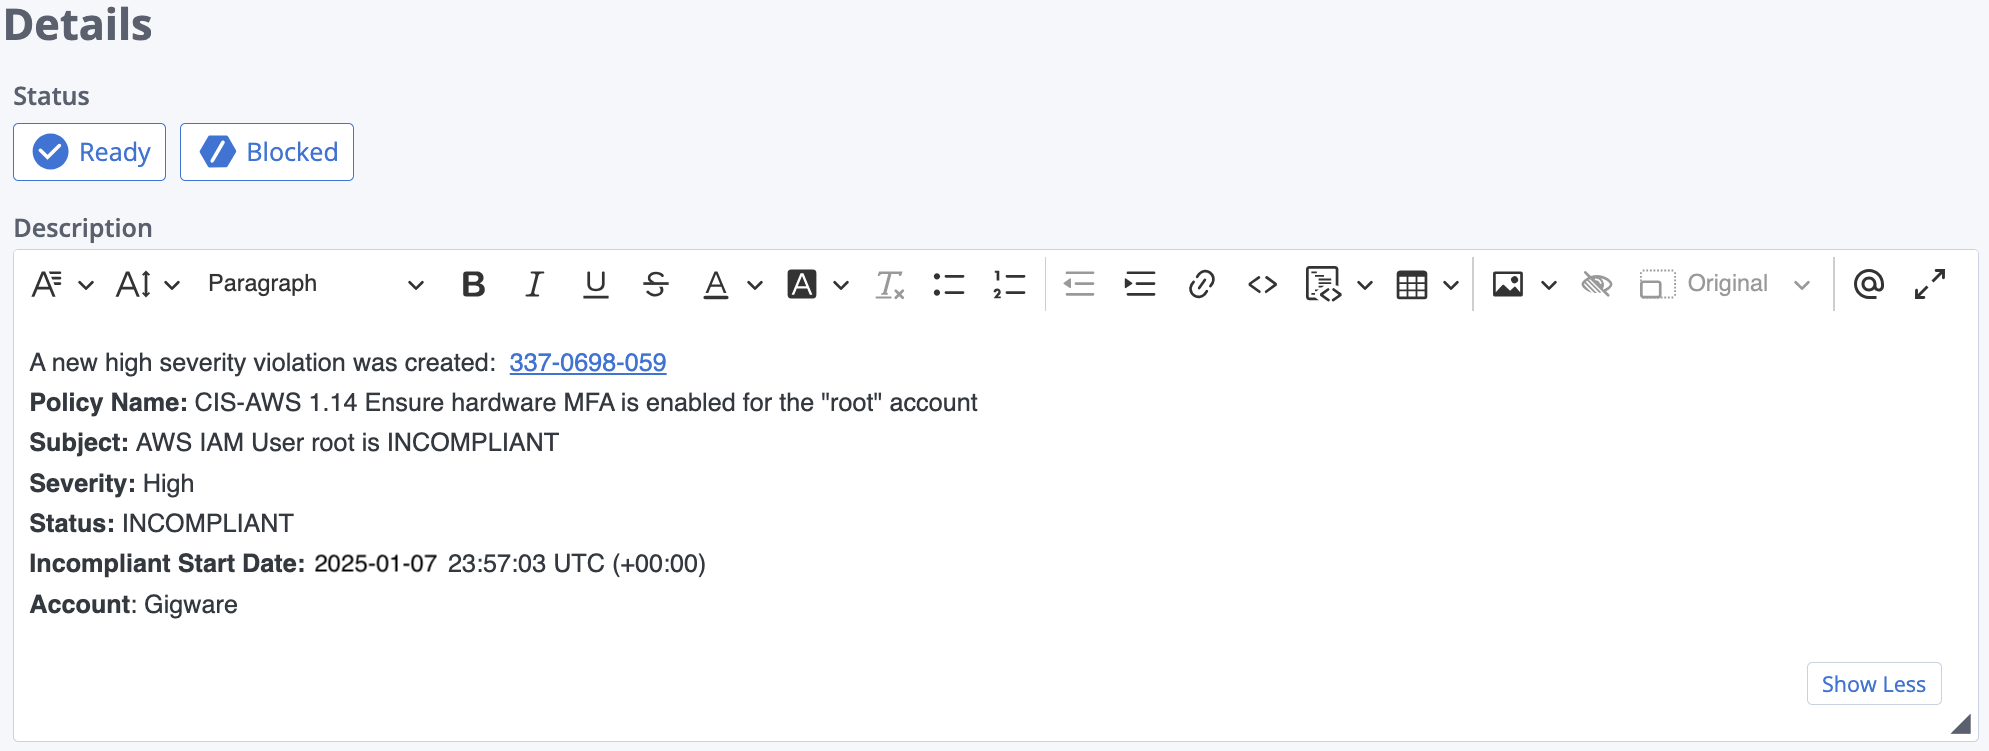
Sample description with the CIS Benchmark Check fields:CODE'<p>New high severity violation: <a class="cke-link-popover-active" href="https://cloudaware-000.lightning.force.com/' + sObject.Id + '">' + sObject.Name + '</a></p>' + '<p><strong>Policy Name:</strong> ' + sObject.Policy_Name__c + '<br />' + '<strong>Subject:</strong> ' + sObject.CA10__subject__c + '<br />' + '<strong>Severity:</strong> ' + sObject.Severity__c + '<br />' + '<strong>Status:</strong> ' + sObject.CA10__status__c + '<br />' + '<strong>Incompliant Start Date:</strong> ' + sObject.CA10__incompliantStartDate__c + '<br />' + '<strong>Account</strong>: ' + sObject.CA10__awsAccount__c + '</p>'WHERE
https://cloudaware-000.lightning.force.com/is a placeholder for a dedicated Cloudaware instance web address link
Environment (optional) – specify Rally environment (Development, Test, Staging, Production)
Severity (optional) – specify Defect severity (Crash/Data Loss, Major Problem, Minor Problem, Cosmetic)
If values in Environment and Severity fields differ from the accepted ones, they will not be defined in a Defect. Cloudaware also supports JS expressions, e.g. sObject.Severity__c can be used to define the field that should be present as a Defect attribute.
Click SAVE.
A green light in the ‘Status’ column indicates successful configuration. If the light is red, contact support@cloudaware.com.

Set up notifications
Cloudaware uses flows to send notifications to Rally. Set up a flow to create Rally defects (notifications) whenever specific criteria are met.
Use case: A security team configures alerts for incompliant benchmark checks with high severity. Whenever a new high-severity benchmark check is created and the ‘Incompliant End Date’ field remains blank as the violation is still open, Cloudaware triggers the flow to create a new Rally defect.
Сonfigure an outbound message
In Cloudaware CMDB Navigator, go to Setup.
In the Quick Find bar, type Outbound → under Workflow Actions, select 'Outbound Message' → New Outbound Message.
From the drop-down list, select the object (for this example, CloudAware Benchmark Check). Click Next.
Configure the outbound message:
Name – enter a descriptive name, e.g. Rally Defect: New Incompliant Benchmark Check
Endpoint URL – paste the saved URL from the Rally Notification integration in Cloudaware
Selected Fields – drag fields from the 'Available Fields' to the right column using the arrow buttons, e.g.Name,CA10__subject__c,CA10__status__c,CA10__incompliantStartDate__c, andCA10__awsAccount__c(for AWS)
Click Save.
Configure a flow
After the outbound message is created, set up a flow to send notifications to Rally.
Go back to Setup.
In the Quick Find bar, type Flows → select 'Flow' → New Flow.
Select 'Start From Scratch' → Next.
Select 'Record-Triggered Flow' → Create.
Select the object, configure a trigger, and set entry conditions, e.g. for this example:
Object: CloudAware Benchmark Check
Trigger the Flow when: A record is created
Condition Requirements: All Conditions are Met (AND)
Field: Status
Operator: Equals
Value: Incompliant
AND
Field: Severity
Operator: Equals
Value: High
AND
Field: Incompliant End Date
Operator: Is Null
Value: True
Leave the tile 'Actions and Related Records' selected. Click Next.Add Action: click 'plus' sign on the flow diagram → Action → Outbound Messages → select the outbound message created earlier (in this case, Rally Defect: New Incompliant Benchmark Check).
Provide a name for the flow action, e.g. Create Rally Defect For New Incompliant Benchmark Check.
Click Save and provide a meaningful name for the flow, e.g. Rally Defect for New Benchmark Check.
Click Activate to enable the flow.
Sample Defect in Rally
Here is a sample Defect (notification) created in Rally based on the flow for Cloudaware Compliance Engine violations: