
Microsoft Azure Billing
This guide explains how to add Azure billing integration to Cloudaware. Ensure you have the necessary permissions in Microsoft Azure to configure billing exports.
Cost Management Export
Azure Cost Management exports can be configured at the Billing account level (MCA/MPA/EA) and Subscription level (MCA/MPA/MSOP/EA). Cloudaware is capable of collecting both billing account level and subscription level exports. In this guide, we use 'cloudaware-api-access' as the name of the Cloudaware app. However, your Cloudaware app name can be different.
Billing Account Level Export Discovery
Enabling Export for Billing account starts with assigning Billing account reader role to your Cloudaware app (in our example, 'cloudaware-api-access').
Replace the app name 'cloudaware-api-access' with your Cloudaware app name while completing these steps
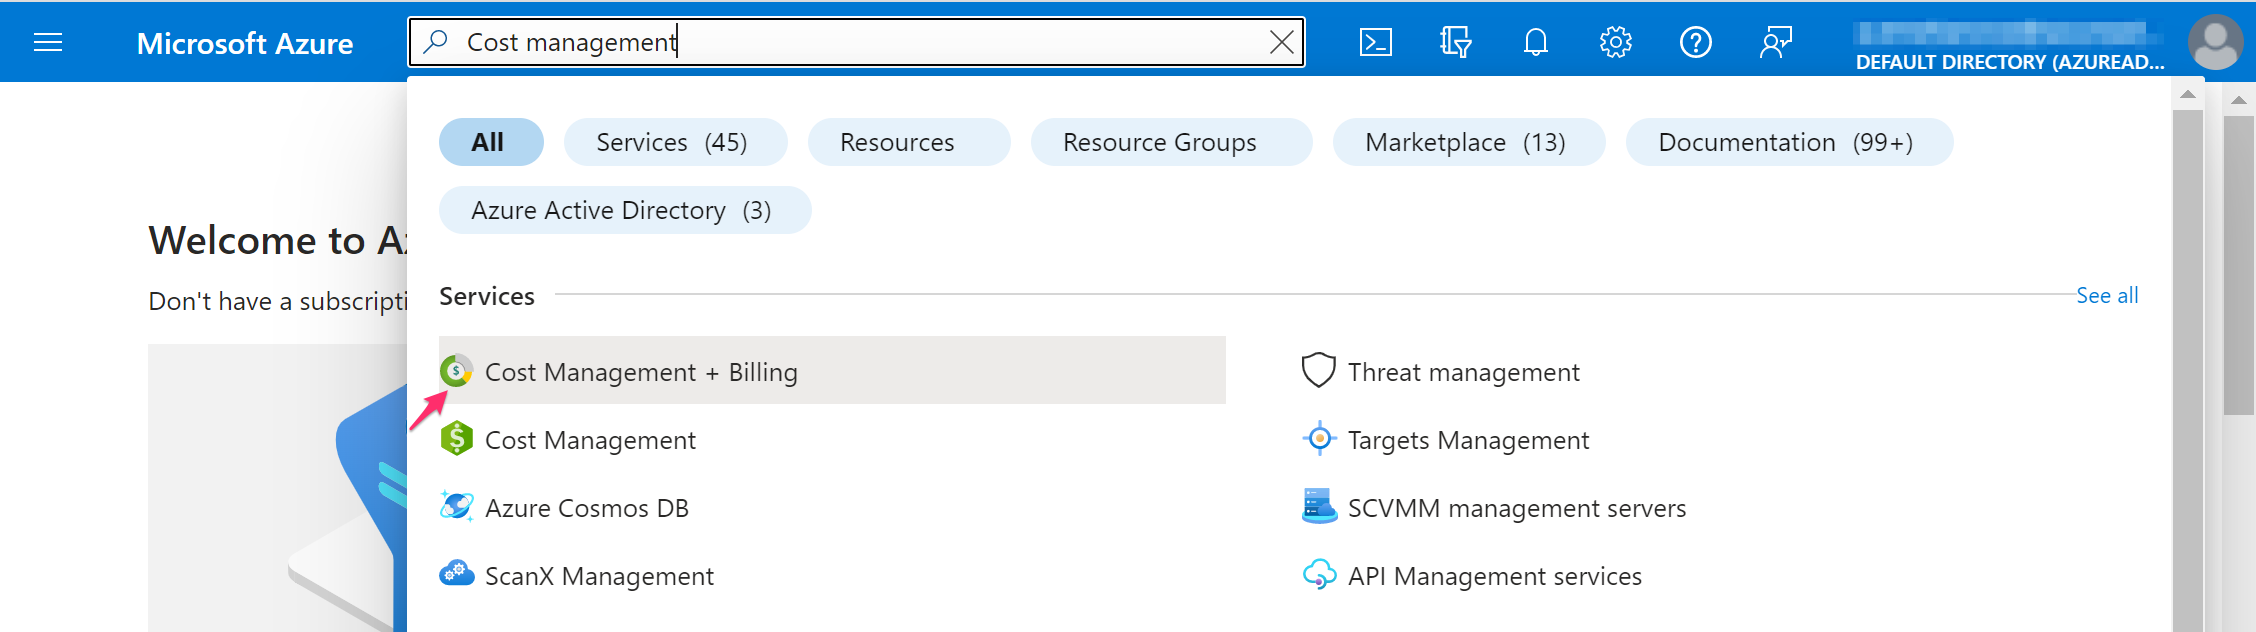
1. Log in to your Microsoft Azure Portal and navigate to the Cost Management + Billing section.
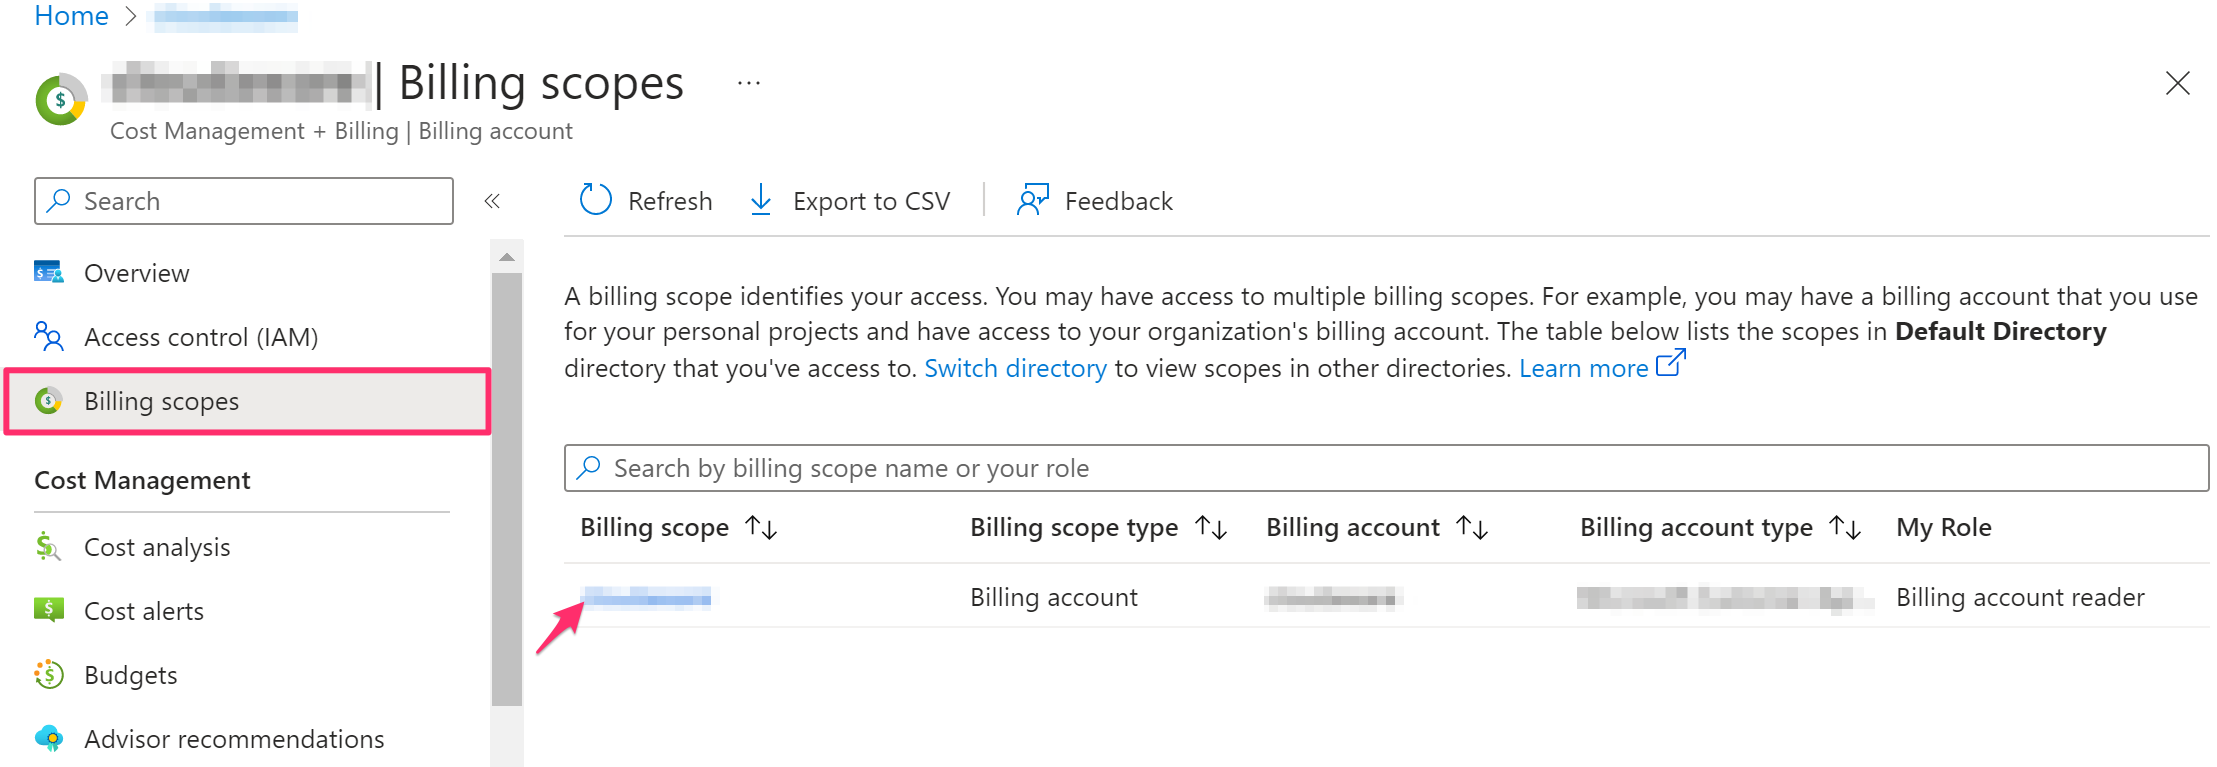
2. Navigate to Billing scopes on the left. Select a billing account from the list.
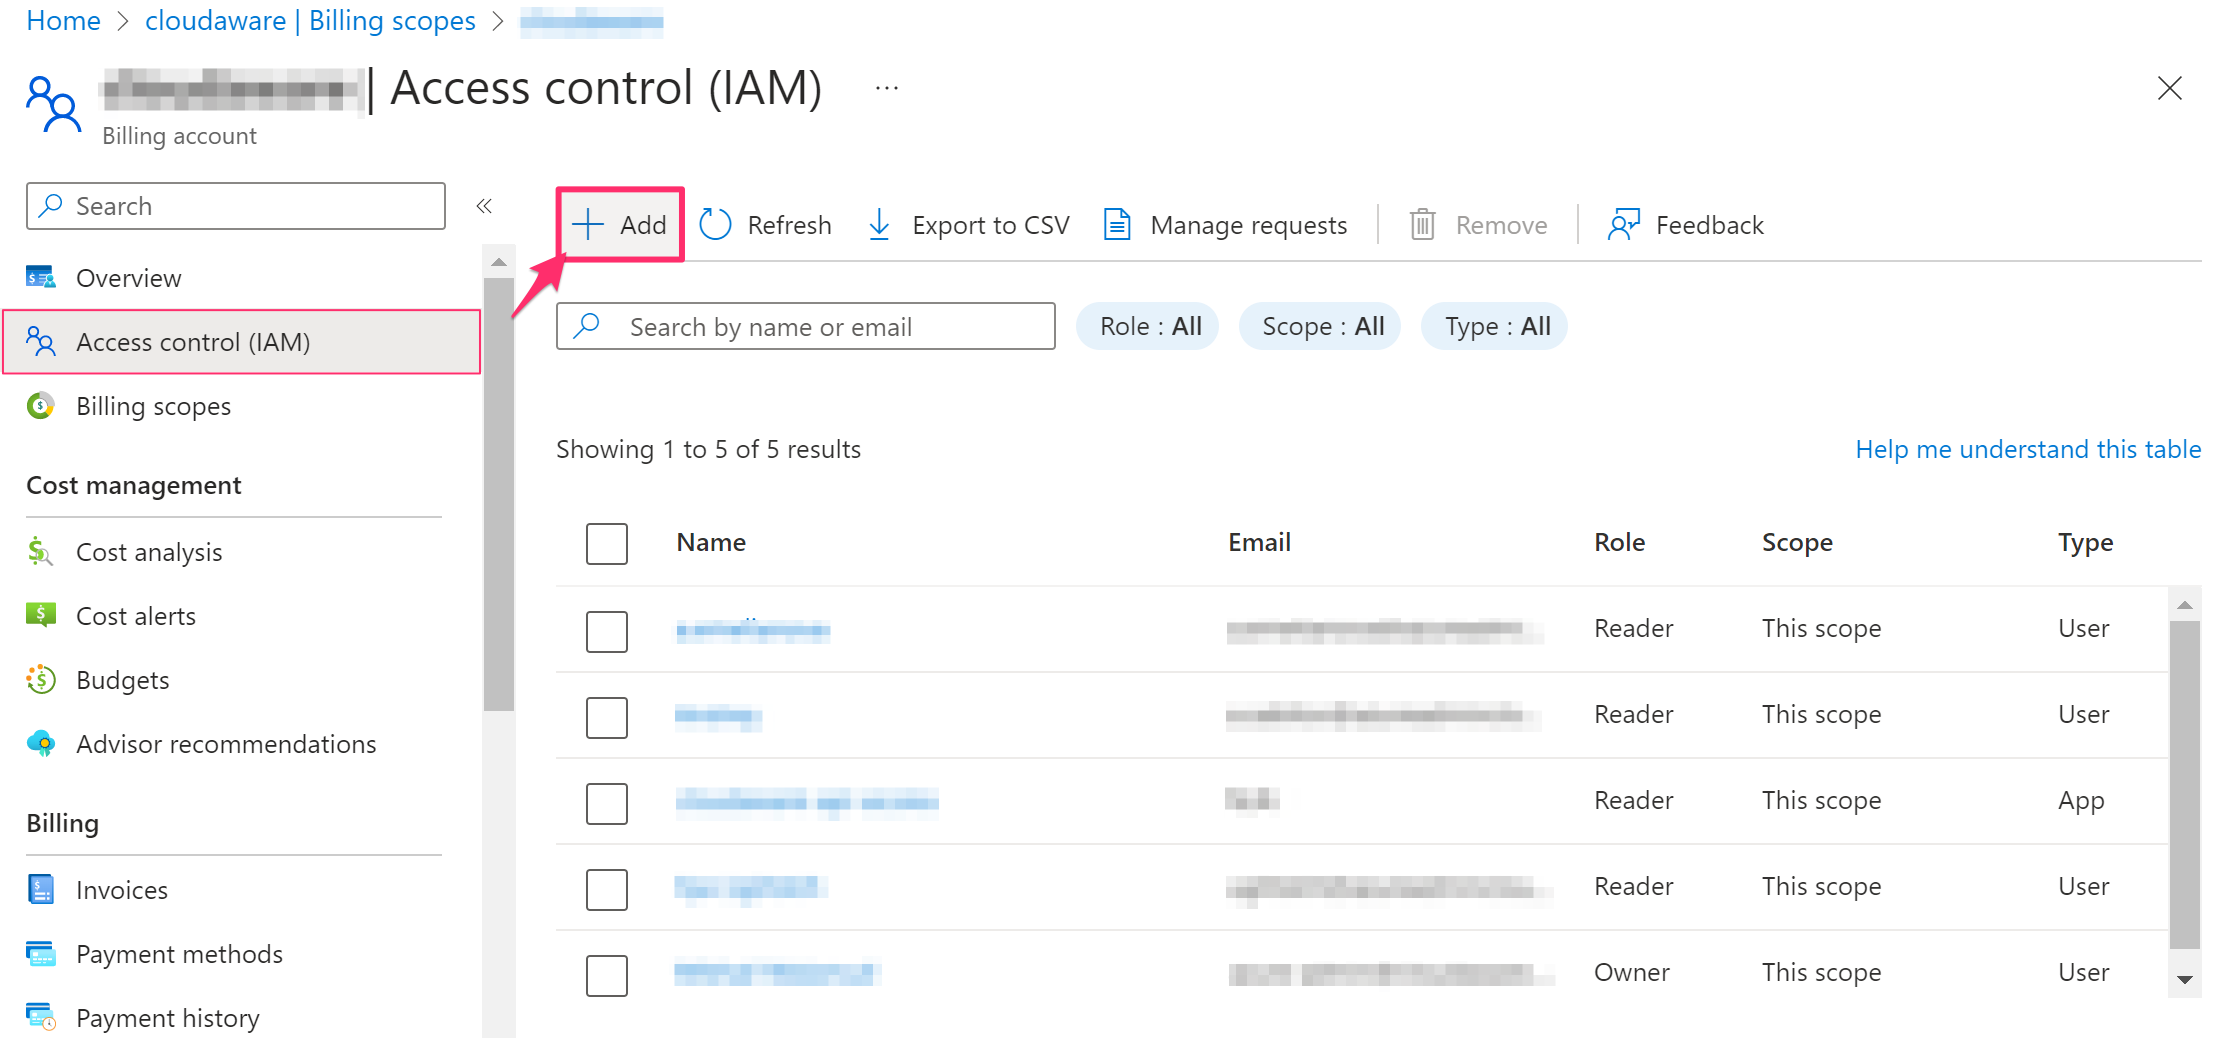
3. Navigate to Access Control (IAM) on the left. Click +Add to add a role assignment.
4. MCA/MPA customers:
Select Billing account reader (View-only access) as a Role for assignment and insert the app name (in our example, 'cloudaware-api-access') for the role assignee. Click Add.
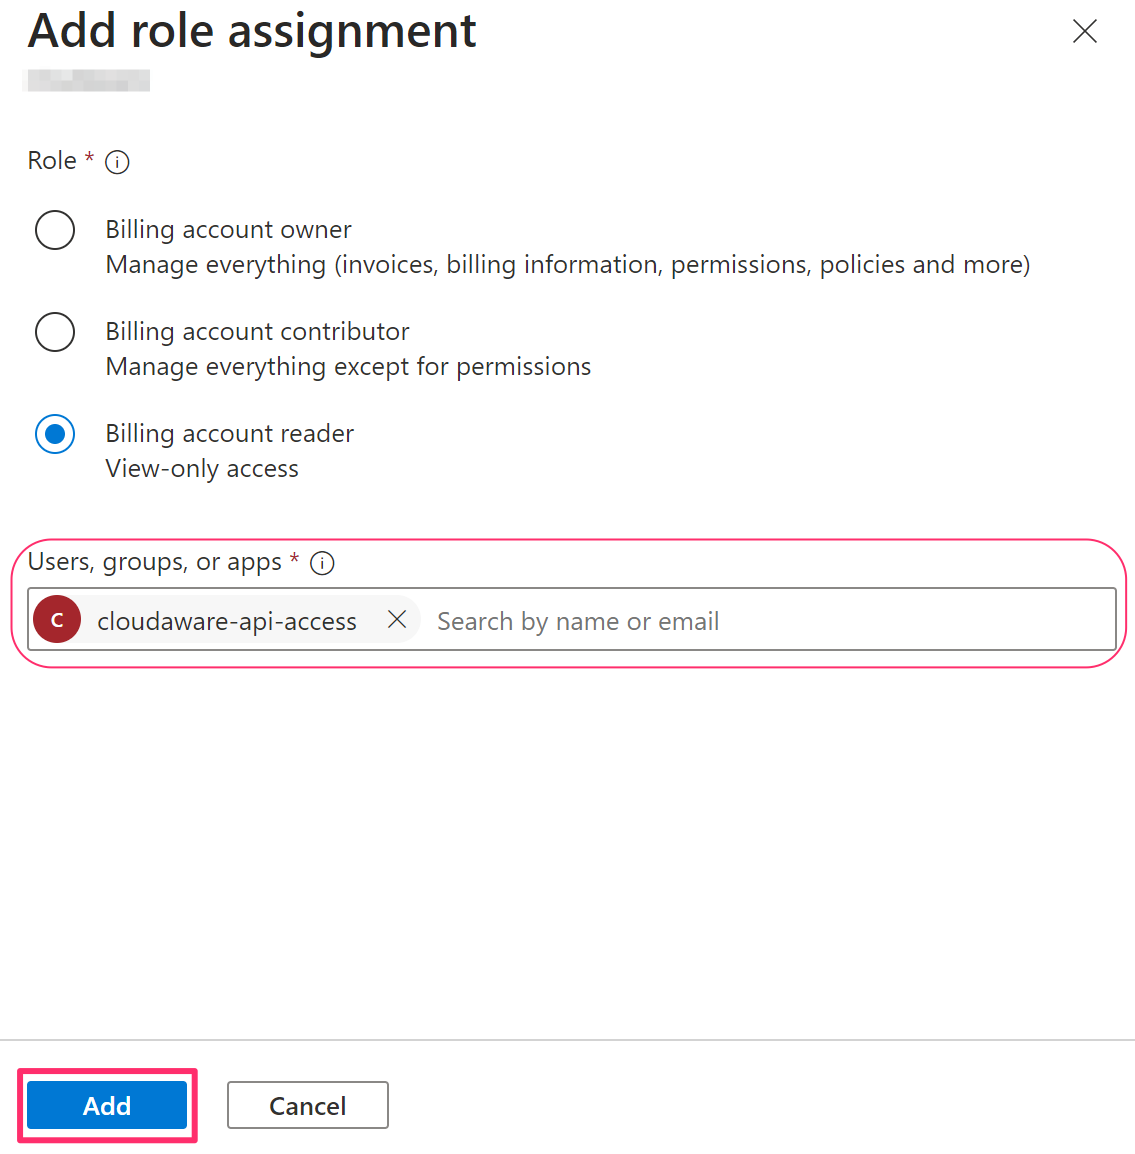
Type the app name (in our example, 'cloudaware-api-access') manually as it may be unavailable in the search suggest drop-down list
EA customers: Assign the role EnrollmentReader programmatically using this guide.
Once the role is assigned, proceed to grant Cloudaware access to the Storage account.
5. Navigate to Exports on the left. Click on the Storage account of the Export in question.
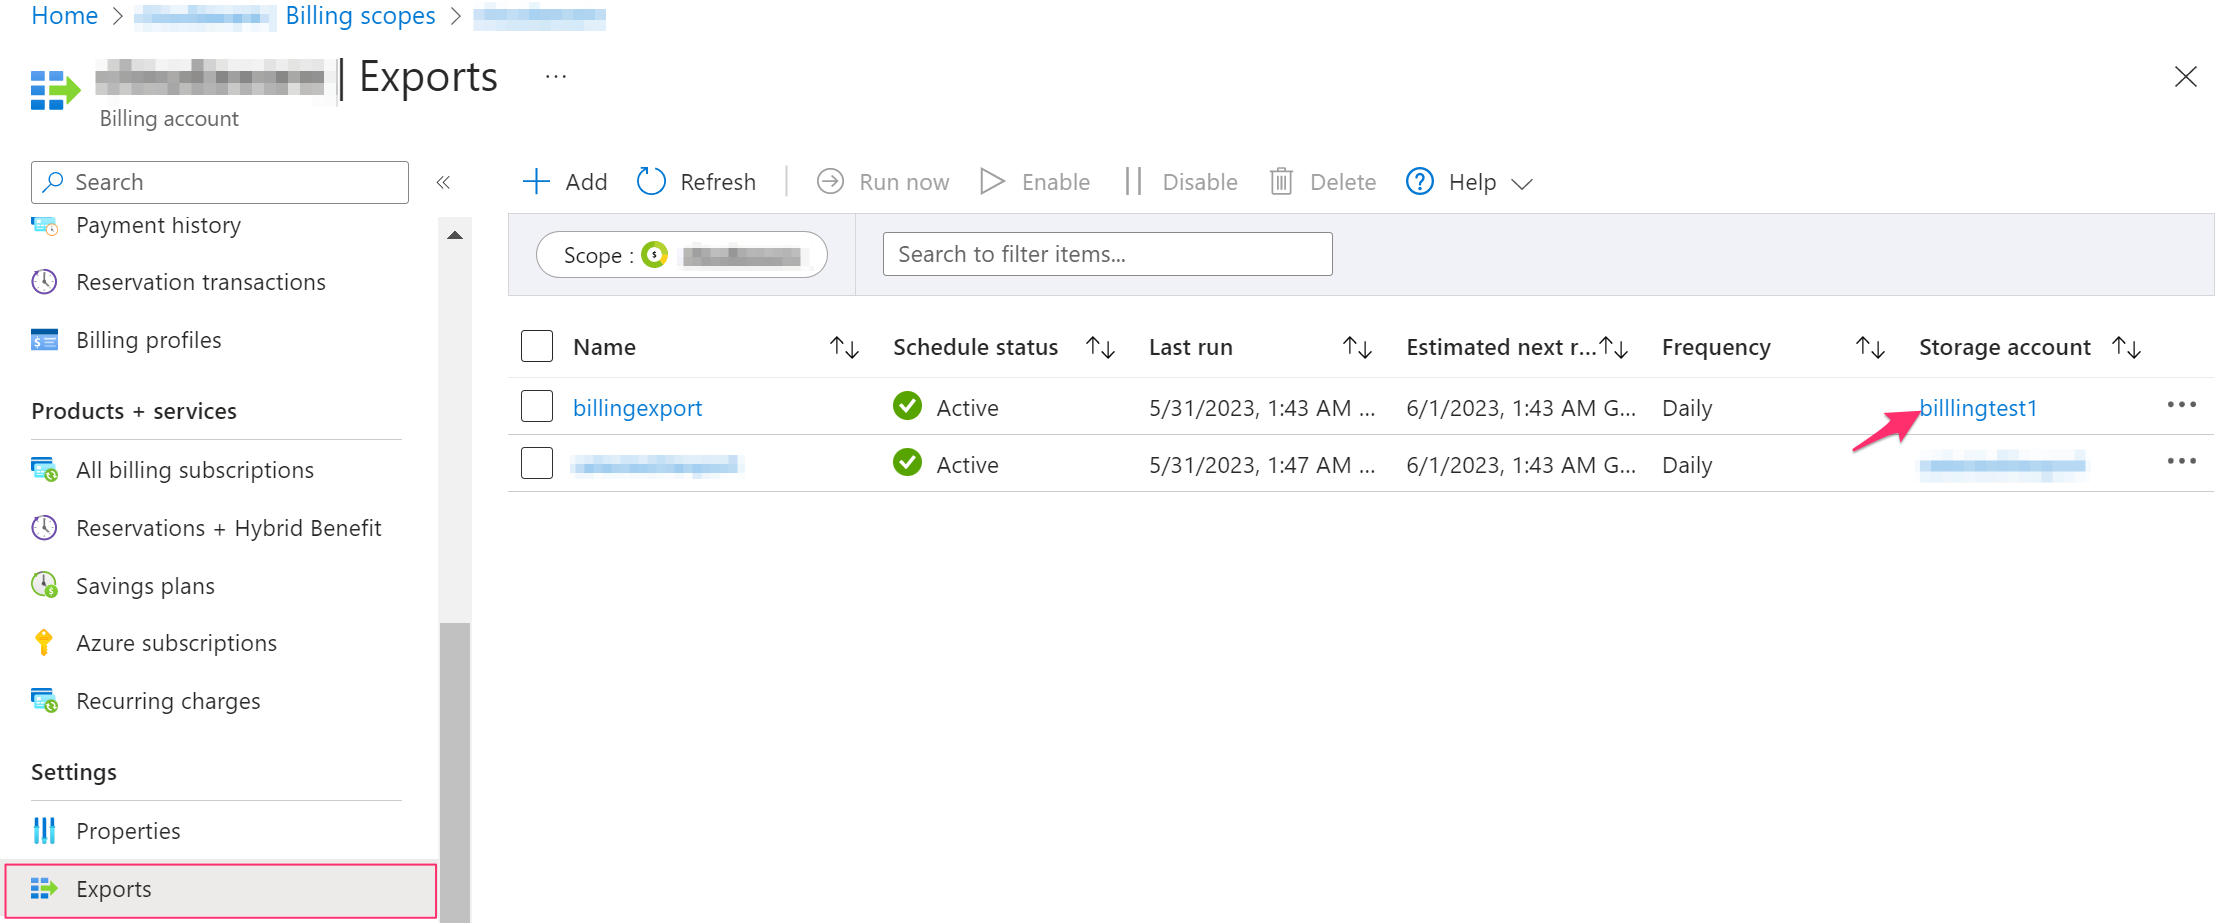
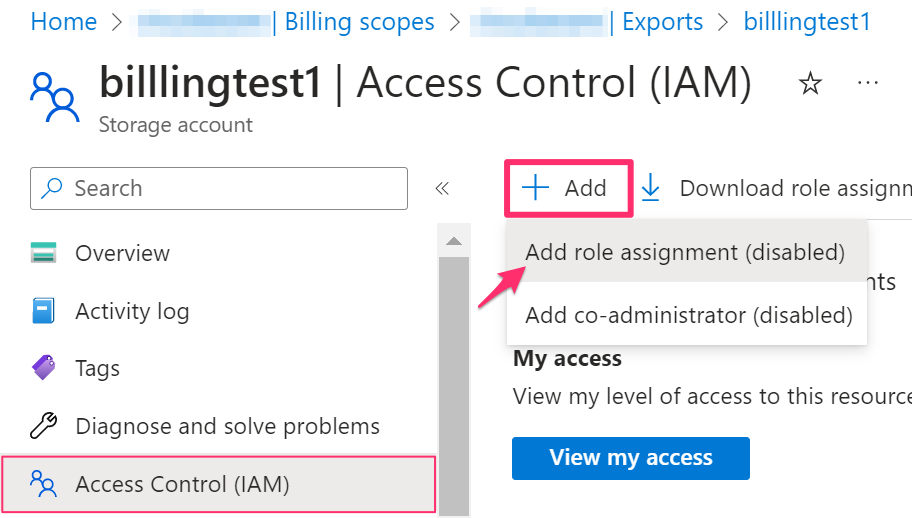
6. Navigate to Access Control (IAM) on the left. Click +Add → Add role assignment.
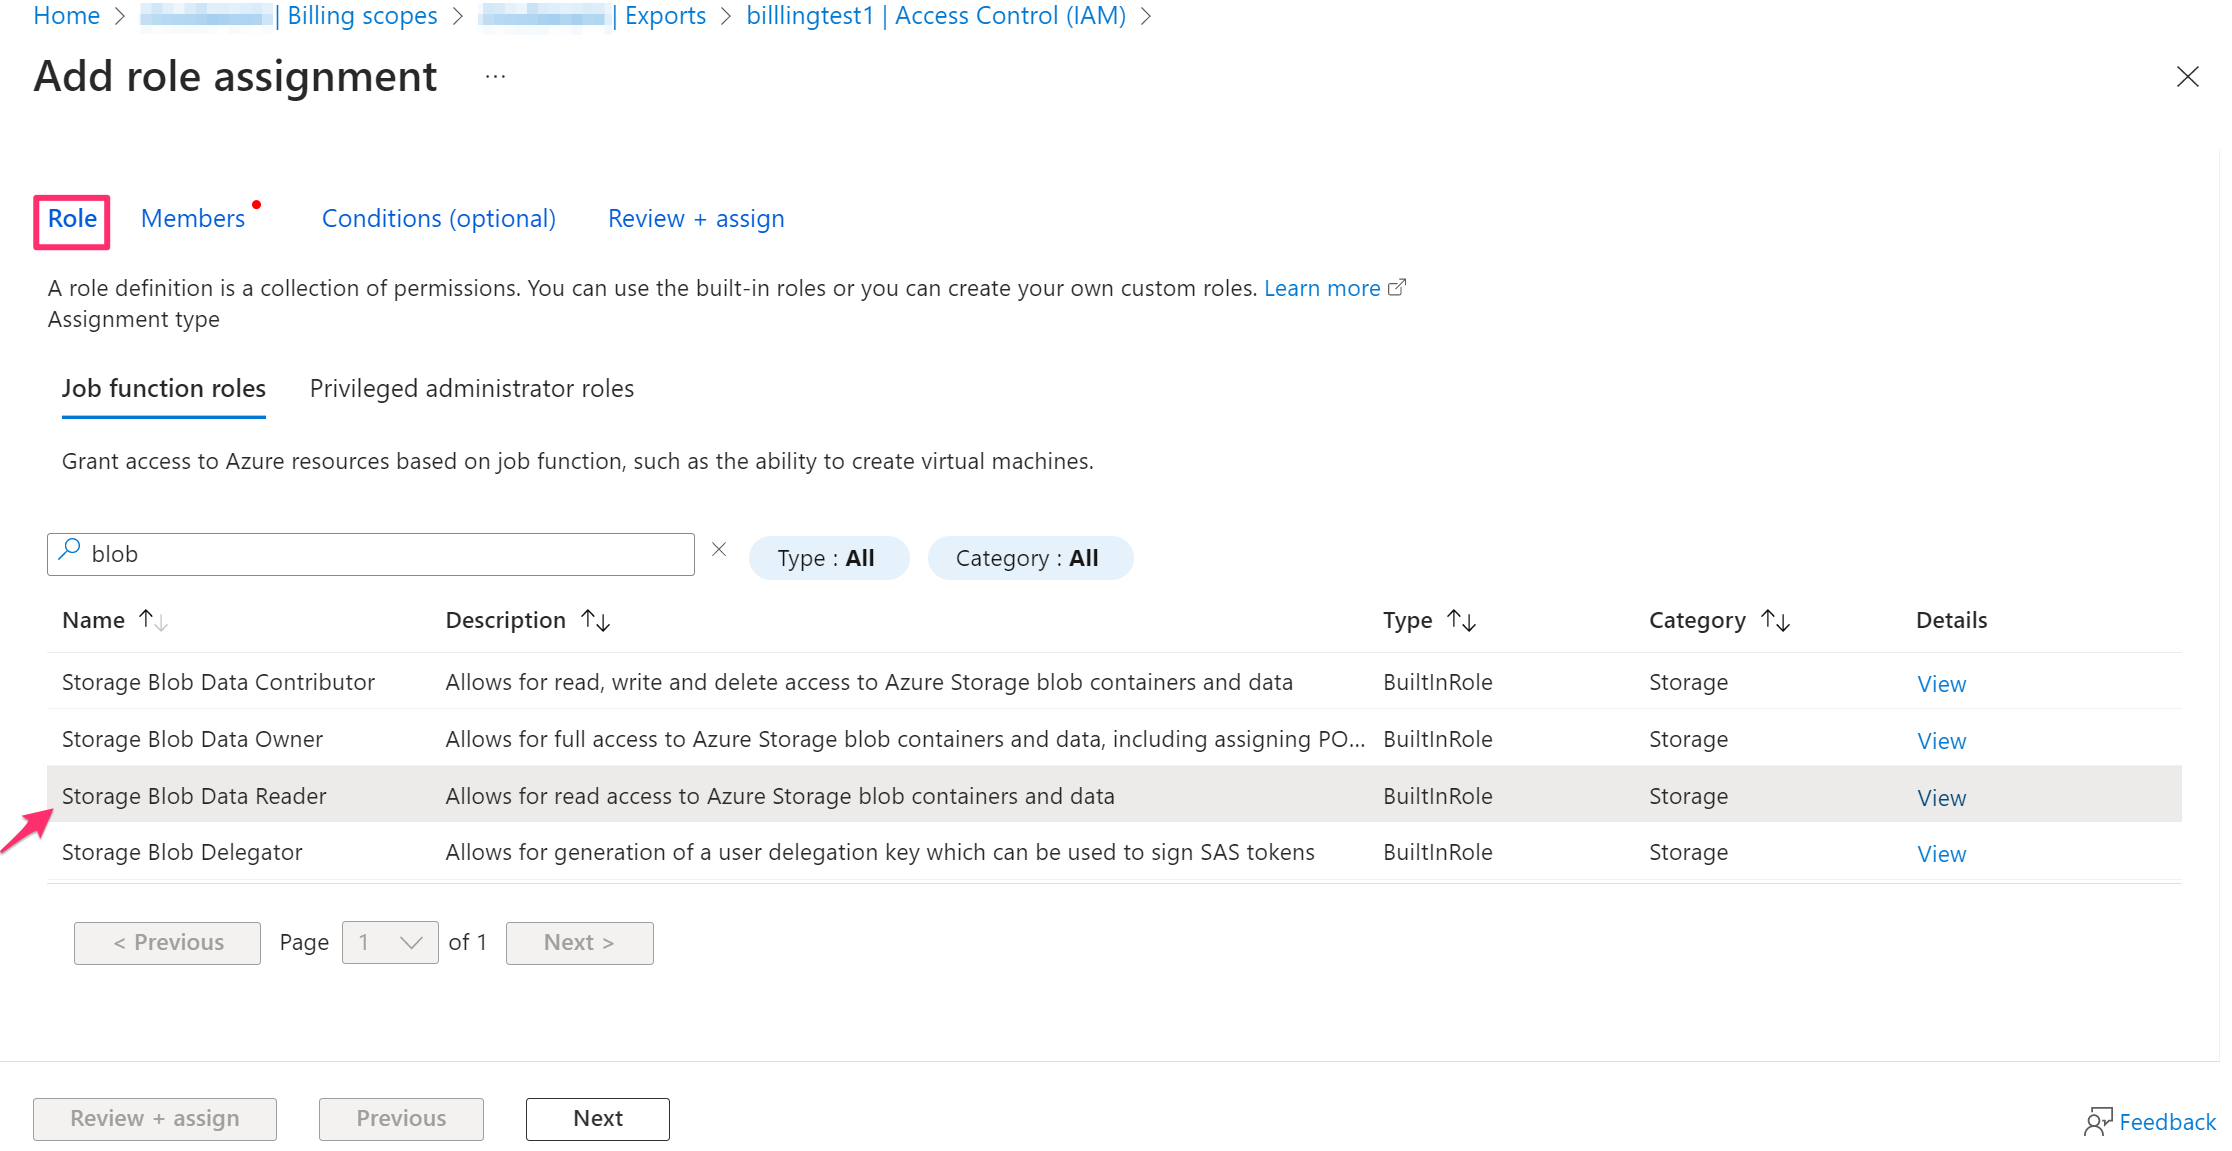
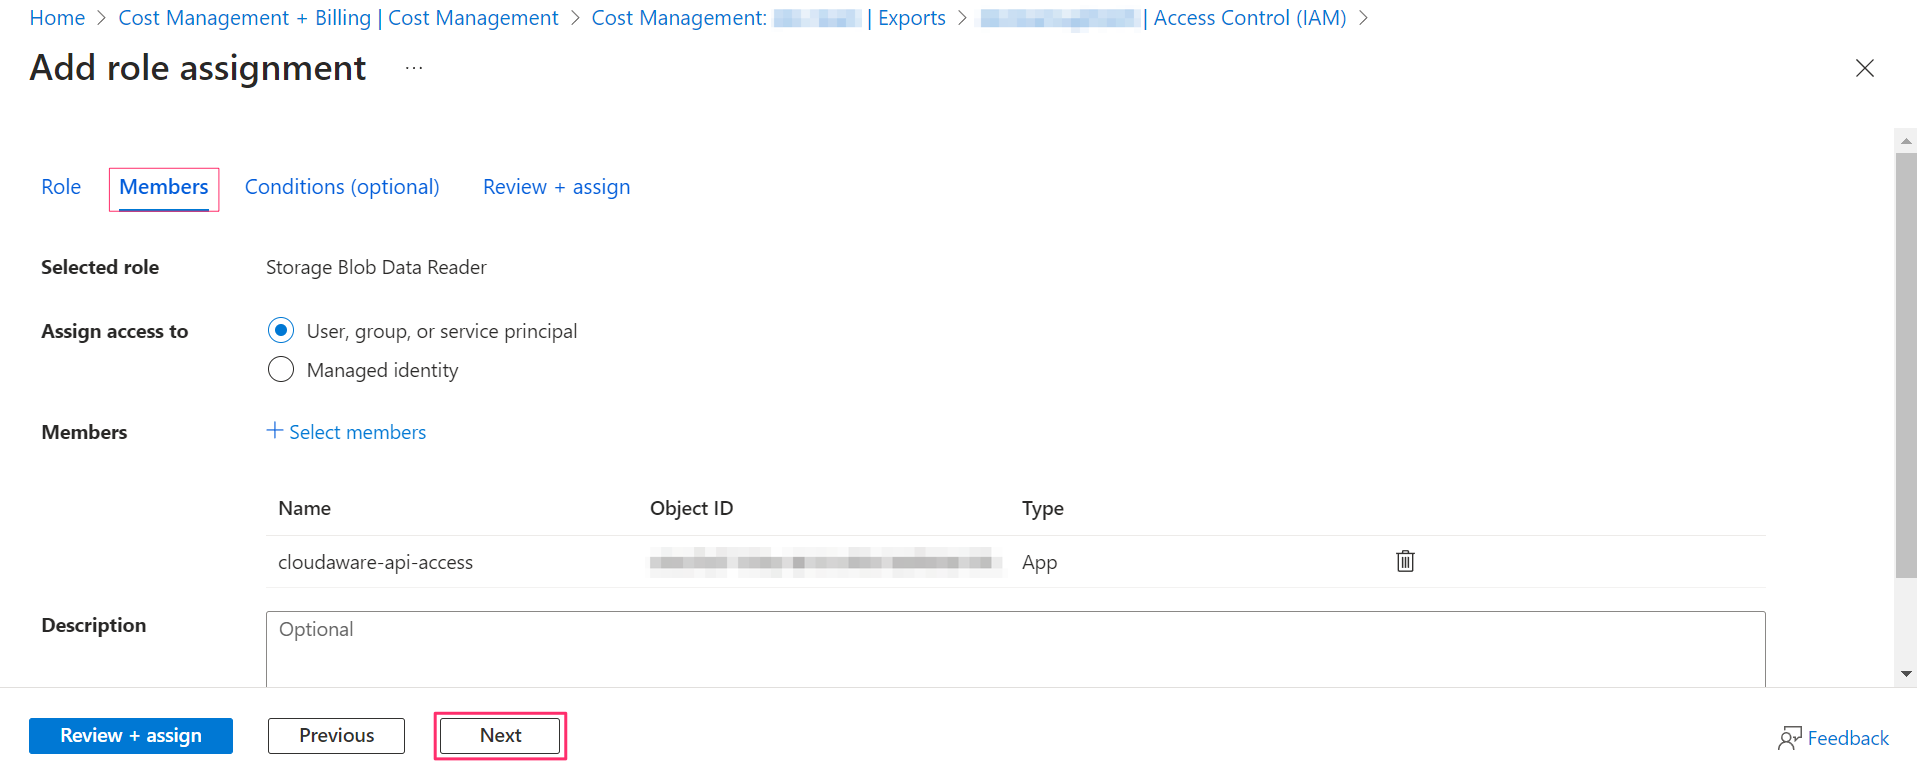
7. In the tab 'Role' of 'Add role assignment' window start typing blob into the search bar. Select Storage Blob Data Reader from the list and click Next.
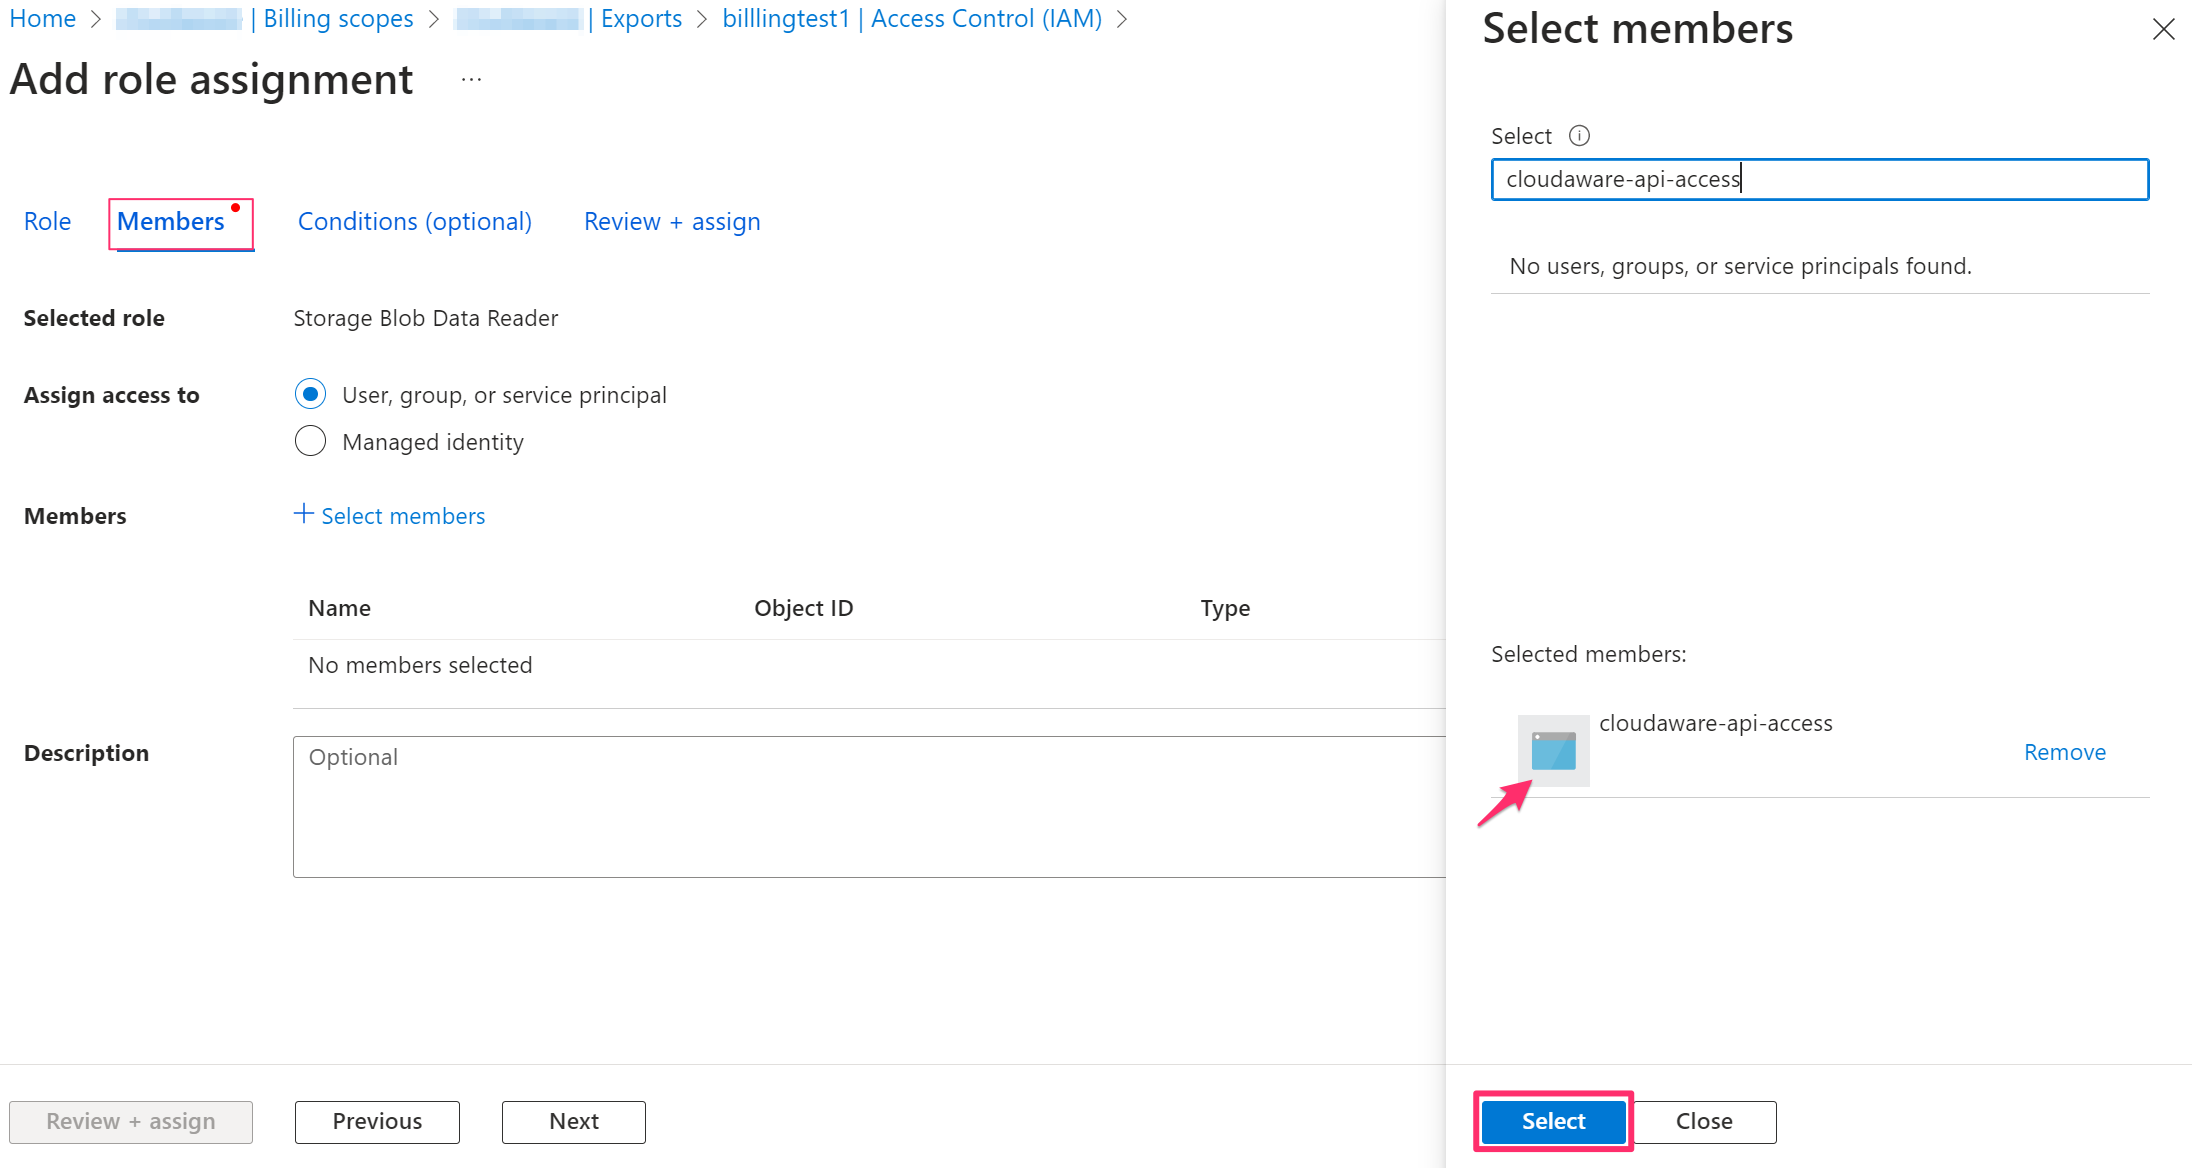
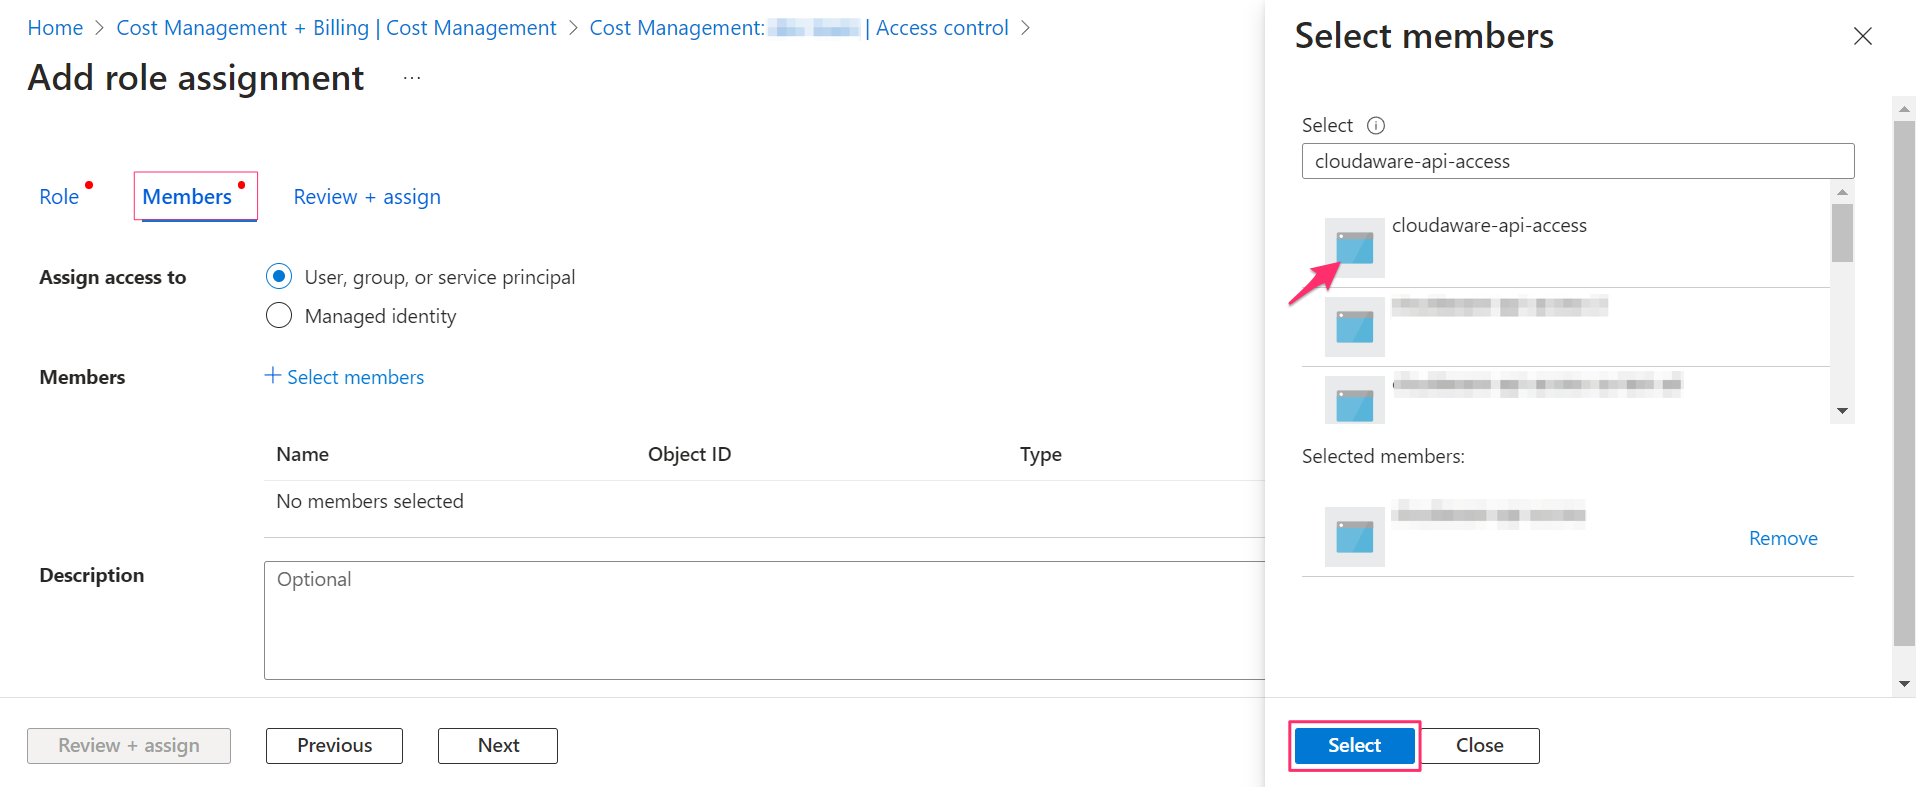
8. In the tab 'Members' of 'Add role assignment' window click +Select members. Start typing the app name (in our example, 'cloudaware-api-access') in the search bar of 'Select members' window. Select the app and click Select to add it as a selected member.
Type the app name (in our example, 'cloudaware-api-access') manually as it may be unavailable in the search suggest drop-down list
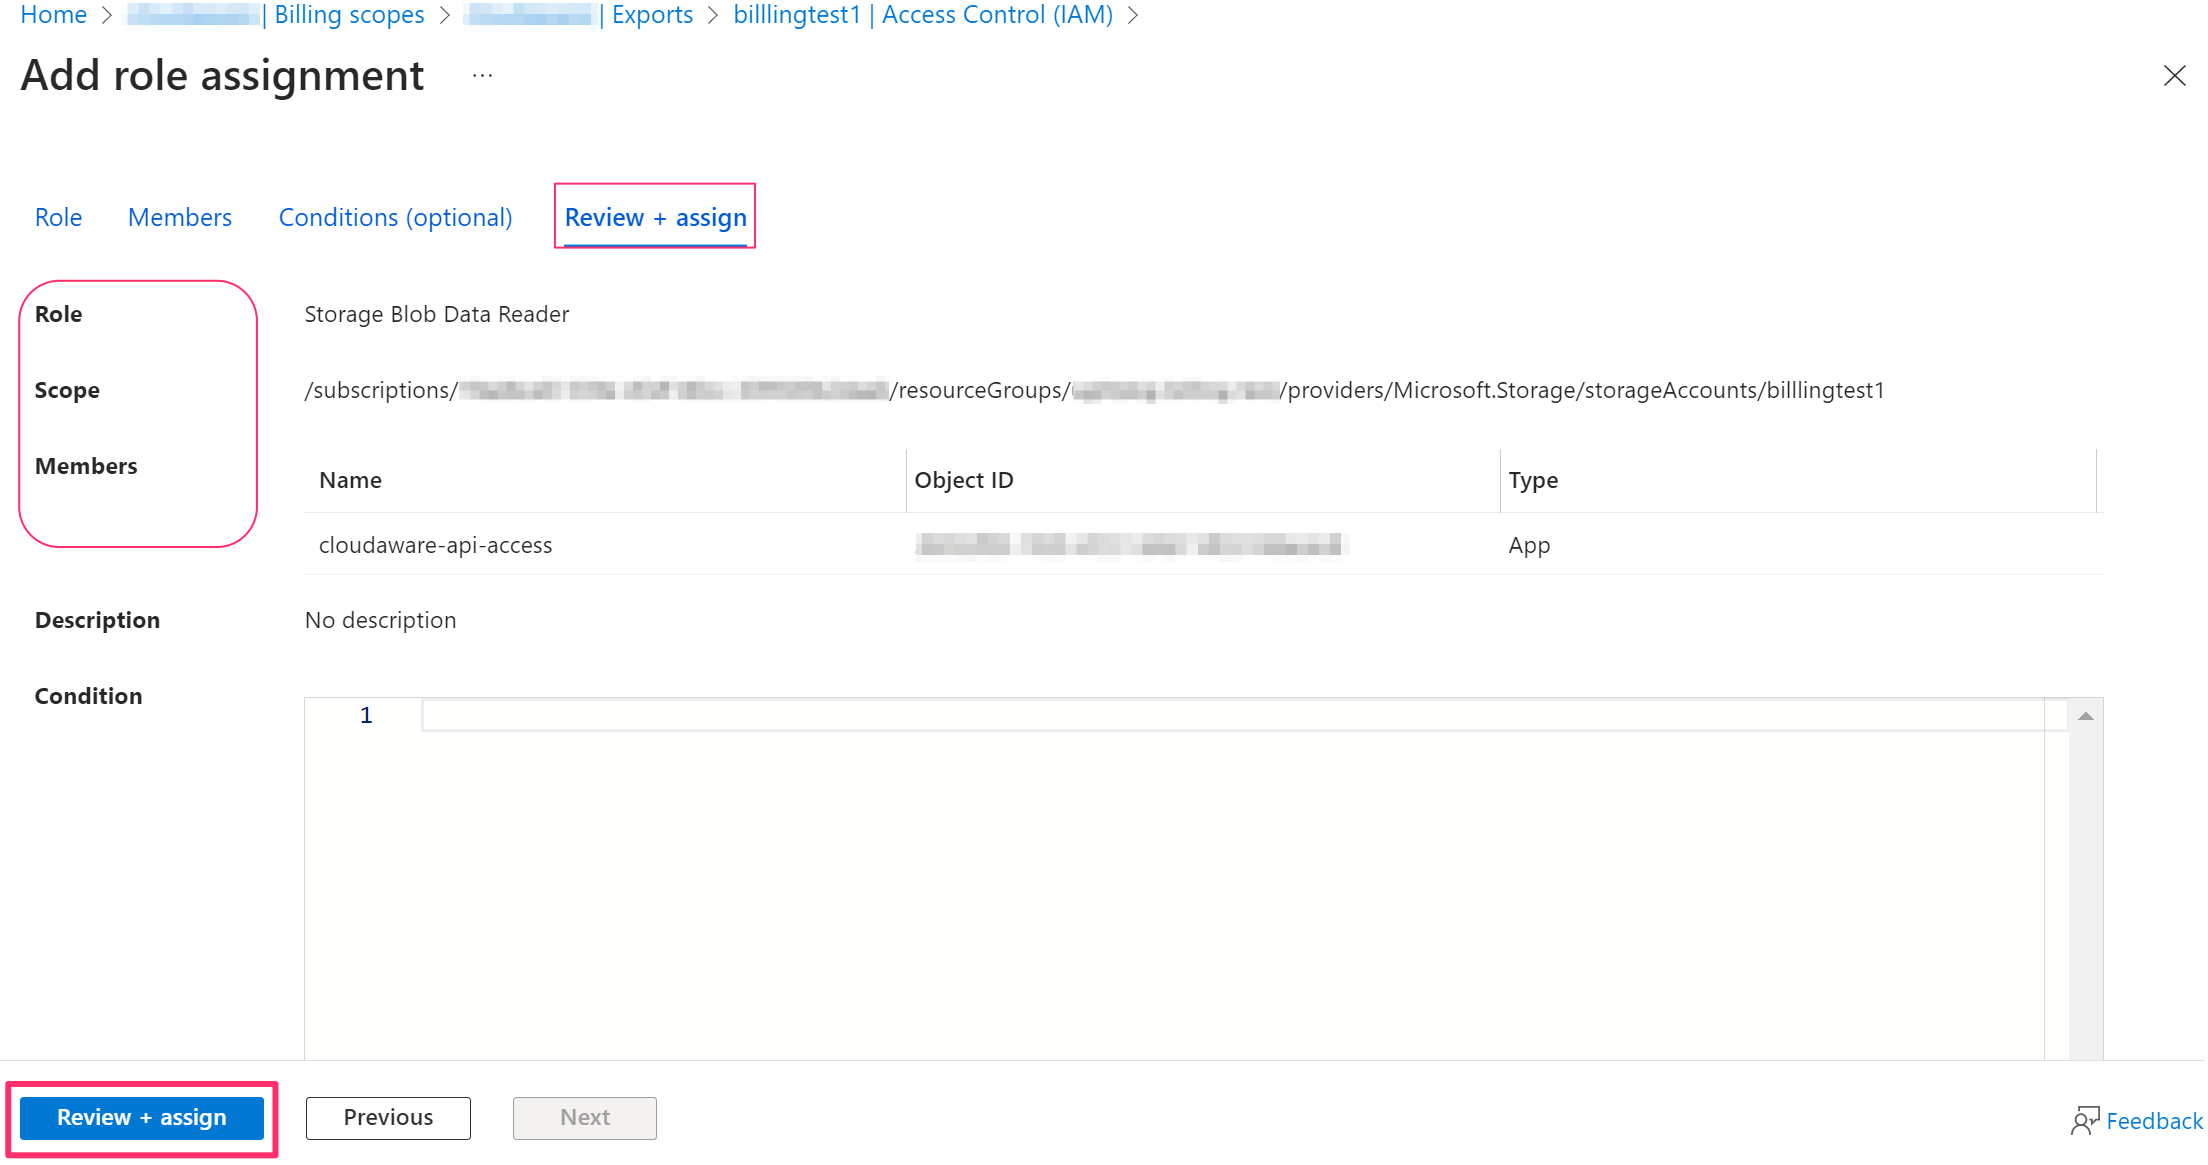
9. Navigate to the tab 'Review + assign' of 'Add role assignment’ window. Ensure that the fields Role, Scope and Members contain correct values. If so, proceed by clicking Review + assign at the bottom of the screen.
10. Log in to your Cloudaware account. Go to Admin → Azure Billing. Check the status of the billing integration under 'Billing Account’:

Please allow around 24 hours for the status of the billing integration to be updated in Cloudaware CMDB. Once the status is green, note that Cloudaware has already started collecting the billing data and it will be available soon.
Subscription Level Export Discovery
Make sure your Azure subscription it added to Cloudaware and it has a reader role assignment to Cloudaware application/service principal.
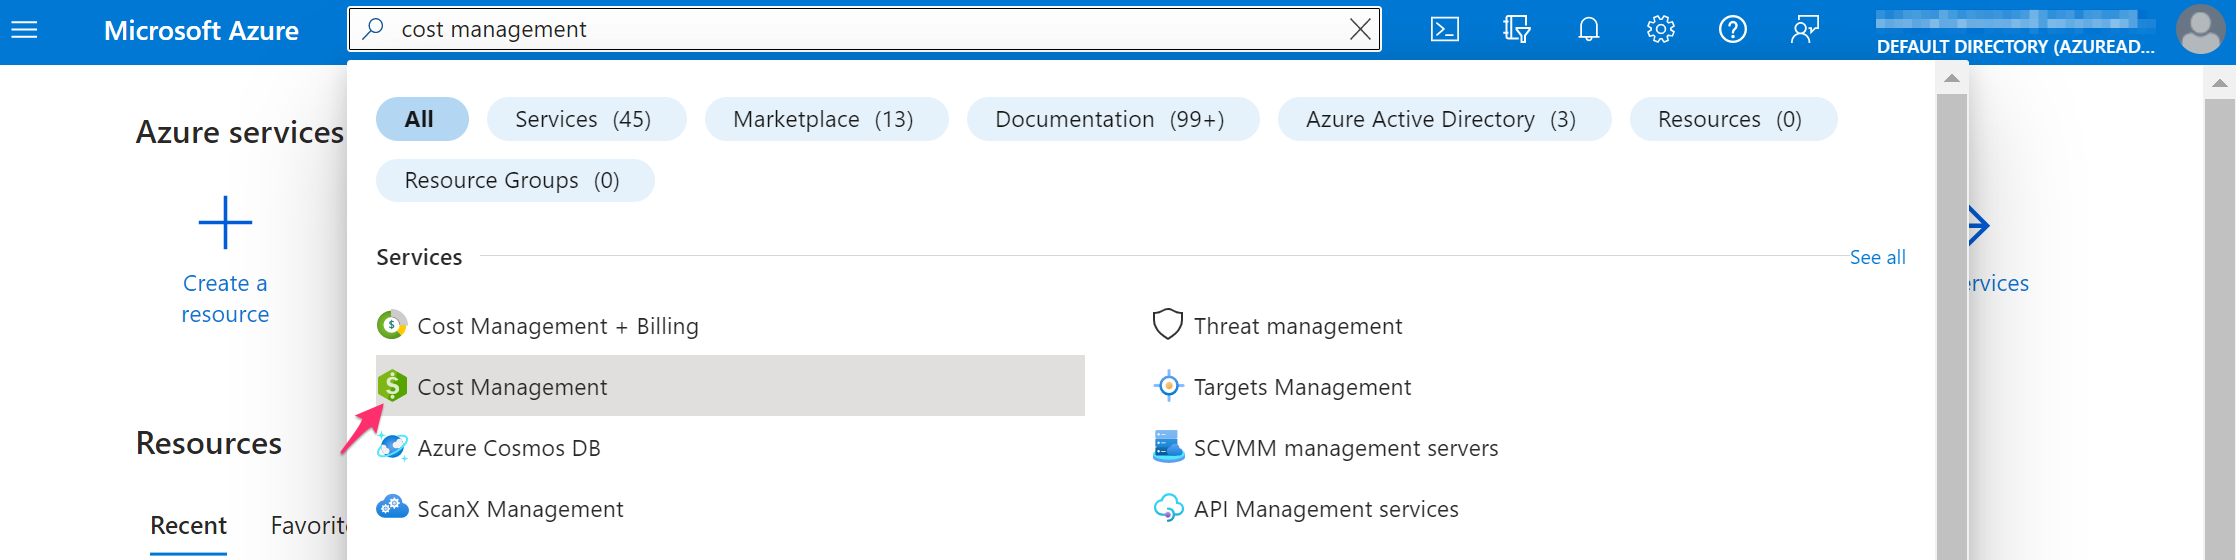
Log in to Microsoft Azure Portal, navigate to the Cost Management section.
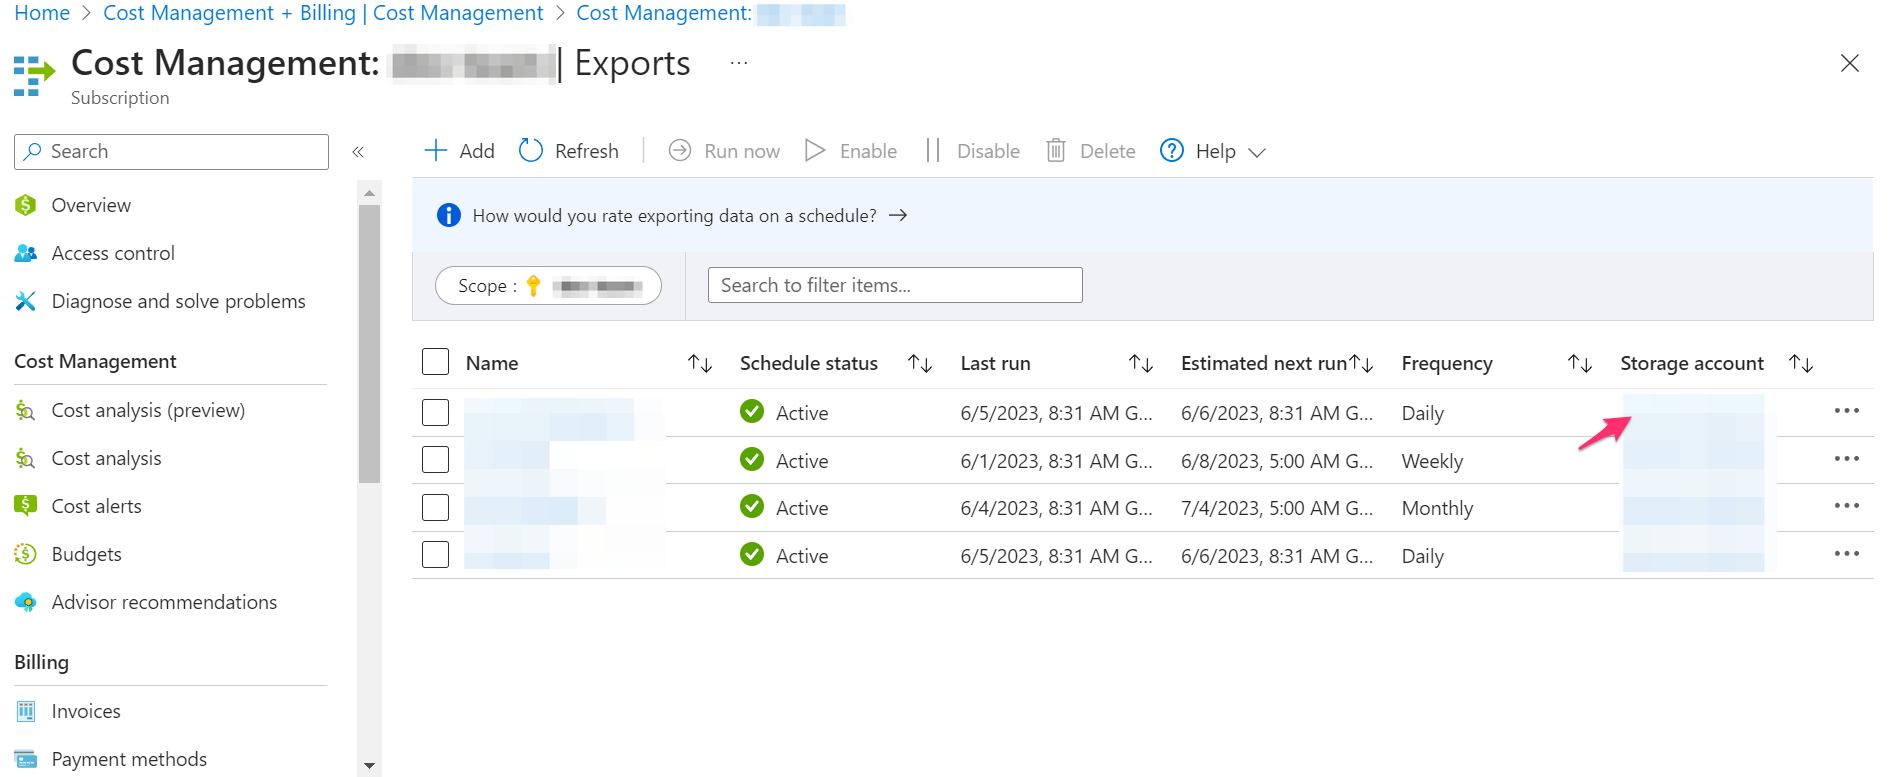
Select the subscription. Navigate to Exports on the left. Select the Storage account of the Export in question.
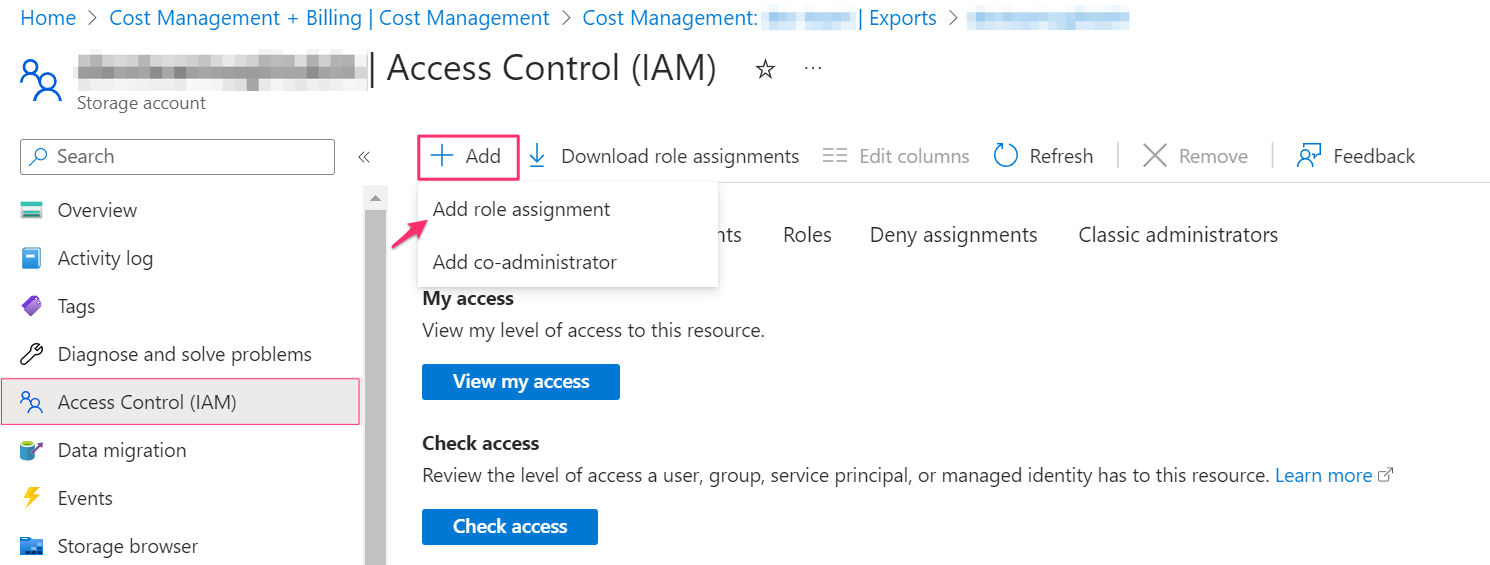
Navigate to Access Control (IAM) on the left. Click +Add → Add role assignment.
In the tab 'Job function roles' of 'Add role assignment' window start typing blob into the search bar. Select Storage Blob Data Reader from the list and click Next.
In the tab 'Members' of 'Add role assignment' window click +Select members. Start typing the app name (in our example, 'cloudaware-api-access') in the search bar of 'Select members' window. Select the app and click Select to add it as a selected member.
Type the app name (in our example, 'cloudaware-api-access') manually as it may be unavailable in the search suggest drop-down list
Navigate to the tab 'Review + assign' of 'Add role assignment’ window. Ensure that the fields Role and Members contain correct values. If so, proceed by clicking Review + assign at the bottom of the screen.
Log in to your Cloudaware account. Go to Admin → Azure Billing. Check the status of the billing integration under 'Subscription':

Please allow around 24 hours for the status of the billing integration to be updated in Cloudaware CMDB. Once the status is green, note that Cloudaware has already started collecting the billing data and it will be available soon.
EA Billing Export (legacy)
Customers who leverage Microsoft Enterprise Agreement (EA) should address this section to enable Azure billing export to Cloudaware.
1. Log in to your Azure EA account.
Access to the EA portal is granted to one individual from your organization during the enrollment process.
2. Select Reports → Download Usage → API Access Key. Copy the Primary Key and save it for later use.
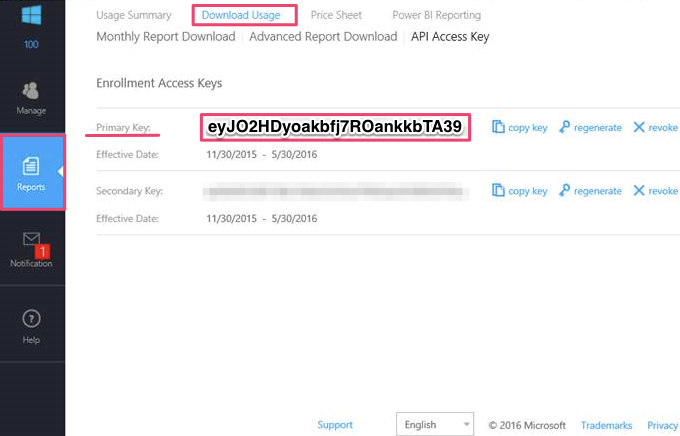
The key is valid for 6 months. When expired, you will need to generate it once again.
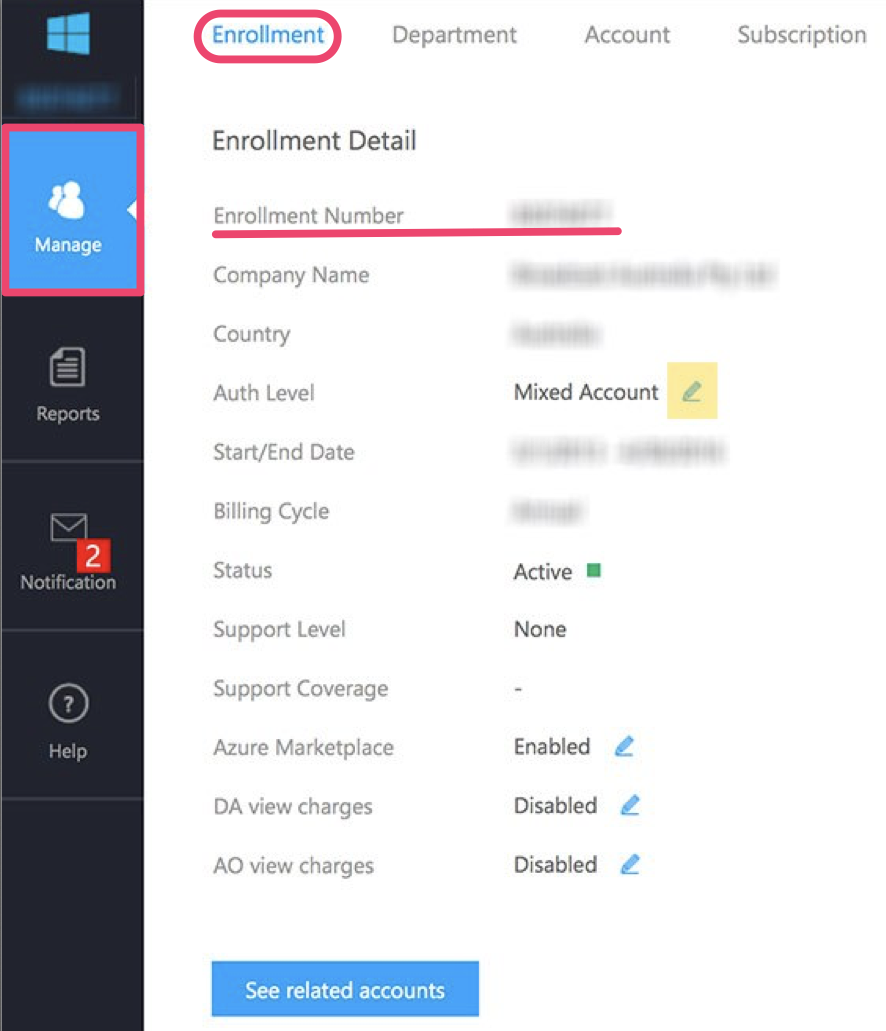
3. Select Manage → Enrollment. Copy the Enrollment number and save it for later use.
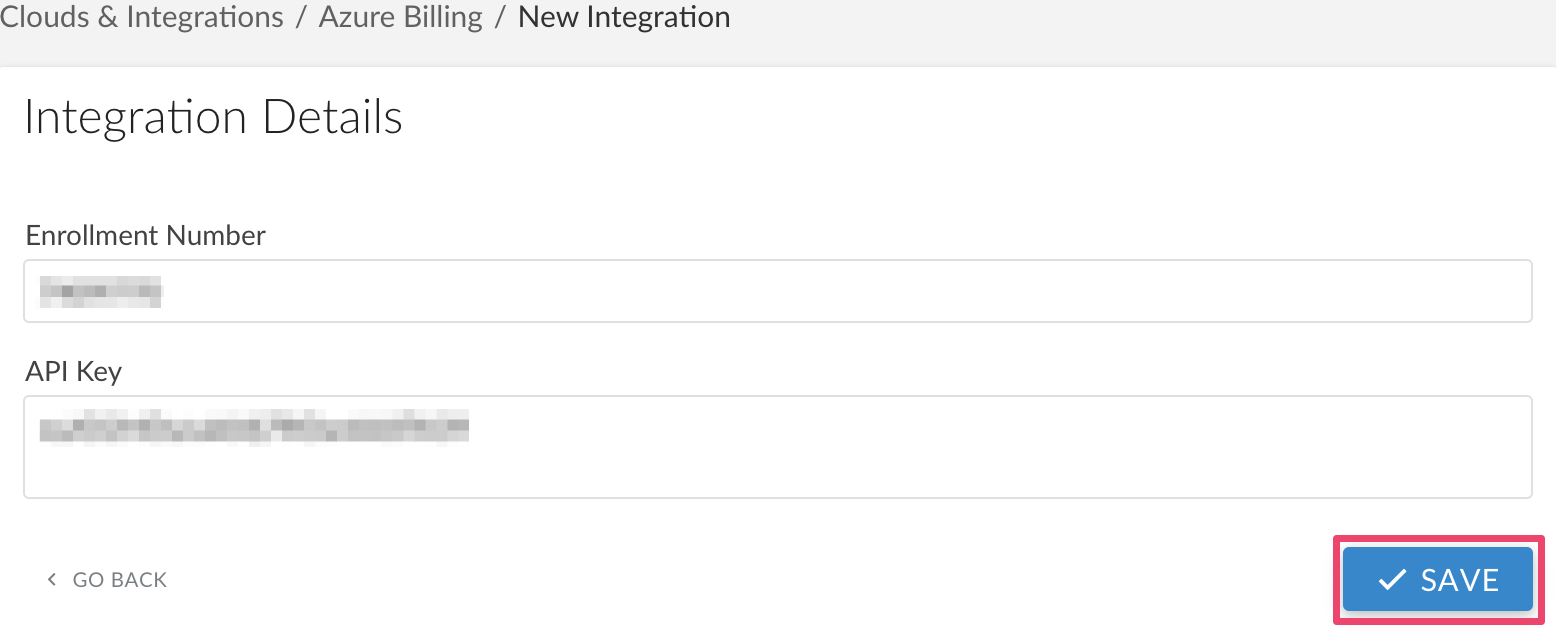
4. Log in to your Cloudaware account. Select Admin, select Azure Billing (Depreacted) and click +Add.

5. Fill in your Enrollment Number and the API Key. Click Save.
6. The green light in 'Status' means that Azure Billing has been added successfully. If there is a red light, please contact support@cloudaware.com.
