Kubernetes Cluster
A Kubernetes cluster is a set of nodes that run containerized applications. This guide explains how to integrate on-prem Kubernetes clusters with Cloudaware.
 To see how Cloudaware seamlessly integrates with Kubernetes Cluster in action, request a demo.
Prerequisites
If the Kubernetes cluster is private, configure the TunHub gateway first. Use the TunHub route URL, e.g., https://tunhub.cloudaware.com:12345 as Cluster URL.
Add a Kubernetes cluster
Log in to Cloudaware → Admin.

Find Kubernetes in integrations. Click +ADD.

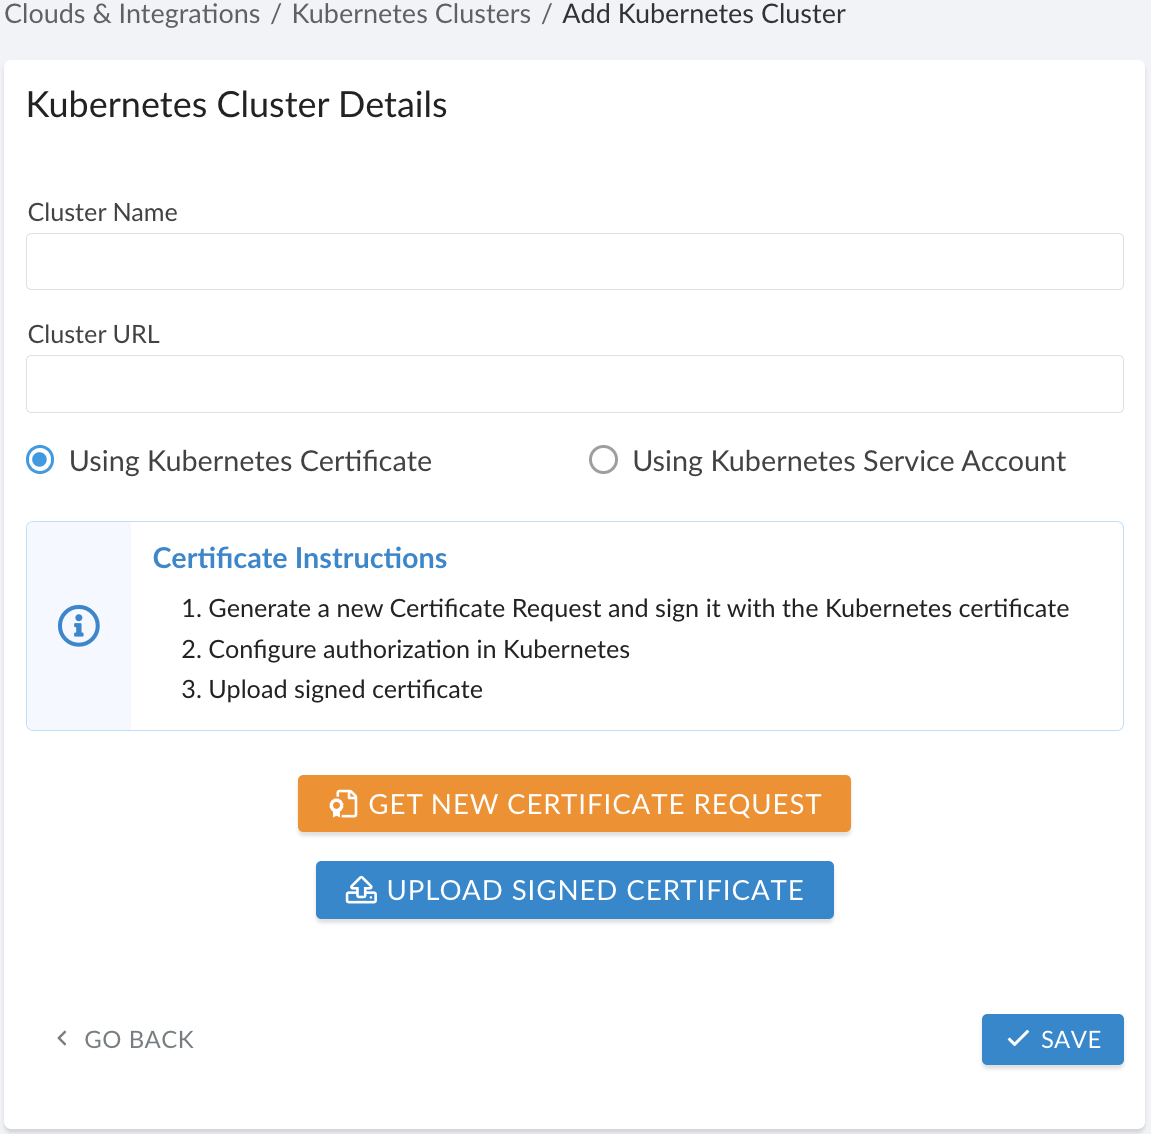
Fill out the form:

WHERE
Cluster Name – the cluster name
Cluster URL – the cluster URL*
*If Kubernetes cluster is public, use the direct web link.
If Kubernetes cluster is private, install the Breeze agent, set up TunHub gateway and use the TunHub route URL, e.g., https://tunhub.cloudaware.com:12345.
Select one of the following authentication methods:
Option 1: Kubernetes certificate
1) Select Using Kubernetes Certificate. Click GET NEW CERTIFICATE REQUEST.
2) Enter the username that will be utilized in Kubernetes. Click Generate. The certificate in .csr format is generated.
3) Sign the Cloudaware certificate request that will be used by Kubernetes control plane node. For example:
openssl x509 -req -in cloudaware_test.csr -CA /etc/kubernetes/pki/ca.crt -CAkey /etc/kubernetes/pki/ca.key -CAcreateserial -out cloudaware_test.crt -days 36504) Configure RBAC authorization for the user. Create a custom Cluster role node-reader to allow Cloudaware to fetch cluster node data:
apiVersion: rbac.authorization.k8s.io/v1
kind: ClusterRole
metadata:
  name: node-reader
rules:
- apiGroups: [""]
  resources: ["nodes"]
  verbs: ["get", "watch", "list"]
Create a role binding. For example:
kubectl create -f cloudaware-user.yamlTwo bindings are in use. The first binds the default view role; the second binds the custom node-reader role:
apiVersion: rbac.authorization.k8s.io/v1
kind: ClusterRoleBinding
metadata:
  name: cloudaware_test-binding
subjects:
- kind: User
  name: cloudaware_test
  namespace: default
  apiGroup: ""
roleRef:
  kind: ClusterRole
  name: view
  apiGroup: ""
---
apiVersion: rbac.authorization.k8s.io/v1
kind: ClusterRoleBinding
metadata:
  name: cloudaware_test-binding2
subjects:
- kind: User
  name: cloudaware_test
  namespace: default
  apiGroup: ""
roleRef:
  kind: ClusterRole
  name: node-reader
  apiGroup: ""
5) Once the certificate is signed, go back to Cloudaware. Click UPLOAD SIGNED CERTIFICATE and upload the certificate file. Click Save.
Option 2: Kubernetes service account
Ensure kubectl is installed and configured.
1) Select Using Kubernetes Service Account.
2) Launch kubectl to access the cluster that will be added to Cloudaware. Create required Kubernetes objects with the following manifest:
apiVersion: v1
kind: ServiceAccount
metadata:
 name: cloudaware-sa
 namespace: default
---
apiVersion: rbac.authorization.k8s.io/v1
kind: ClusterRole
metadata:
 name: cloudaware-node-reader
rules:
- apiGroups: [""]
 resources: ["nodes"]
 verbs: ["get", "watch", "list"]
---
apiVersion: rbac.authorization.k8s.io/v1
kind: ClusterRoleBinding
metadata:
 name: cloudaware-node-reader-binding
subjects:
- kind: ServiceAccount
 name: cloudaware-sa
 namespace: default
 apiGroup: ""
roleRef:
 kind: ClusterRole
 name: cloudaware-node-reader
 apiGroup: ""
---
apiVersion: rbac.authorization.k8s.io/v1
kind: ClusterRoleBinding
metadata:
 name: cloudaware-view-binding
subjects:
- kind: ServiceAccount
 name: cloudaware-sa
 namespace: default
 apiGroup: ""
roleRef:
 kind: ClusterRole
 name: view
 apiGroup: ""
The manifest creates a service account cloudaware-sa and grants it with the cluster-wide read-only access, along with the permissions to get/list/watch cluster nodes. Learn more on Kubernetes RBAC here.
2) Save the manifest to a file, e.g. cloudaware-sa.yaml, and apply it:
kubectl create -f cloudaware-sa.yaml3) Retrieve the service account token:
kubectl get secret $(kubectl get secret | awk '/cloudaware-sa/{print $1}') -o jsonpath={.data.token} | base64 -d The token is stored as a Kubernetes secret. This command reads and decodes it. Learn more on Service Account Tokens here.
4) Go back to Cloudaware. Paste the service account token in the integration form. Click SAVE.
A green light in the ‘Status’ column indicates a successful configuration. If the light is red, contact support@cloudaware.com.

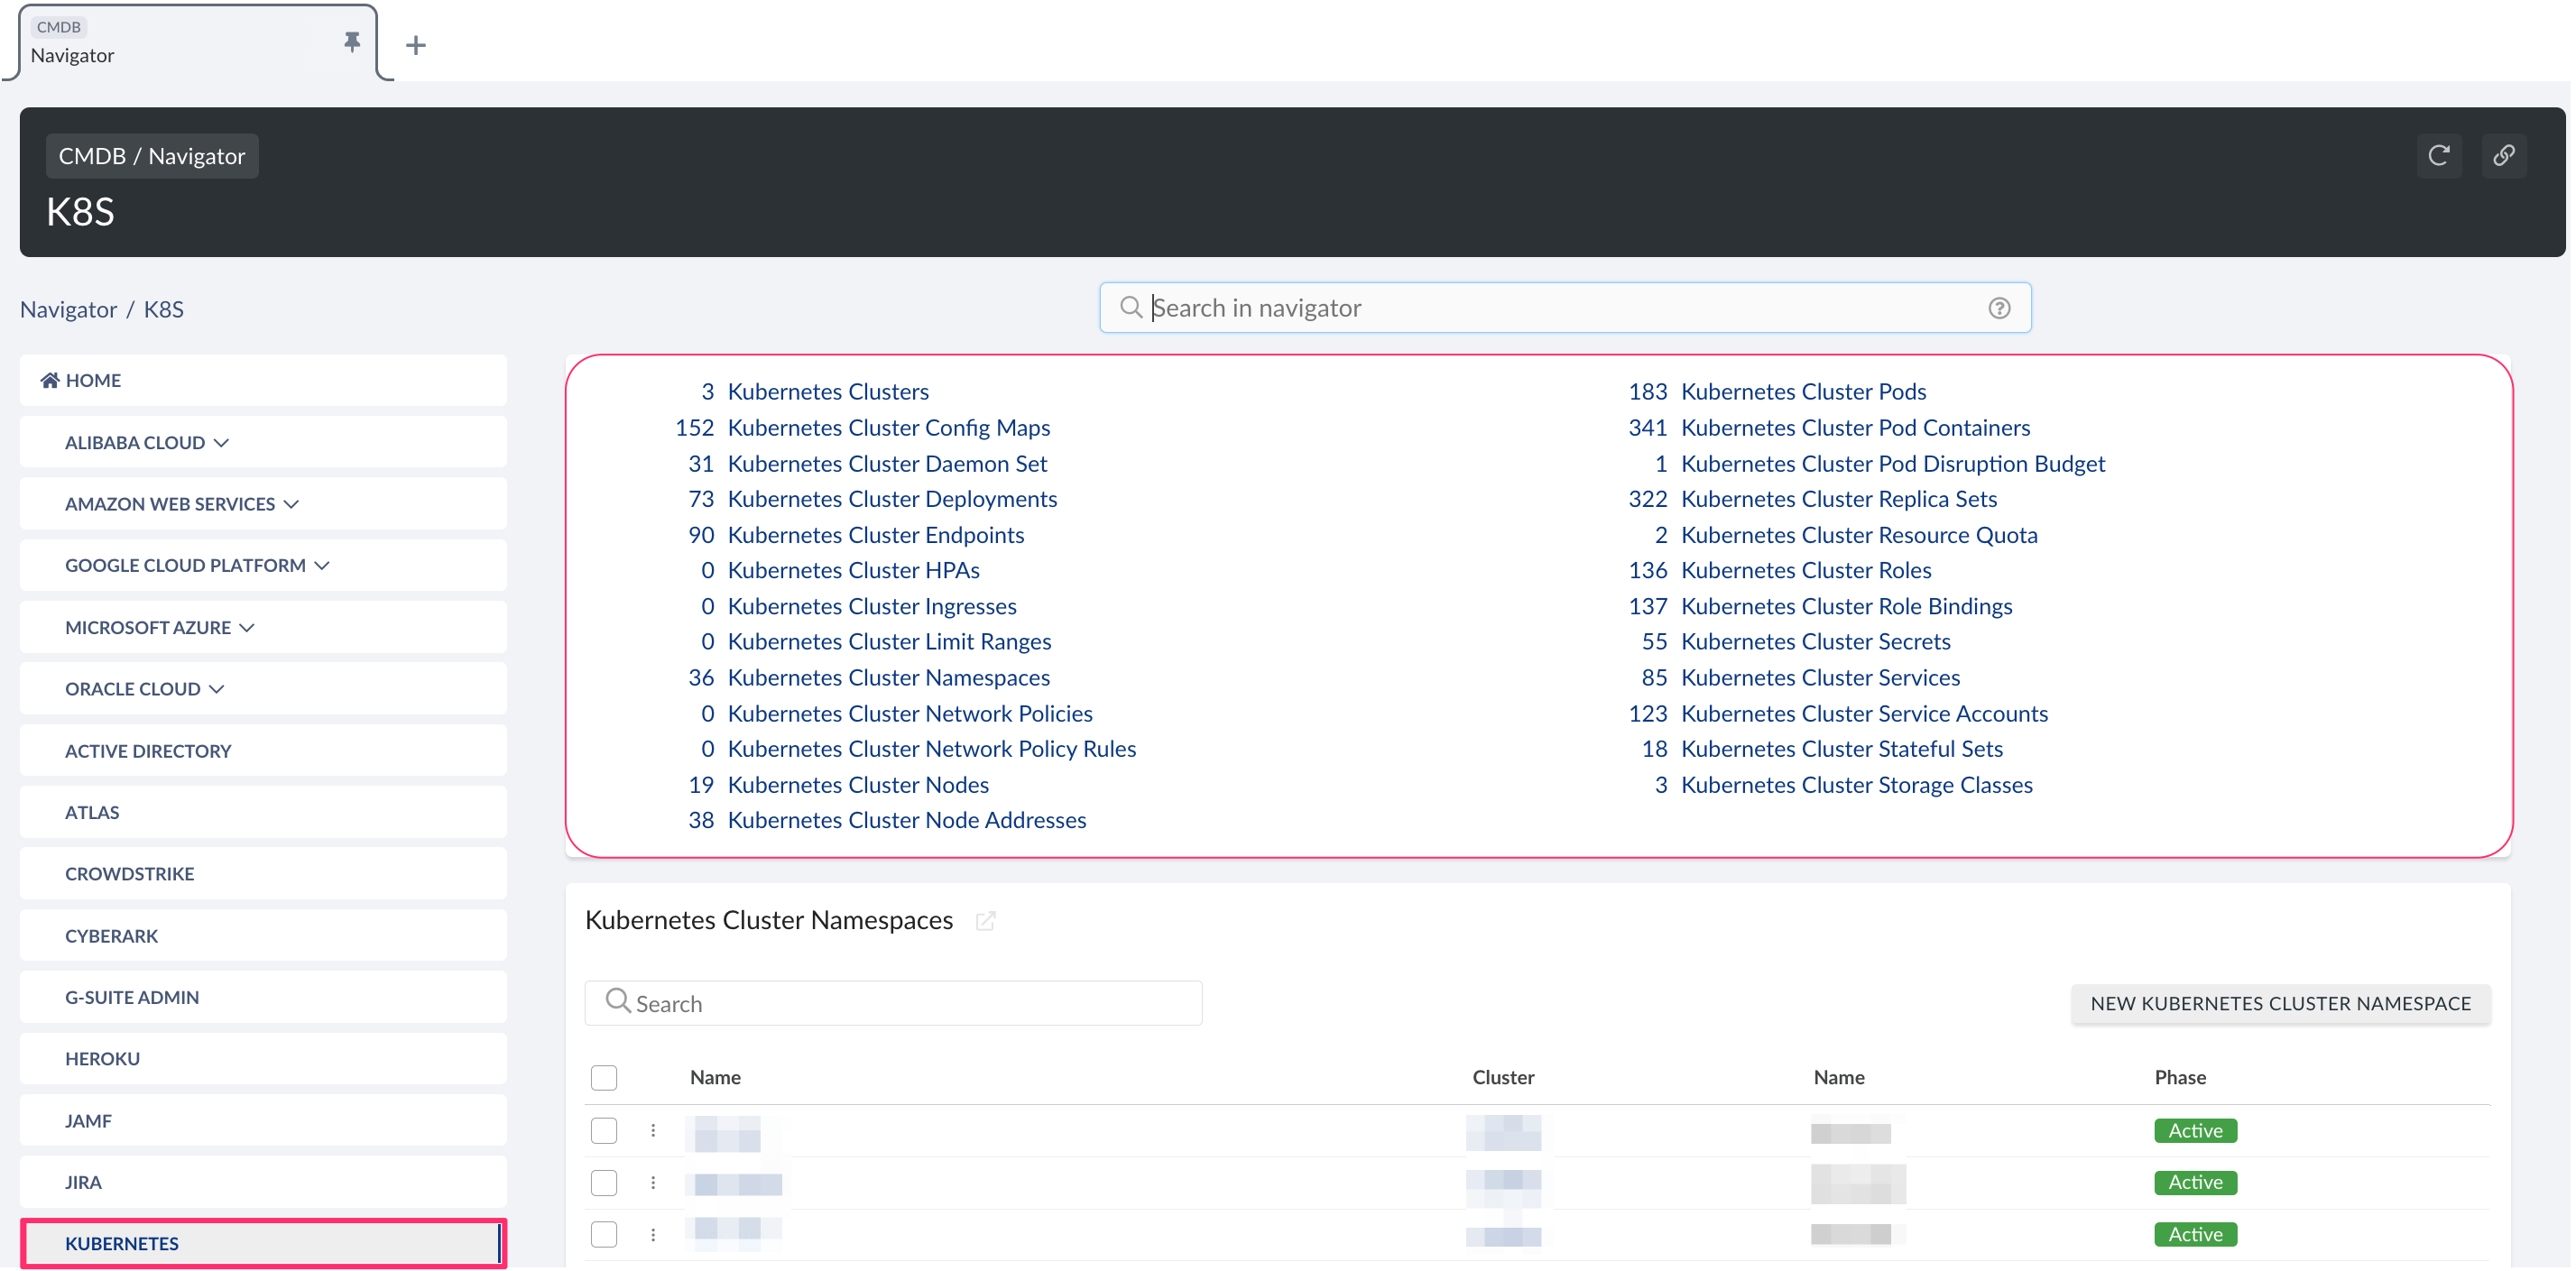
To view Kubernetes-related data, go to Cloudaware CMDB Navigator. Select KUBERNETES in the left-hand menu.

List of Kubernetes objects
Cloudaware supports the following Kubernetes objects:
Kubernetes Cluster
CA10K__CaKubernetesCluster__cKubernetes Cluster Config Map
CA10K__CaKubernetesClusterConfigMap__cKubernetes Cluster Daemon Set
CA10K__CaKubernetesClusterDaemonSet__cKubernetes Cluster Deployment
CA10K__CaKubernetesClusterDeployment__cKubernetes Cluster Endpoint
CA10K__CaKubernetesClusterEndpoint__cKubernetes Cluster HPA
CA10K__CaKubernetesClusterHpa__cKubernetes Cluster Ingress
CA10K__CaKubernetesClusterIngress__cKubernetes Cluster Limit Range
CA10K__CaKubernetesClusterLimitRange__cKubernetes Cluster Namespace
CA10K__CaKubernetesClusterNamespace__cKubernetes Cluster Network Policy
CA10K__CaKubernetesClusterNetworkPolicy__cKubernetes Cluster Network Policy Rule
CA10K__CaKubernetesClusterNetworkPolicyRule__cKubernetes Cluster Node
CA10K__CaKubernetesClusterNode__cKubernetes Cluster Node Address
CA10K__CaKubernetesClusterNodeAddress__cKubernetes Cluster Pod
CA10K__CaKubernetesClusterPod__cKubernetes Cluster Pod Container
CA10K__CaKubernetesClusterPodContainer__cKubernetes Cluster Pod Disruption Budget
CA10K__CaKubernetesClusterPodDisruptionBudget__cKubernetes Cluster Replica Set
CA10K__CaKubernetesClusterReplicaSet__cKubernetes Cluster Resource Quota
CA10K__CaKubernetesClusterResourceQuota__cKubernetes Cluster Role
CA10K__CaKubernetesClusterRole__cKubernetes Cluster Role Binding
CA10K__CaKubernetesClusterRoleBinding__cKubernetes Cluster Secret
CA10K__CaKubernetesClusterSecret__cKubernetes Cluster Service
CA10K__CaKubernetesClusterService__cKubernetes Cluster Service Account
CA10K__CaKubernetesClusterServiceAccount__cKubernetes Cluster Service Account Secret
CA10K__CaKubernetesClusterServiceAccSecret__cKubernetes Cluster Stateful Set
CA10K__CaKubernetesClusterStatefulSet__cKubernetes Cluster Storage Class
CA10K__CaKubernetesClusterStorageClass__c
