
Customize CMDB CI layouts
This guide explains how to customize a CI record layout in Cloudaware CMDB to add a section, a tile, or a related list.
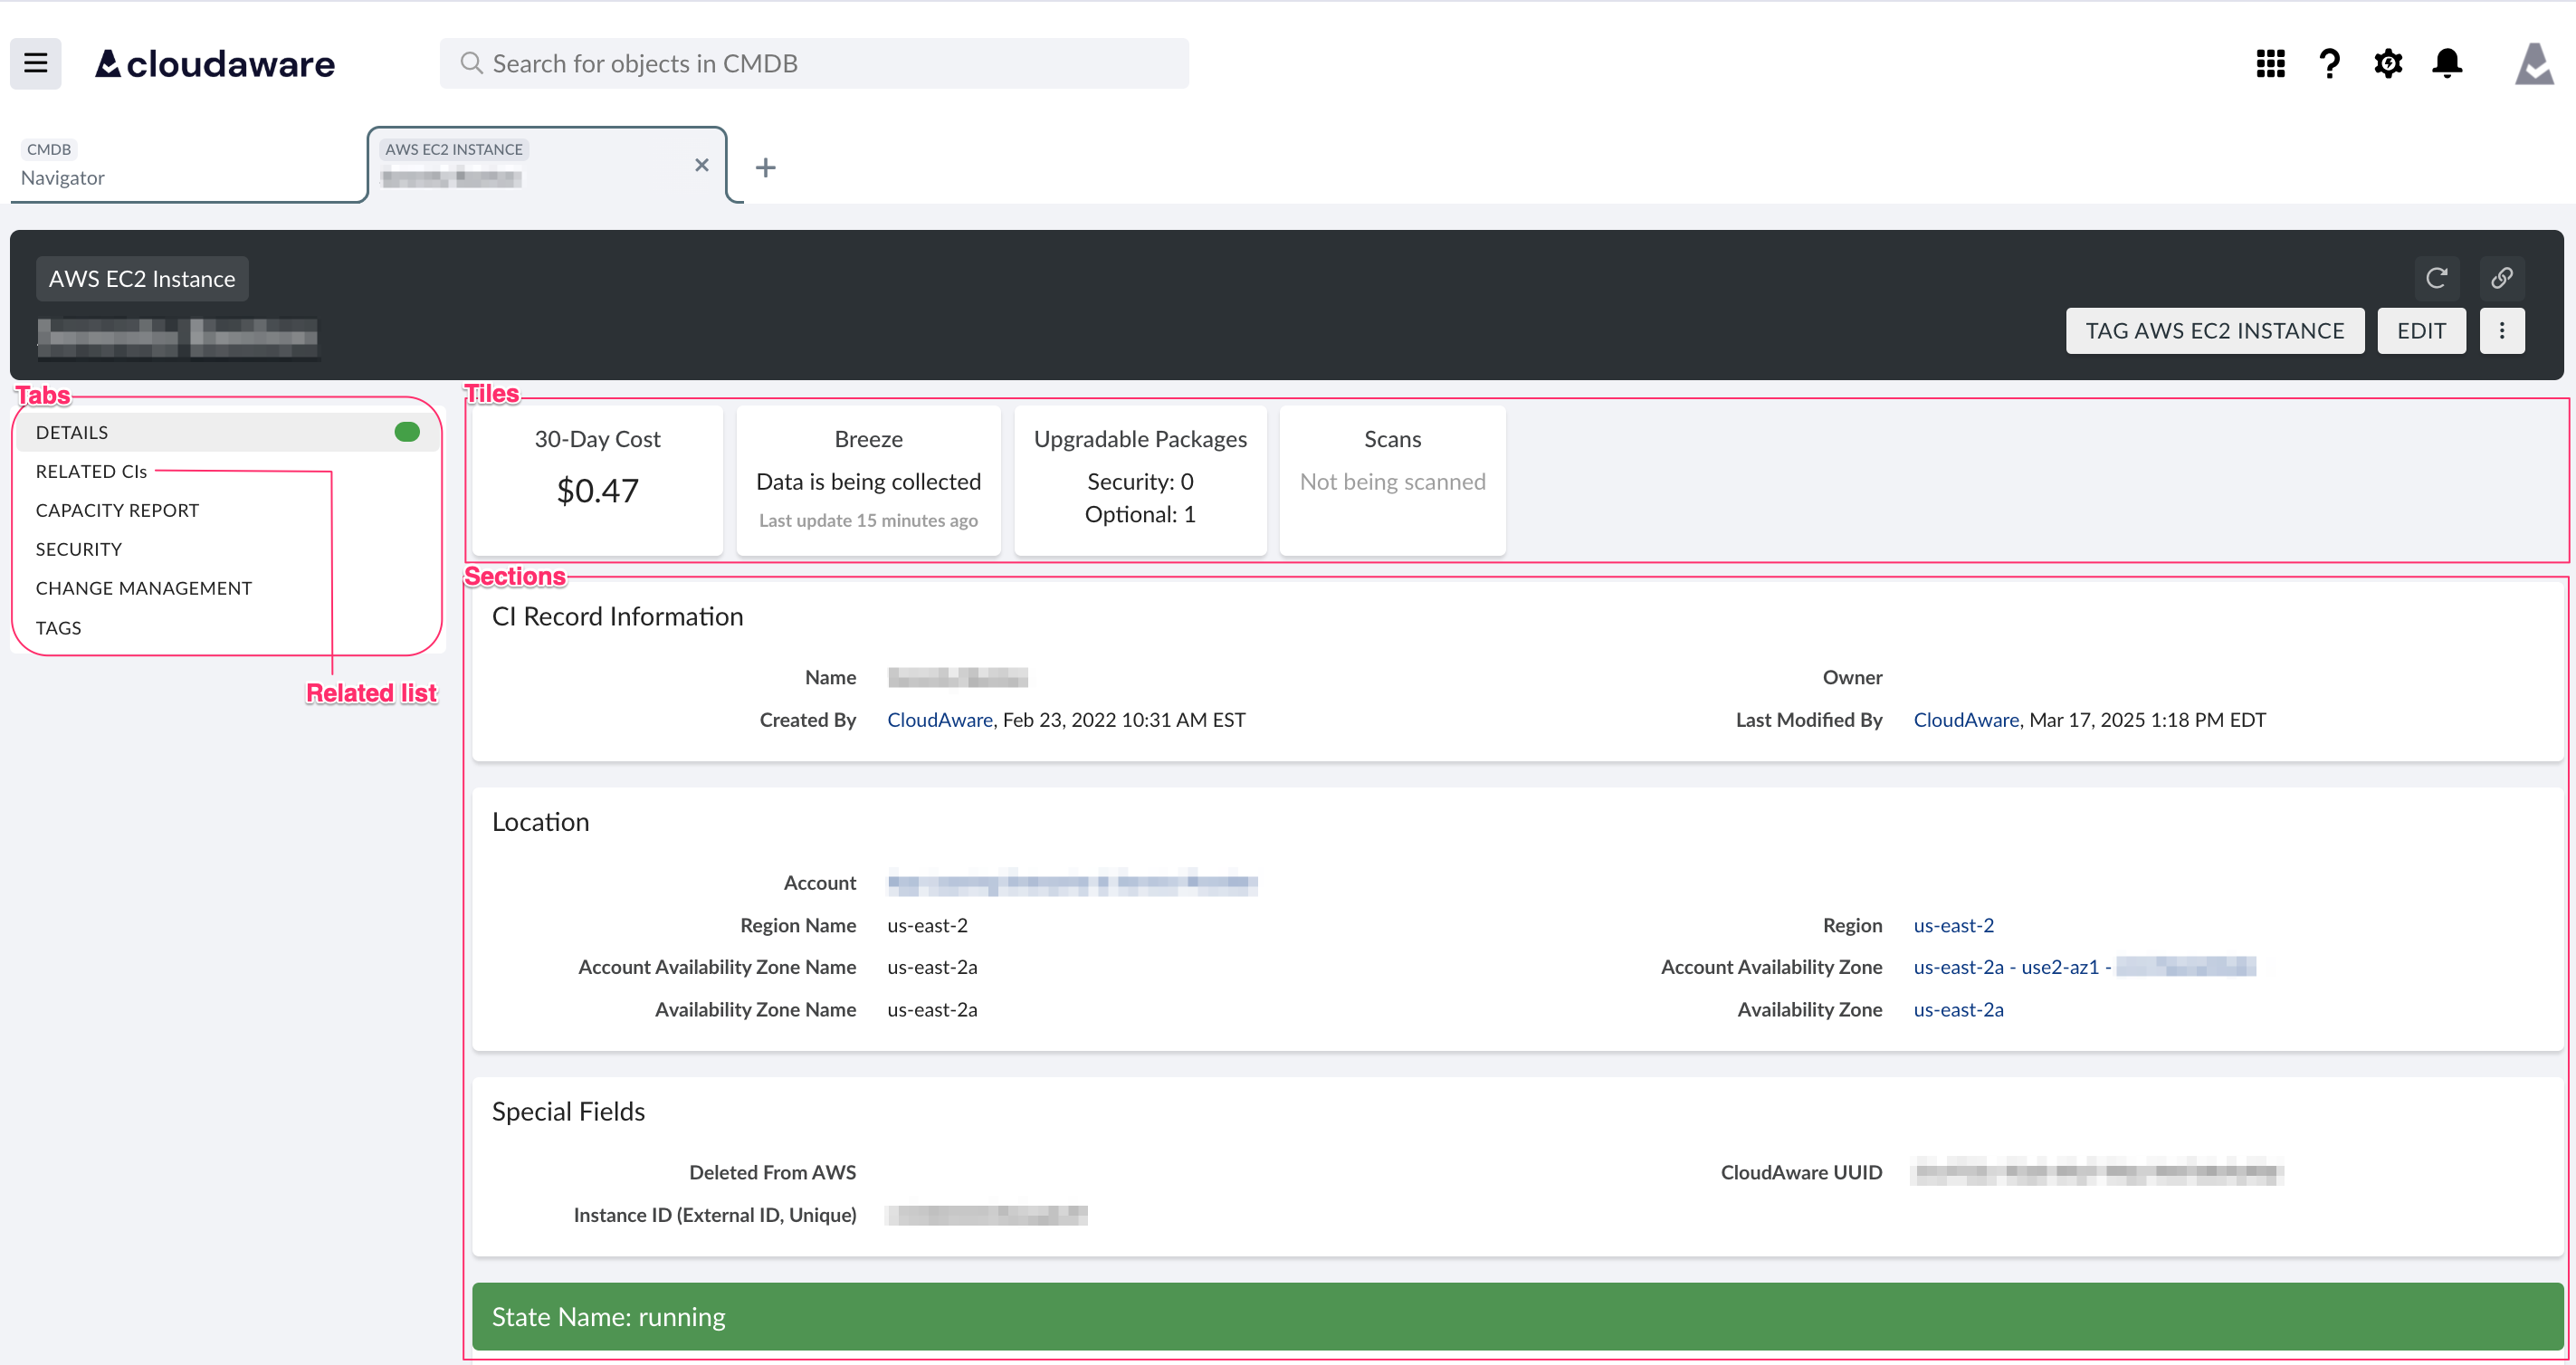
Standard layout structure
A standard layout includes such components as tabs, tiles, and sections. The "Related CIs" related list is located within the tabs.
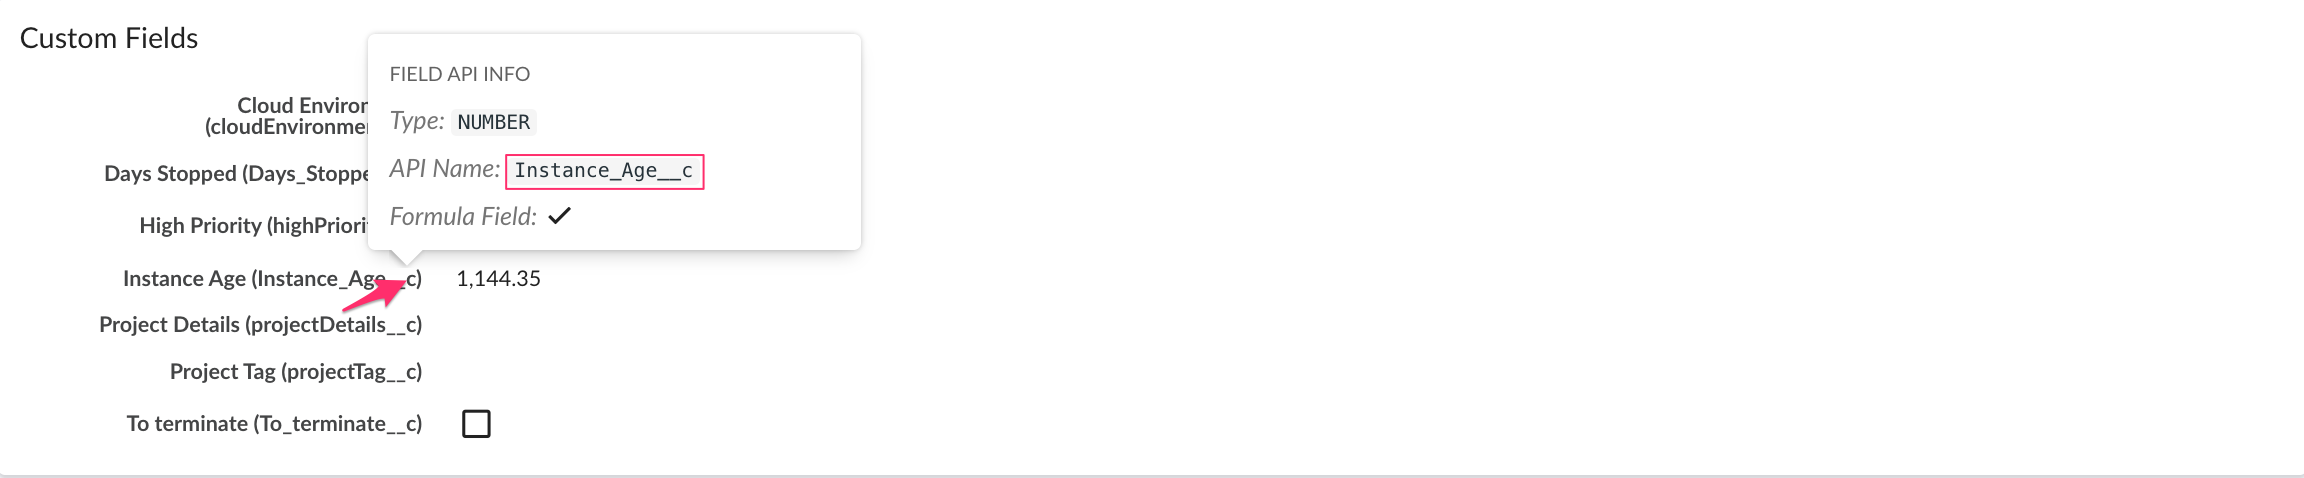
Use the API names of fields when customizing a layout. To find the field's API name, hover over the field in the existing layout:
Customize CI layout
Log in to Cloudaware account → CMDB Navigator.
Select the object, e.g. AWS EC2 Instances. Click on any CI from the list view and open a CI record.
In the upper right corner click the tree-dot menu → Edit Layout Extension to open the Layout Editor*.
Add a JSON for customization.
Click Validate to check the JSON. If everything is correct, click Save.
Click Close Editor → OK.
Click Refresh layout.
*Layouts for Cloudaware-managed objects have an empty layout extension, meaning no JSON is present in the Layout Editor. The structural elements of the standard layout can’t be removed.
Add a section
Note that a section can contain multiple rows, with each row having one or two columns.
Below are the JSON examples:
1-row 1-column section
{
  "sections": [
    {
      "name": "Custom Fields",
      "after": "CI Record Information",
      "tab": "details",
      "rows": [
        {
          "columns": [
            {
              "field": "Environment__c"
            }
          ]
        }
      ]
    }
  ]
}
WHERE
"name": - the name of the section, e.g. Custom Fields"after": - the order in which a section appears relative to other sections, e.g. CI Record Information"tab": - the tab to which the section will be assigned, e.g. Details"rows": - the order of rows with fields"columns": - use "columns" within the "row" element to define the field order within one row, e.g. the field Environment (Environment__c) will be listed as the first and only field in one column"field": - the API name of the field to be added to the layout
2-row 2-column section
{
  "sections": [
    {
      "name": "Application Details",
      "after": "Special Fields",
      "tab": "details",
      "rows": [
        {
          "columns": [
            {
              "field": "Application_ID__c"
            },
           {
              "field": "costCenter__c"
            }
          ]
        },
        {
          "columns": [
            {
              "field": "contact__c"
            },
           {
              "field": "lineOfBusiness__c"
            }
          ]
        }
      ]
    }
  ]
}
WHERE
"name": - the name of the section, e.g. Application Details"after": - the order in which a section appears relative to other sections, e.g. Special Fields"tab": - the tab to which the section will be assigned, e.g. Details"rows": - the order of rows with fields"columns": - use "columns" within the "row" element to define the field order within one row, with a maximum of two fields per row for two-column placement, e.g. fields Application ID (Application_ID__c) and Cost Center (costCenter__c) will be placed in the first row, while the fields Application Owner (contact__c) and Line of Business (lineOfBusiness__c) will be placed in the second row. As a result, the first column will contain Application-related fields, and the second column will contain Cost Center-related fields."field": - the API name of the field to be added to the layout
Add a tile
Below is the JSON example for adding a custom tile 'Blended Cost' to the AWS EC2 Instance record layout:
{
  "infoBlocks": [
    {
      "name": "Blended Cost",
      "after": "IDS",
      "tab": "details",
      "field": "CA10__mtdBlendedCost__c"
    }
  ]
}
WHERE
"name": - the name of the tile to be added, e.g. Blended Cost"after": - the order of the tile relative to other tiles, e.g. IDS"tab": - the tab where the tile will be displayed, e.g. Details"field": - the API name of the field associated with the tile, e.g. Cost: Blended, MTD (CA10__mtdBlendedCost__c)
Add a related list
Objects may have different record types, each with unique attributes. The CI record layout can be configured to display related lists specific to each record type. Fields and columns for these related lists can be configured independently in JSON.
Below is the JSON example for adding a related list based a custom record type:
{
"relatedLists": [
    {
      "childRelationship": "CA10__Azure_Virtual_Machine_Fact__r",
      "recordType": "caAzureVirtualMachineFactRm",
      "tab": "details",
      "columns": [
        {
          "field": "CA10__caUuid__c"
        }
      ]
    }
  ]
}
WHERE
"childRelationship": - the name of the child relationship name* on the object referenced by the parent object "recordType": - the record type that the related list will reference, e.g. the record type caAzureVirtualMachineFactRm indicates a reference to the Azure Resource Manager record type of the Azure Virtual Machine Fact object"tab": - the tab to which the related list will be added, e.g. Details"columns": - the placement of fields within a column within the related list"field": - the API name of the field to be added to the layout, e.g. CloudAware UUID (CA10__caUuid__c)
*To find the child relationship name, go to Setup → Objects → select the parent object → locate the child object (lookup) → locate the field in 'Child Relationship Name'. For Cloudaware-managed package fields, add CA10__ at the beginning and __r at the end; for custom, non-package fields, only add __r at the end. For example, go to the Azure Virtual Machine Fact object, click on the custom field Virtual Machine, and locate the Child Relationship Name - Azure_Virtual_Machine_Fact. The resulting child relationship name for JSON will beCA10__Azure_Virtual_Machine_Fact__r.
JSON example
Below is the JSON example for customizing the AWS EC2 instance layout, covering all the layout components described in the article:
{
  "sections": [
    {
      "name": "Systems Manager",
      "tab": "Systems Manager",
      "rows": [
        {
          "columns": [
            {
              "field": "CA10__ssmActivationId__c"
            },
            {
              "field": "CA10__ssmAgentVersion__c"
            }
          ]
        },
        {
          "columns": [
            {
              "field": "CA10__ssmAssociationStatus__c"
            },
            {
              "field": "CA10__ssmIsManaged__c"
            }
          ]
        },
        {
          "columns": [
            {
              "field": "CA10__ssmPingStatus__c"
            },
            {
              "field": "CA10__ssmUpdatesInstalled__c"
            }
          ]
        },
        {
          "columns": [
            {
              "field": "CA10__ssmUpdatesNeeded__c"
            },
            {
              "field": "CA10__ssmUpdatesWithError__c"
            }
          ]
        }
      ]
    }
  ],
  "infoBlocks": [
    {
      "name": "Blended Cost",
      "tab": "details",
      "field": "CA10__mtdBlendedCost__c"
    }
  ],
  "relatedLists": [
    {
      "childRelationship": "CA10__networkInterfaces__r",
      "tab": "details",
      "columns": [
        {
          "field": "Id"
        },
        {
          "field": "Name"
        },
        {
          "field": "CA10__privateIpAddress__c"
        },
        {
          "field": "CA10__associationPublicIp__c"
        }
      ]
    }
  ]
}